
Introduction
This tutorial is about the science of skin tone for artist, explaining to you how the skin color works and why you should not rely on a single skin tone palette without understanding why they pick those colors.
Palette is one of the easiest way to go but it doesn't apply to different kind of realistic lighting.
Light affects all the color on the surroundings and there are some subtle lighting exist to every corner.
Overall, it's good to use palette but it's better if you understand it.
One example below of skin color changes depending on the lighting.
Video Tutorial
For visual representation type of people, you can always get tutorial from my Youtube.
Reason behind the Skin Color
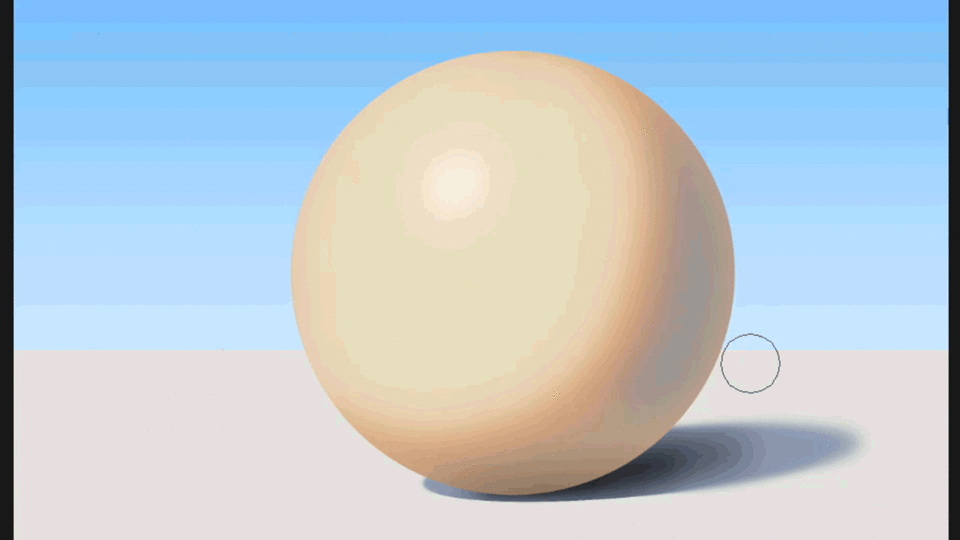
Let's prepare the setup!
Our ball of skin tone (no color just yet)
Some sky for our background
and some yellow~ish color ground because it's 3pm
I also added a black shadow. Later on, we'll get back to that.
The first thing we have to ask ourselves is why is the skin color looks like this?
The short answer is that because of the blood underneath our skin.
-------------------------------------------------------------------------------------------------------------Normally, our skin color is different without a blood. If we separate the Skin color and Blood color, it looks like this.
-------------------------------------------------------------------------------------------------------------But the thing is, our skin is a little translucent, so therefore, if you overlap them together, you'll be able to see a little blood color to it, and that become our skin tone.
Take note that, skin color will depends to each person and same as blood.
-------------------------------------------------------------------------------------------------------------So now, let's apply it to our sphere.
Adding Highlights
Before we add the highlights, let's lower the opacity of the casted shadow. Shadow isn't supposed to be black but we'll get there later.
For now, keep the black and lower the opacity.
-------------------------------------------------------------------------------------------------------------Now, adding the highlight will depends on what color there is.
In this case, we'll be using the sun color which is a Yellow-White Light.
For choosing the color, start from the original skin color.
1. On the palette, you always have to go to the white direction first.
2. Move the color towards to yellow(in our case) or depends on what color is there.
-------------------------------------------------------------------------------------------------------------Now the next thing we'll be adding is the "Specular Lighting"
Specular Lighting isn't really that visible on non-glossy material.
We usually add specular lighting on glossy object because it is basically a reflection of the light itself.
-------------------------------------------------------------------------------------------------------------But we don't usually add this because it's a skin, and skin is not reflective, or is it?
Yes, skin is reflective, in fact, any object is reflective but it's not glossy like mirror and reflection also depends on what kind of material there is.
Different material absorbs light in different ways.
So that is why, we should add the specular lighting to our subject and blend it for later.
For the color, you can pick white if you want, or the color of light will do.
Adding the Shadow
I am sure a lot of us heard the advice "never use black on your shadow".
Which is correct, but do we know why?
Before we answer that "why", let's add darker tones to shadowed area first by going into black direction.
-------------------------------------------------------------------------------------------------------------Now, the reason why shadow isn't black because of the "Ambient Light"
Ambient Light is a light isn't directly came from the Main Light.
"Direct" light is the keyword here. It is not direct it means it bounces somewhere else.
So Ambient Light is basically just another term of "Bounce Light, Reflected Light, Atmospheric Light, and any other kind of Light.
Because any object can create light too, but it's just borrowed from different light source.
One great example is the moonlight.
Moon doesn't have a light, it just borrowed a light from the sun.
-------------------------------------------------------------------------------------------------------------In our case, other kind of light can freely enter the shadowed area.
and the Ambient Light in our case is the "Sky and the Ground"
Skies can create light because of some science, atmosphere and wavelength stuff. Too complicated, just remember that Sky also get light from the sun.
Sunlight bounces to the ground and can enter the shadowed area.
Another real photo example that sky created light because it made the shadow in our photo into a little bit of blue.
This subtle detail can affect the color of the subject.
-------------------------------------------------------------------------------------------------------------So to apply the Ambient Light.
Add New Layer on top and simply add the color of the object that created it. (sky and ground)
Then simply lower it's opacity. As simple as that.
The shadow on the ground should be affected as well because of the sky.
Just get the right amount of Dark Blue. You need to make sure it's a little blue to look at.
Adding Subsurface Scattering
I am sure a lot of noticed this to our skin. The reddish edge of the shadow, in-between the light and dark.
or when you put a flashlight in-between your fingers, you'll see an orange-red color under your skin.
We already discussed about the skin being little "translucent".
Basically that is the reason why we are seeing this.
-------------------------------------------------------------------------------------------------------------When the light hits the object, in this case, our skin, the skin absorbs the light and spread it around especially, it is a little translucent, so it absorbs more and spread even more light in it.
Now, if the skin is a little translucent, then the light can pass through and hit the blood color underneath it, resulting more light spread under the skin.
-------------------------------------------------------------------------------------------------------------Now, we'll be adding the subsurface scattering to our subject, it will probably look like this.
The Ambient Occlusion
Ambient Occlusion is one of the key on greater depth to your drawing. Usually, you find this on the corners of any object.
Basically, this is the darkest area of the shadow.
If you can't remember the term, you can free to call it a "Darker Shadow" or "Secondary Shadow" so that it will be easier to remember.
Because for me, what matters is you understand how the thing works than the word itself.
-------------------------------------------------------------------------------------------------------------To explain a little how it appears.
We've talk about ambient light and light bounces into different direction.
It bounces multiple times. The more it bounces, it looses its brightness until it's gone.
And the area where the lesser light can get in, that is the part you apply the Ambient Occlusion.
-------------------------------------------------------------------------------------------------------------Applying it is simple.
You use any kind of soft brush, or just airbrush.
You should use black for this one. You can use different color for style but normally, it should be black, to give more depth to the subject.
-------------------------------------------------------------------------------------------------------------To give great effect for our illustration, Blur the shadow on the ground.
The farther the shadow to the object, the more blur it become.
The reason for that is multiple bounces of light.
Blending and Refining
Now, we completed all the colors we needed for our skin tone.
All we need to do is to blend it because the object isn't glossy and shadows isn't supposed to be sharp.
To do that, you can use blend tool for it but the easier way to do it is use "Gaussian Blur"
Before that, Transparent Lock the Layer first to avoid edges to be blur.
-------------------------------------------------------------------------------------------------------------Then, go to your menu bar
Find Filter > Blur > Gaussian Blur
-------------------------------------------------------------------------------------------------------------Now adjust it to the right amount you need.
-------------------------------------------------------------------------------------------------------------Of course, it doesn't always appear perfect after the gaussian blur.
From then, you can do some finishing touches using an air brush and color picking.
Now, we got our final Result! CONGRATS!
Examples of different Lighting and Final Thoughts
So after this, I am confident enough that color palette will make more sense now.
With this knowledge, it will be now easier for you to experiment on different kind of lighting effects to the skin tone and you can play around when different environment.
Of course, relying on just this wouldn't be enough, you need reference too for more understanding on the situation.
Great Lighting will lead us to great result for our art!
Thank you for taking time to check out this tutorial! KEEP DRAWING!
Users who liked this post


Comment