Part 3. Painting and Decoration

-
 MVP ◆This user has contributed greatly to the management of the community, by posting many great responses to the questions asked. Once every three months, MVPs are determined based on the points earned during that period and will be recognized accordingly.
 -
 New Valuable Player (NVP) ◆These are the next-best contributors to the community after MVPs. This is awarded to users who have not yet won an MVP award, based on the number of points they have earned.
 -
 Official Expert ◆Chosen out of all MVP awardees, who are already proof of excellence, this is a testimony of outstanding correspondence in the community. After careful screening, they are appointed by CELSYS and assume their position.Note: Formally called “Evangelists”
 -
 CELSYS official moderators ◆Moderators are official CELSYS staff members who are fluent in Japanese as well as various other languages. As moderators are not experts on software or creative work, they will not be able to directly answer your questions. However, moderators will provide communication and language support to ensure that everyone can smoothly communicate with each other.
 -
 CELSYS officialThis is the official administrator account.
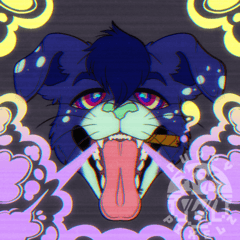
In this lesson, I will show you how to create image variants using the [Fill] tool and how to make variations using the color set palette and the decoration brush.
3.1 Painting
I will create a layer for painting.
I click the [Layer] palette’s [New Raster Layer] button to create a new raster layer, and then change its name to “Painting.”
By clicking on the [Fill] tool > [Refer other layers] sub tool, and clicking on the region to fill, you can fill on the same layer. With this, you don’t have to create a selection area on the layer with the line art.
Painting with the [Fill] tool may leave unfilled parts if there are 1px gaps or translucent parts.
In that case, you can trace those parts with the [Fill] tool > [Paint unfilled area] to only paint the leftover parts (closed region).
3.2 Things to be careful of when painting
With LINE stickers, the “theme” and “background” vary depending on the person using them.
For example, if you create a sticker with a character that is black, and the user uses a black background, they will end up not seeing the sticker at all.
While painting of the stamp, consider how it might look on a black screen, on a blue screen, etc. Once you have completed painting it, double check how it looks by testing it on various colored backgrounds.
■ How to check
I create a [New Layer Folder] at the bottom and prepare solid fill layers of black, blue, white, etc.
Placing the sticker on a colored background also helps you easily find any unfilled parts or marks left over from drawing or painting.
Note: After checking the background, click the eye icon to the left of the “Background” layer folder to hide it. Please be aware that if you export with a visible background, the sticker will come with a background.
3.3 Color set settings
For LINE stamp sets, you will probably draw the same character over and over again in different poses.
If you create a color set of the colors you used, it will be very convenient when drawing the same character over and over.
To display the [Color set] palette on the screen, I select the [Window] menu > [Color set].
Then, I click the [Edit color set] tool mark at the top of the palette and add an original color set from [Add new settings].
I enter a name for the new set and click the [OK] button to register the color set.
Here, I use the [Eyedropper] tool to pick up the color of the character. To register it you can either right-click the transparent part of the color set or select the bottom [Replace color] button.
When making the next sticker, I can now easily choose colors from this color set.
Note: Read the following article to learn how to use color sets.
3.4 Decoration
Even if you use the same character image, you can create a completely different sticker just by swapping letters and effects.
By using various decorations or image materials, you can easily increase sticker variants.
(However, please be careful as making very similar stickers is subject to rejection.)
This time, I will use the [Decoration] tool > [Pattern] > [Seven petaled flower] to decorate the background.
Since the [Seven petaled flower] brush sprays in a pattern, you can change the size of the petals from the [Tool Property] palette > [Particle size].
Using different brushes from the [Decoration] tool will change the overall impression of the sticker.
When using [Effect] > [Heart color]
When using [Hatching and sand pattern] > [Cross-hatching x4]
Note: You can also create your own original decoration brush. For details on how to use create a decoration brush, refer to the following article.
3.5 Finding materials on Clip Studio Assets
If you use materials, you can easily make your stickers fancier.
I launch Clip Studio from the [File] menu > [Open Clip Studio] and click [Clip Studio Assets] from the left menu to download materials and tools that match the theme of the sticker.
All materials on Clip Studio Assets are available for commercial use, except for licensed materials.
Clicking [Clip Studio Assets] displays Clip Studio Assets.
You can click the [Detail] button next to the search window to filter search results by type of material or price. You can also sort the materials in descending order of popularity.
Go to the material page and click [Download] to obtain the material.
The downloaded material will appear in Clip Studio Paint’s [Material] palette > [Download] folder.
I drag and drop the materials I want to use onto the canvas or the [Sub tool] palette.
■ For Image/Layer materials
Drag and drop the material directly onto the canvas.
Otherwise, click [Paste] at the bottom of the palette while selecting the material.
■ For Sub tool materials
Drag and drop the material directly onto the [Sub Tool] palette.
Otherwise, display the [Sub tool] palette you want to register the material to, and with the material selected, click [Paste] at the bottom of the [Material] palette.
Note: You can also register the material by clicking [Import sub tool from material] at the bottom of the [Sub tool] palette.
■ For Color set materials
Drag and drop the material directly onto the [Color Set] palette.
Otherwise, and with the material selected, click [Paste] at the bottom of the [Material] palette.
Note: You can also register the material by clicking the [Import color set from material] button at the top of the [Color set] palette.
In the next lesson, I will teach you how to create animated stickers!
Users who liked this post


Comment