Using the Gradient Tool in CLIP STUDIO PAINT
Hello there! My name is Doug Hills, and I would like to welcome you to the Clip Studio Guide.
This is the first entry of an ongoing series of posts that will discuss how to use some of the tools and functions of CLIP STUDIO PAINT. They are intended to help new users become familiar and comfortable with what is available, whether they are new to CLIP STUDIO PAINT, or digital creation in general.
To start things off, I am going to talk about the Gradient Tool: what it is, how to use it, and how it can be adjusted to best suit how you would like to work in the program.
Before We Begin
I have a couple of quick notes before we get started, just to ensure that we all have a general understanding of terms and settings I will be talking about:
• The focus of this series will be on the essential information needed to become familiar with these tools, as well as how to adjust their basic settings. As such, I will not be covering any advanced functionality. I do however encourage you to investigate any advanced settings these tools have, once you become more comfortable with their basics.
• I will be referring to the default workspace and keyboard shortcuts that users will see when they open CLIP STUDIO PAINT for the first time. If you have made any customizations, what I cover might not match with your copy of the program. So, make sure to replace the locations and shortcuts I discuss with what you have set up for your workflow.
• Windows are the group of tools, settings, and materials used in Clip Studio. These are the items you see on either side of the workspace, or what you select from the Main Menu under Window.
• Foreground and Background Colors refer to the colors that are selected on the Tools and Color Wheel Windows.
With that out of the way, let’s get started!
What are Gradients?
Gradients provide a smooth transition from one color to another. This can be from one color to another, color to transparent, or even a repeating pattern.
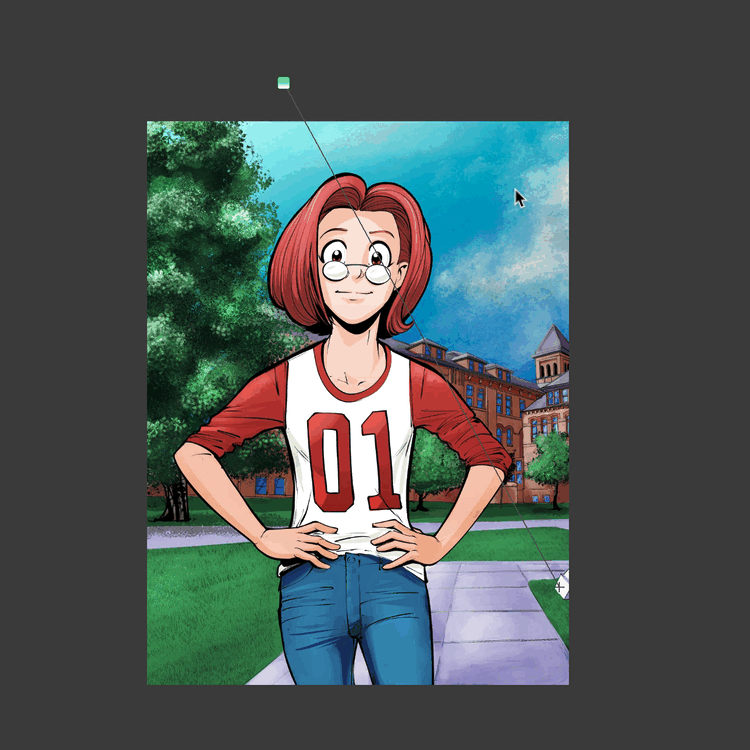
In this example, I used the Gradient Tool to create a blue sky for the background:
I could have left the scene as it is, but I decided to add a few clouds on top. This is a key thing to remember with the Gradient Tool (or any of the tools in the program, really): it can be used by itself, or as a base that you can then add your own touches to.
There is a second gradient on this piece that is not as noticeable: a light-to dark gradient placed on top of the character in this scene. I will remove the additional shadows and highlights to show what I mean:
By changing a Layer Blending mode (a topic I will be discussing in a future entry), I converted the gradient’s layer from Normal (which would have simply covered her flat colors) to Overlay (which subtly places the gradient over the flats.
To add depth, I switched to the Eraser Tool, and removed parts of the gradient: erasing along the lighter part of the gradient created shadows, while erasing along the darker area created highlights. I then placed additional layers to the piece to add in more highlights and shadows.
These are just two of the many ways gradients can be used in CLIP STUDIO PAINT. So, let’s talk about how we can make them, using the Gradient Tool.
Where is the Gradient Tool?
The Gradient Tool can be found on the Tools Window between the Fill and Figure Tools, or by pressing 'G' on the keyboard.
Note: By default, this keyboard shortcut is also used by the Fill Tool. We can see which tool is active by noting which one is highlighted on the Tools Window.
Switching to the Sub Tools Window, we can find the collection of presets that come with the program. These include:
• Foreground to Transparent (a Foreground color to transparent transition)

• Foreground to Background (a Foreground to Background color transition)

• Stripe (a Foreground to transparent striped pattern)

• Background Stripe (a Foreground to Background color striped pattern)

• Photosphere (a blurry ring transition from white to foreground color to transparent)

• Blue Sky

• Midday Sky

• Sunset

• Night Sky

• Rainbow

• Gradient Erase (a transition from white to transparent)

• Manga Gradient (a black to white gradient that is added to a new gradient layer)
Adjusting The Gradient Tool
The Tool Property window provides the tweak and adjust the settings of each Sub Tool to our liking:
Here, we can find the default settings used by each Sub Tool. The settings shown will vary, depending on the preset chosen:
• Color Transition Bar: This adjusts how the gradient will look when placed on the canvas. To adjust the length/intensity of the transition, click and drag the triangles along the bottom of the bar. To change the transition’s colors, first select a new foreground color, then click in any of the color boxes seen along the top of the bar.
• Shape: The type of gradient we would want to create:
Linear: the gradient transitions along a line
Circular: the gradient radiates from a circular focal point
Elliptical: the gradient radiates from an elliptical focal point
• Edge Process: The type of pattern that is created by the Sub Tool:
Not Repeat: The gradient is simply created from the starting color to the ending color along the entire canvas without any pattern repeats.
Repeat: The gradient will repeat, with its length determined by how long/large the gradient is created on the canvas.
Reverse: This works the same as Repeat, except the gradient reverses order with each iteration of the pattern
Not Draw: The gradient is only created within the size and/or shape of the gradient drawn on the canvas.
• Step of Angle: When checked, the gradient type will be locked along a specific angle increment. For example, setting the Step of Angle to 45 will lock the Gradient Tool to increments of 45 degrees.
• Drawing Target: This drop down list sets whether the gradient will be drawn on the currently selected layer, or if it will be created on a separate Gradient Layer.
• Opacity: This slider sets how opaque or transparent the gradient will be created. The lower the value, the more transparent the gradient will become.
• Blending Mode: This dropdown list sets how the colors in the gradient interact with the other colors on the selected layer. For example: Normal would color over the existing colors, while multiply would create a dark combination of the two. I suggest experimenting with the available blending modes to see what kind of color effects can be created.
• Anti-Aliasing: This checkbox sets whether the line edges in a gradient pattern will be aliased (jagged) or anti-aliased (jagged). This will be most noticeable if using the circular or elliptical gradient, or if creating a linear gradient at an angle other than 0º or 90º.
Using the Gradient Tool
Now that we’ve talked about where the Gradient Tool is, and how we can adjust its Sub Tools, let’s start using it!
To place a gradient on the canvas:
1\. On the *Layers* Window, select the layer that the gradient will be placed on. If the gradient will be added to a new Gradient Layer, it will be placed above the selected Layer
2\. Click anywhere on the canvas to define the starting point
3\. Drag along the canvas to set the end point.
4\. Release to create the gradient.

With Elliptical Gradients, the size and shape of the gradient is first created. After releasing from the canvas, there is the option to adjust the ellipse’s angle. Hovering over the guide with the stylus (or clicking and dragging along the canvas on the iPad) will rotate the elliptical guide. When the desired angle is found, click on the canvas to set the gradient.

If all goes well, there should have a brand new gradient on the canvas, either on the selected layer, or on a brand new Gradient Layer.
About Gradient Layers
Gradient Layers are one of a series of a specialty layer types in CLIP STUDIO PAINT that provides us some flexibility when working with a gradient.
When a gradient is created on a basic raster layer, the gradient is fixed in place: The size, shape, and angle cannot be redone without undoing (or erasing) the gradient, and re-drawing it.
By comparison, a a gradient created on a Gradient Layer is still malleable. We can easily resize, reshape, and readjust the gradient as many times as we want, without any loss of quality.
In my sample piece, I created the sky on a Gradient Layer. So, if I wanted to change the way the sky looked, I could do so quickly and easily. To do this:
1. Select the Sky’s Gradient Layer on the Layers Window
2. Pick the Object Select Tool from the Tools Window ('O' on the keyboard).
Once the Object Select Tool is active, the Gradient Layer’s Control Guide will appear. In the case of the sky, I used a linear gradient, so a linear Control Guide is now visible, with a starting and ending control points.
To reposition the beginning of the gradient, click and drag the starting control point to its new starting location. To adjust the length and angle of the gradient, click and drag the ending control point to its new position.

With circular gradients, a circular Control Guide will appear, with a starting focal point, and two control points. To reposition the gradient, click and drag the focal point to its new location. To resize, click and drag either of the two Control Points, until the gradient is at the desired size.
Bonus Note: If working with a patterned gradient, clicking and dragging the controls will adjust the pattern’s size, shape, and frequency.
With Elliptical Gradients, an elliptical Control Guide will appear with a starting focal point, and four Control Points. To reposition, click and drag the focal point to its new location. To resize, reshape, and and adjust the angle of the ellipse, click and drag each Control Point until the gradient is at its desired size and shape.
In addition to the Control Points, the Tool Property Window will have the settings used by the Sub Tool that created the gradient. We can now adjust the gradient’s settings after it has been made! These settings will vary depend on the Sub Tool used.
And finally, the Gradient Layer come with its own Layer Mask. If you are not familiar with Layer Masks, they allow us to non-destructively erase parts of a layer. So, if I were to erase away part of the gradient, and erase too much, I can fill that part back in, using the pen tool and a black foreground color.
(Incidentally, I used the Layer Mask to erase parts from the overlay gradient I placed on my character in the sample piece.)

Conclusion
------
For more information on CLIP Studio Paint, please visit https://www.clipstudio.net/en or https://graphixly.com/


Comment