
Introduction
Hi, I'm Oume.K and I'm going to show you via this little tutorial how to get a traditional color pencil effect with digital studio clip paint.
NB: I use the ex version but this tutorial is also available to the pro version.
1. Creation of brush tips
At first, we will create two new mines for our brush pencils.
To do this, open a new page with the following settings (I have colored my page in beige by personal preference, you can keep it white).
With Pen G and black ink, draw a kind of fast spiral as in the picture.
Go to 'Filter' => 'Transformation' => 'Waveform', then apply the parameters of the image, you will get the following form.
Clean the excess with the lasso.
Then save the shape as an image material. Click 'Edit' => 'Save Material' => 'Image'.
Select 'Use for brush tip shape', save it in the folder of your choice. Give the material a name, here 'Pencil 4', and use a tag to find it more easily.
For the second mine, duplicate the layer with the 'Duplicate Layer' function or 'Copy Paste', select the shape with the lasso and reduce it as on the image.
Then with the Pen G reduced to a minimum of 0.07 and a light color, make a small dot at both ends of the layer, the goal being that it is there but not visible.
This step is important because it reduces the size of the tip of the brush and therefore to obtain a different effect thereafter.
Save the material in the same way as before. Here, the material is named 'Pencil 5'.
2. Pencil brush settings
We will now set the brushes. I opened a new file with the same settings as brush tips, but with 'color' instead of 'gray'.
In the toolbar, select 'Darker Pencil' and duplicate it. I named the new material 'Darker Pencil 3'.
Open the window 'Detail of the secondary tool', to do this go to the 'Tool Properties' and click on the wrench.
Once in the 'Tool Properties', go to 'Brush Tip' => 'Material' and select 'Pencil 5'.
Go to 'Texture', add the texture 'Pencil' provided by the software. Then set as on the image.
Finally, go to 'Line' and 'Ink' and set as in the picture.
Our first pencil brush is ready, let's move to the second.
In the toolbar, select 'Drawing pencil' and duplicate it. This new material will be called 'Drawing pencil 5'. In the 'Tool Properties', go to 'Brush Tip' => 'Material' and select 'Pencil 4'.
Set 'Stroke', 'Textures' and 'Ink' as on the image.
The second pencil brush is over!
3. Color tests
Here is what give the 2 brush pencil. Thanks to the various settings, we obtain an effect very close to the traditional pencil. You can layer multiple layers to darken the color, but also mix multiple colors in between and get some nice gradients.
The brush 'Darker pencil 3' will be used for the details and 'Drawing pencil 5' to color more generally.
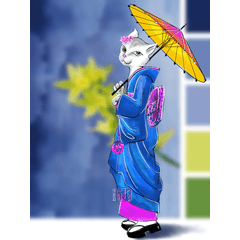
4. Illustration
After a quick draft, I draw my line with 'Darker Pencil 3' on 3 different layers to facilitate future modifications if needed. One layer for the skin, another for the gloves / earrings and one for the hair and the dress.
I do the same for the color, I create 3 different layers and I apply a first layer of color with 'Drawing pencil 5'.
I will then apply a second layer with darker colors for the shadows, then a third and add details always with 'Drawing pencil 5'.
I duplicate the layer of the line of the skin to bring out a little more and I combine the copy layer and the original layer. I change the color of the hairline because I find it too light. I choose my new color, I go on the layer of the hair, I select them with the lasso then I go in 'Edition' => 'Change the color of the line'.
I add details and more shadows with 'Darker Pencil 3', and I duplicate all line and color layers once.
On a new layer 'Linear light' I add a little pink on the hair with 'Pencil drawing 5'.
I duplicate again the colors layers and I add a background, the illustration is finished!
I hope this tutorial although a little long will have helped you!
You can follow me on my networks:
https://www.instagram.com/oume.k/
Good drawing!
Users who liked this post


Comment