
One of Clip Studio Paint’s most amazing features are vector layers. In this tutorial I want to look at how they will be able to help you perfect your lineart!
If you'd prefer to watch a video version of this tutorial, you can do so here:
What’s a Vector Layer?
If you’ve never heard of the term before, you might wonder what the difference between a vector layer and a typical bitmap layer is. The best way to explain is to give a small demonstration. Let’s start by drawing lineart on both a bitmap and a vector layer. I’ve drawn a “B” for the bitmap layer, and a “V” for the vector layer.
I’ve drawn these letters very small, so now let’s see what happens when we scale them up.
Pay attention to the edges of the lineart. You’ll notice that the bitmap layer is looking pixely, whereas the vector layer is still looking sharp. That’s because a bitmap layer saves pixels, and a vector layer saves the data for your strokes.
Another way you can see the difference is if you use the “Operation” > “Object” tool and select the lineart.
On a bitmap layer, you will see nothing. If you do the same on a vector layer, you will now see a bunch of little dots. These are the control points of the line you drew, and they can be moved around to adjust your lineart after you’ve already drawn it!
And that brings us to the actual meat of the tutorial...
Perfecting your Lineart - Method 1: Adjusting the Shape
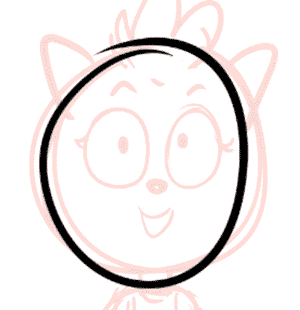
I want to give a practical demonstration of these methods, so to start out, I’ve decided to sketch a little character that’s going to illustrate the advantages of vector layers very clearly.
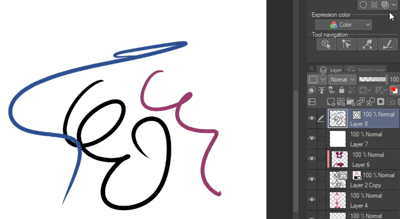
I like to sketch on a bitmap layer so that any work I do on the lineart vector layer won’t be affected by the sketch. I also like to use a bright color for my sketches to differentiate it from the black lineart I draw on top of it. If I draw multiple characters or backgrounds in detailed illustrations, I sometimes use different colors to separate different parts of the image. Here’s an example:
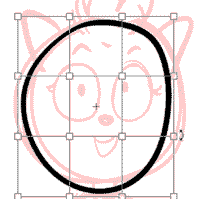
But back to our tutorial drawing. We have a very round head shape here. You’ve probably seen plenty of memes about how digital artists draw circles. They’ll CTRL+Z and redraw the circle a million times. But, with a vector layer, you can adjust the line afterwards without quality loss, so you can just go with your first drawing.
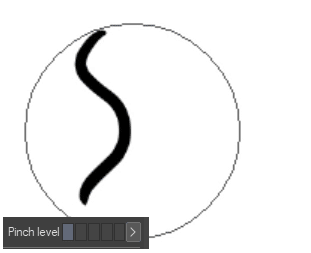
Let’s take this circle here. It’s not even fully closed. We’re gonna adjust that now with the “Pinch Vector Line” tool.
There’s a variety of settings available here, and I’ll explain them in a bit. Right now, let’s just find out how the tool works.
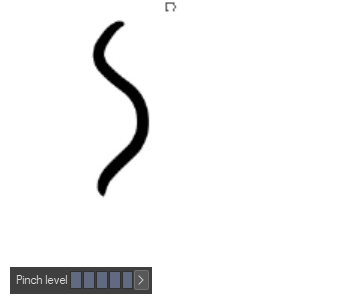
As you can see, I was able to drag the end of my line around and make it a fully closed circle.
Let’s look at the settings of the tool in detail now.
Most important is the “Pinch level” setting. With it, you’ll be able to adjust the strength of the tool. Remember how you saw all those control points when you selected your lineart with the “Object” tool? If you have your pinch level set to the lowest point, you’ll basically just grab a single control point and move that around.
On the other hand, if you have your pinch level set to the highest point, depending on the size of your lineart and also your “Effect Range” setting (which is basically a brush size setting), you might move around the entire lineart.
So, choosing which Pinch level to work with depends on what you want to achieve and what your lineart already looks like. Just experiment with it. You can always undo a mistake!
The “Fix End” options specify whether the beginning and ending of a line will stay where they are. You can either leave both the beginning and end in the same place, only one of them, or neither of them. If you select the “fix both ends” option, you could drag around a line to make it look like you’re using a jump rope and I think that illustrates how the functionality works pretty well!

The “Add Control Point” option does exactly what it says. When you adjust your lineart, it adds new control points. This can sometimes result in a smoother looking line.
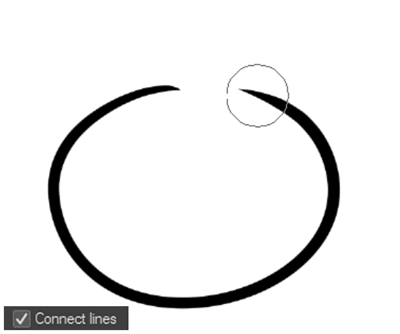
Finally, the “Connect Lines” option. It’s pretty self explanatory. I’ve already given an example of using the “Pinch Vector Line” tool to close a circle. With this option active, you could do the same, or connect two separate lines. The difference being, is that it suddenly becomes one fully connected line, linking two control points together. It will only connect if you move two end points of one or two lines close to one another.
Let’s go back to our sketch and look at another way you can adjust the shape of your lineart. The “Pinch Vector Line” tool is great, but if you want to adjust the overall shape of your lineart (especially if there’s already a lot of detail to your drawing), then you might want to use the “Mesh Transformation” tool instead!
With “Mesh Transformation”, you now get a bunch of control points that you can adjust to inform the overall shape in a much quicker way. As you can see, I adjusted the circle to be more round, even though it’s not gonna look like a perfect mathematical circle either. I still want a hand-drawn look after all!
If you’d like to go into more detail without resorting to the “Pinch Vector Line” tool, you could also increase the amount of control points the “Mesh Transformation” tool will generate. To do so, simply increase the values in the tool settings here:
Keep in mind that you can also use the “Mesh Transformation” tool on portions of your lineart, not just the whole drawing! So, for example, you could select a portion with the lasso tool, and then use the “Mesh Transformation” tool to adjust only the lassoed portion, while leaving the rest of the lineart intact.
Sometimes when making these kinds of adjustments, you may notice weird spikes appear in your lineart. This is a normal side effect of using vector layers. If you go back to the “Object” tool and select your line, you should be able to identify where this problem arises. This usually is a control point that is located a bit outside of where it should be. Simply select that control point, move it around, and the spike should disappear again.
Perfecting your Lineart - Method 2: Using the Vector Eraser
Now that we have the base for the character’s head done, we can move on to adding details. And this is where our next method comes in: the Vector Eraser.
If you haven’t used the tool before, you might be used to erasing lines in your drawings manually. This takes a while and you sometimes might even overlook small bits of lineart here and there. The Vector Eraser will help you deal with both of these issues.
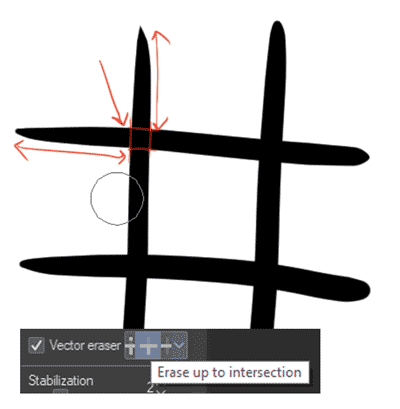
Before I’ll show the tool’s application in a practical way, I want to explain it in detail. To do so, I drew this grid. Think about how this is an intersection of multiple lines.
The reason we’re going to do this is because the main advantage the Vector Eraser has is that it can help you erase lines only up until their intersection. To activate this feature, switch to your Eraser tool, activate the “Vector Eraser” option, and select the “Erase up to intersection” option. You can now see how this speeds up the erasing process compared to doing it normally, and once we go back to the practical application, you’ll see me using this method a lot.
Before we do that though, a quick explanation of the other two Vector Eraser options:
“Erase touched areas” pretty much makes the Vector Eraser function like a normal eraser.
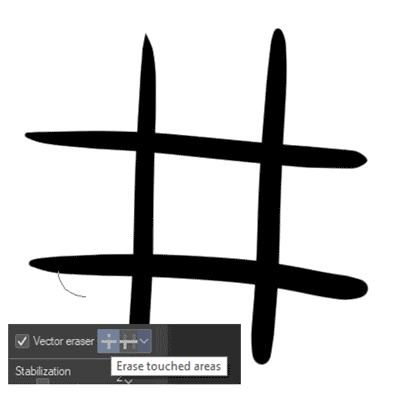
“Erase whole line” does exactly that.

Now that I’ve explained these two methods, I’m going to finalize the lineart. If you’d like to follow along with the process and learn a few extra tips, feel free to watch the video version of this tutorial!
Perfecting your Lineart - Method 3: Adjusting the Weight
Now that the basic drawing is mostly done, there’s only one problem left: it looks a bit flat!
Using weight variances in lineart can really help exaggerate or define shapes. Of course, if you plan on adding weight to your drawing by doing detailed shading or painting it, you might not need the variances in the lineart itself. It’s up to you to decide what kind of style you’re going for!
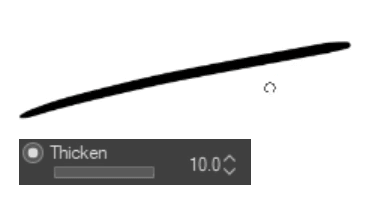
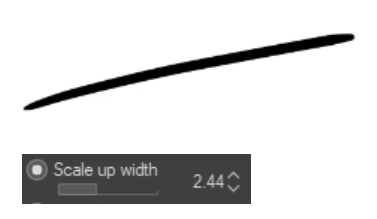
But for now, let’s assume that we are doing a simple, flat colored piece and that we do want the weight variances. It’s not always easy to get this right when you first ink, so it’s a good thing that with vector layers, we can go back in and adjust the line weight using the “Correct Line Width” tool.
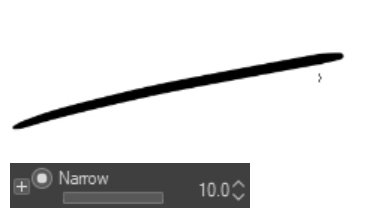
There’s a bunch of different settings available here again, so let’s look at them in detail.
“Thicken” and “Scale up width” are pretty much the same option and make your lineart look thicker. The main difference, as I’ve found it to be is that “thicken” uses the point value as you might find in a brush size, whereas “scale up” uses a percentage value based off of the lineart you are applying the tool to.
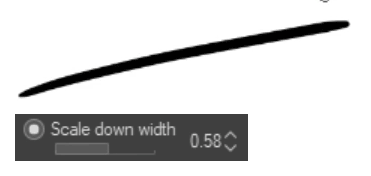
“Narrow” and “Scale down width” are the exact inverse of the other two options and make your lineart look thinner.
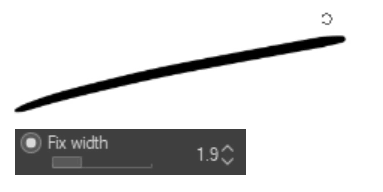
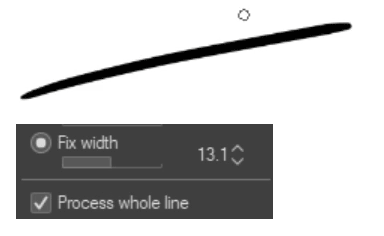
“Fix width” is different in that it helps you set a certain lineart size and immediately adjust your drawing to that. This option will also remove all existing line weight variances. If you want a uniform lineart width, this is going to be a very useful option for you!
You can combine all of these methods with the “Process whole line” option, which does exactly what you might assume it does. Rather than adjusting sections of a line that you might be applying the tool to, it applies the tool to the entire line. This ignores intersections, unlike the Vector Eraser!
You can, of course, also adjust the brush size of this tool so that you can either work in detail or apply the settings to your entire drawing.
An alternative way of adjusting the line weight of your drawing after it’s done is by going back to the “Object” tool. Click and drag to select your entire drawing (or whatever portion of the drawing you want to adjust). Now, you can adjust the base brush size value in the “Tool property” window. This is a bit faster than using “Thicken” and “Narrow” over and over again, and compared to using “Fix width”, it retains existing line weight variances.
This is what the lineart looked like once I adjusted the weight:
You’ll find that it isn’t the most dramatic difference, and that’s okay! It doesn’t always need to be. Here’s what I changed, and why:
I thickened the line weight of the hair and the hands to give them a bit more volume
I thinned out the line weight of the bottom of the head to connect it more to the body
I evened out the line weight of the arms to make it appear more unified
I thinned out the line weight of the clothing details to have them be less distracting from the character silhouette.
Perfecting your Lineart - Method 4: Coloring your Lineart
Next, we’re gonna be looking at adding color to your lineart!
There’s multiple ways to do so. The first one we’re gonna look at is the “Layer Property” > “Effect” > “Layer Color” option.
This gives your entire layer a uniform color. You can either define this color by clicking in the color field, which opens a color picker, or you can apply your currently active color by clicking the fill bucket icon.
What’s interesting about this option is that it recognizes the brightness values of your lineart. So, if for instance, you drew your lineart in shades of gray, or maybe even in color, once you apply this option, your lineart is now going to be uniformly colored, but in different shades of the color you picked.
In drawing comics, I often use the “Layer Color” option, and I like giving a darker layer color to my characters and a brighter layer color to my backgrounds, to make the characters pop more.
However, if you want to color your lineart in more detail, this option might not be the best for you.
If you have very simple lineart without a lot of strokes, then you could just go back in with the “Object” tool (1), select portions of your lineart (2), open the “Main Color” option in the Tool property window (3), manually select a color (4) and press OK (5).
However, if you have a more complex lineart, it might be easiest to just create a new layer above your lineart layer and select the “Clip to Layer Below” option. I would recommend using a bitmap layer for this, rather than a vector layer, as I personally find it easier to manage than two vector layers on top of each other.
Once you have done this, anything you paint or draw on the top layer will only be visible where you have drawn lineart on the bottom layer. You can deselect the “Clip to Layer Below” option again to find that whatever you’ve drawn on this layer actually does extend beyond the lineart - it just doesn’t show up, letting you color the lineart!
Keep in mind that you can activate the “Clip to Layer Below” option for multiple layers. So you could create different layers for different colors. This can be especially useful if you want to finetune the colors later on.
Here’s what the colored lineart looked like once I finished it, with the flat colors both deactivated and activated:
Perfecting your Lineart - Method 5: Adjusting the Style
We’ve arrived at the last method for perfecting your lineart! So let’s say, you finished this drawing. And you’re actually pretty happy with it. But then you come across a really neat brush and you realize, man, it would have been perfect for this drawing. Should you just redraw the whole thing now?
With vector layers, you don’t have to! Just like you can adjust the shape, weight and color of your lineart, you can also change the brush style!
To do this, go back to the “Object” tool and select your lineart, or whichever portions of your lineart you want to change. In the Tool Property window, look for the “Brush shape” option. You can now select any of the following options and it will change your lineart style!
But there’s a problem. The brush you found isn’t in this list! Fortunately, it’s pretty easy to add a new shape. To do so, select your brush in the “Pen” tool (or whichever other tool you may have registered the brush to) (1). Now click the little Wrench icon in the Tool Property window (2). The “Sub Tool Detail” window will open. Here, select the “Brush Shape” menu (3). Finally, click “Register to preset” (4). You may now close the window, and now the brush will be available in the “Object” tool / “Brush shape” option.
And just like that, you can very easily give your drawing a fresh new look.
A Note on Pen Stabilization
Before we close off this tutorial, I want to quickly address the “Stabilization” feature. I often see people asking about this.
Personally, I like to leave the setting pretty low, at around 6. I’m used to drawing fast, quick strokes, so this option works pretty well for me. But just experiment! If you find yourself drawing slow, long pen strokes and you’re unsatisfied with the lineart looking kind of wobbly, then a higher stabilization setting might work out better for you!
The one disadvantage higher stabilization settings have is that they will feel less like you’re “drawing” and more like you’re “guiding around your lineart” if that makes sense. The actual lineart is going to follow your cursor at a distance, so that the stabilization has time to catch up to what you’re doing.

I’m personally not a fan of that, so I don’t use this option, but it will definitely have its use for some people. And keep in mind that you can also adjust it, of course. No need to always stick to a single stabilization setting for your entire drawing. Maybe on one line you’ll want the feature, maybe on another you won’t. So my advice is to just experiment and find what works for you personally!
Thank you for reading!
And there we have it, five different methods to perfecting your lineart using vector layers in Clip Studio Paint. You can use these independently of each other or combine them to create a variety of interesting art styles. I hope this helped, and if you have any questions, feel free to drop them in the comments!
Users who liked this post


Comment