Drawing Anthropomorphic Animals
Introduction
Anthropomorphic animals are animals with human-like characteristics. They're commonly referred to as "furries" or "kemono." The genre has been gaining a rapid increase of attention in recent years, and is often found in movies, anime, cartoons, and writing. The ability to draw these creatures can increase an artist's versatility for character creation in their works. Fantasy based settings tend to especially make use of this, with species such as "Beast men" being a common trope.
The wide range of animals to choose from when designing your anthro gives birth to vast possibilities for the character's structure and build. Be sure to research real life species first to examine their body shape and features. Picking out clothing and even hairstyles which may reflect on the human cultures found in the geography that the animals live in can be a fun bonus.
In this guide, I'll be sharing with you some tutorials I've made which provide useful tips and tricks when drawing furries. Most of these tutorials can also be applied to feral structured animal art, in the event that you're not too fond of their anthro counterpart.
Anthro Legs
Unlike humans who have one pivot point, animals have two, resulting in a different anatomical structure. Depending on how animal-like you want your furry to be, this can be useful in adding an additional element of realism to their character. Also, don't forget! The body is a three dimensional form. Be sure to incorporate a sense of depth, rather than a flat figure.
Different species will have varying thickness of legs and body. For example, heavy draft horses or elephants have a sturdy build, while coyotes or deer have slim, agile legs. Keep in mind how muscular your character and species is, as the legs are a great opportunity for showing personality and style.
Fluid, rounded shapes are most common in real animals. Combine circles, ovals, and curves to achieve an appealing form. If you’re going for a more stylistic appearance, however, the sky’s the limit.
Anthro Hands
Anthropomorphic hands can range drastically in style and be either significantly different from human hands, or quite similar. For this tutorial I’ve gone with a more human-like example, featuring enlarged finger tips to allow for paw pads.
If you’re feeling lost on how to stylize your own anthro hands, try looking up photographs of hands belonging to primates as they’re different from slender human fingers and can feature odd shapes.
---
Step Three :: Starting from the base of each finger circle and drawing up to the top of the finger box, I make the individual fingers.
---
Step Six :: Finish off your sketch with a clean layer of lineart, coloring, shading, and highlights. Don’t forget that this is a three dimensional form, so rounded shadows and highlights can assist in this visually.
Drawing a Canine Head
Dogs are one of the most popular species of anthropomorphic animals, so I’ll be doing a step by step tutorial on how to draw a doberman’s head. This same method can be applied to most any canine, or even most species with some minor adjustments such as muzzle length. While drawing the head, consider all parts moving with some degree of connection amongst themselves.
---
---
Step Three :: The cheeks connect from the ends of each eye, to the muzzle in one circular motion. It may help to draw a circle first there, to better envision the space. Once again, the head is three dimensional, so don’t make those cheeks too flat or straight!
The eyebrows get added in on top of each eyelid by drawing a “Ying-Yang half” connected to the eyelid.
After that is adding your mouth. Start right before your middle box line starts to curve upwards, and end the mouth about where the pupil of the eye will be to achieve a smile. Curves are your best friend!
Step Four :: Time to add the ears! Think of a three dimensional cone shape, and add it to each side of the head. A helpful tip is that both ears will be about the same height, even though one is going on the other side of quarter view head. You can check to make sure they’re the same height to grabbing your ruler tool (CTRL+R) and moving the top ruler down to measure.
---
Step Six :: Time to define the collar bone and chest dimensions! Make another diamond/square just below the middle of your first. Then draw a line to connect the two at the bottom.
---
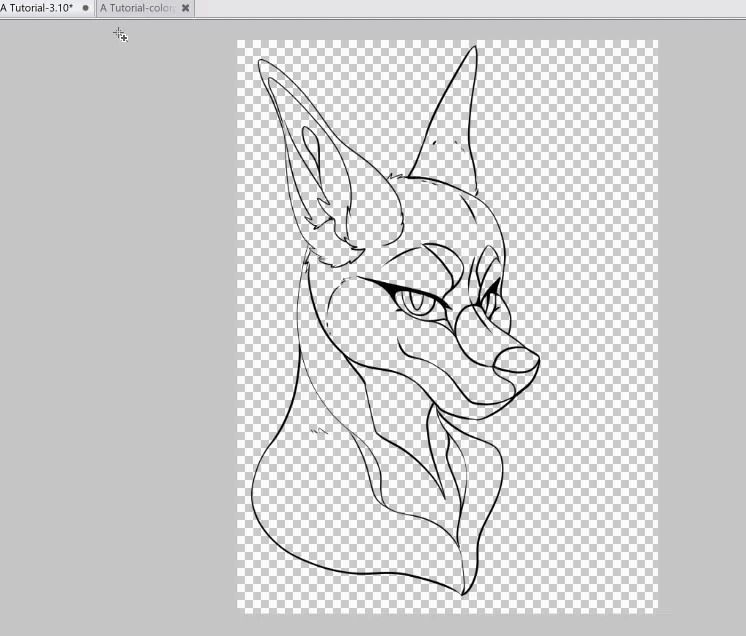
Step Eight :: The sketch is done! Round out of the edges of it so it flows smoothly, and tidy things up with some clean lineart.
A tip for doing lineart on top of your sketch is to turn on Layer Color for your sketch found under the “Effect” tab on your right side panel. Make a new layer. Then do your clean lineart on top in black. The sketch being in a different color makes it easier to see your final lineart.
Once the clean lines are done, just turn off your sketch layer and wow! You’re left with pretty final line work.
I use the G-Pen with stabilization and pen pressure turned on for easy control of line width and smooth lines.
Consider what colors your character or animal species has before you begin the coloring process and make a color pallet. Dobermans have a variety of different coat colors to choose from, above I’ve made very basic color pallets for three different varieties.
I made these color pallets by pulling up real life photos of the dog breed and using my Color Selector tool to grab colors directly from the dogs.

Having easy access to your references and color pallets for quick visibility, without hindering your drawing process or cluttering your screen, is vital for a smooth work flow. To do this I open my references and color pallets in a new tab, drag the tab down onto my main canvas, resize the tab, and move it to an easy to see spot on the screen. You can even do this for multiple tabs at a time.

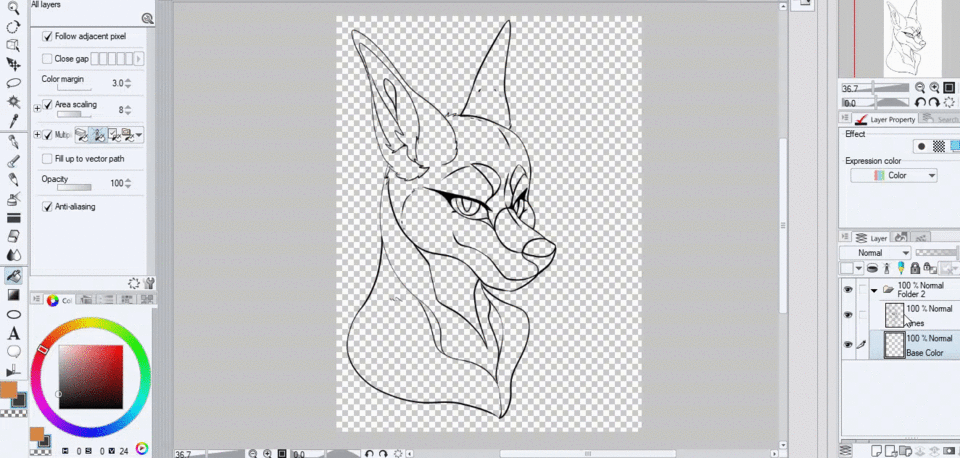
Step Nine :: Coloring. To get an instant base layer of color under your lineart, set your lineart layer as “Reference Layer” by clicking the lighthouse looking icon above your layer menu. Make a new layer for color below it. Select your Magic Wand tool now, and click anywhere outside of your lineart. Inverse this selection on the small popup panel, and then select “Fill.”
Want to quickly color a sketch, or lineart which contains gaps? Just enable “Close Gap” on your Selection Wand and adjust that setting for how large your gaps are.
Step Nine Continued :: With the base layer of color done, go in and color the additional fur patterns. If your lineart layer is set to “Reference Layer” as described in the above tip, coloring in lineart is quick and easy regardless of what layer you’re on.
Step Ten :: Set your shadow layer to “Multiply.” Clip this layer to your base color layer. When painting shadows, be sure to keep in mind where your light source is located. I prefer to use watercolor styled brushes for this step, as it gives a fur-like effect with minimum effort. Dobermans have very short, glossy fur, so it’s not necessary to go into excess detail painting fur for this breed.
The color of shadow you use can vary depending on the surrounding light or scene. For this simple headshot, however, I’ve just used a basic blue to stand out against the dark grey of the coat color.
Step Eleven :: Set new highlight layer to “Overlay.” Clip this layer to your base color layer. With the same watercolor based brush I used for painting shadows, I now go in and paint the basic highlights using a warm gold color.
Step Twelve :: Time to add gloss! Cyan or light yellow tends to work best for bright pops of color. I prefer to avoid using solid white, as it doesn’t provide enough depth.
This is the brush I use for most all of my gloss effects;
Step Thirteen :: This step is optional but helps to add appeal and depth to the character.
For the final touches, I like to take my “Gradient Tool” set on “Background to Transparent” mode and in a new layer set to “Linear light” do additional lighting. Be sure to clip this new additional lighting layer to your base color layer. Do one gradient stroke with a warm color from the top where your light source is coming from, and one stroke in a different, ambient lightning coloring, from the bottom.
Painting Fur
When drawing nearly any mammal, chances are you’ll need to create some degree of fur. For this next tutorial, I’ll be sharing my step by step guide on how to do this. As always, be sure to pull up a reference photograph of whatever your animal is so you can gauge the density, color, pattern, length, and straightness of their fur. Some species will have very wavy fur while others will have a more straight and slick appearance.
---
Step Two , Three , Four , and Five :: As we did with the Doberman Head tutorial in step nine, it’s time to lay out the base colors of our tail.
Set your sketch layer as “Reference Layer” by clicking the lighthouse looking icon above your layer menu. Make a new layer for color below it. Select your “Magic Wand” tool, make sure that “Fill Gap” is enabled if you have a rough sketch like I do with lots of gaps in it. Click anywhere on the canvas outside of your lineart, inverse that selection, and then fill.
Step Six :: It’s now time to establish base shading and highlights! Make a new layer and clip it to your tail base coloring below.
---
Step Eight :: I get to work painting both the general highlights and shadows. Notice how the brush gives a textured, fur-like effect, rather than being a completely smooth surface.
---
Step Ten :: Using a lighter color, define the fur strands further by going over top of the shadows with your highlights. The highlighted potion will be found on the edges of the individual fur strands, the base of the fur strands should get darker as it blends in.
---
Step Twelve :: Adding gloss. Using a light cyan color to contrast against the brown fur, I use this brush again (as seen in step Twelve of the doberman tutorial) to make the figure pop out by adding glossy effects.
Step Thirteen through Fourteen :: Make three new layers. Clip new layers to your painted fur layer, and set two of the new layers to “Overlay” and one of the new layers to “Multiply.”
Step Fourteen through Fifteen :: Using a cyan color, I go in with a smooth rounded brush and add additional lighting effects to the top of the fur on my new highlights Overlay layer. I also go in with a light red brush color and add rim lights to the bottom of the fur on my second new Overlay layer.
On my multiply layer, I select a muted redish color and bring out some of those shadows where needed.
Once this step is done, your fur is complete!
---
Thank you all for reading, and I hope you picked up some tips, tricks, and ideas to incorporate into your own work!


Comment