
Heyo! ( •̀ ω •́ )✧
I'm Ash. This tutorial will quickly discuss about the workflow of turning Gray-scale/colored images into different, combination of colors, using Cilp Studio paint's recent tools! Lets hop onto the first step.
•.:°❀════════----------------------------------------------════════❀°:.•
Understanding Values
•.:°❀════════-----------------------------------------------════════❀°:.•
"Definitions"
Tone; the degree of intensity or strength of a color.
Hue; indicates the original pigmentation/color
Value; the relative lightness and darkness of colors in a composition.
Gray-Scale; a black and white image with shades of gray.
Contrast; the arrangement of opposite elements and effects.
•.:°❀════════___________________________════════❀°:.•
Value divides the lightness or darkness of a color on a certain object. We understand objects because of how dark or light they are, which are values. Therefore it is incredibly important to art in general.
When a painting isn't popping with values, check the tonal range in it. Focus on tone or value, rather than the colors in the illustration. The range of tones might be too narrow. If so, then add few highlights and dark shadows.
When your painting is 'finished', check whether you have your "darkest dark" and, "lightest lights." If you haven't, then the painting isn't finished yet, so you need to adjust the tones again. Patience is key! ( •̀ ω •́ )✧
Adjustment layer's Gradient Map
Okai, now is the fun part!
This is how do my illustrations using gradient map. First I separate each separate components like so. Most artist merge them into one, although it's easy. However in the end is going to be difficult/messy to add in colors.
Create a selection of all of the main object into one. To do it faster;
Edit -> Tonal Correction -> Gradient Map
It will apply a gradient map to the layer you are currently working on. So you can't change after doing final renderings
Right click on the layer -> Selection from layer -> Create Selection
Then keep on adding them up, then fill a color in a separate layer above everything. So will be using this function for this illustration.
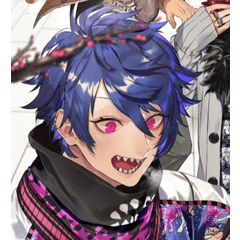
I prefer vibrant colors as my style so I decide to change the color of the whole vibe/tone. Changing it to redish gray. Of course, you don't have to follow this, however muddy feel isn't my go to palette. Here's the procedure;
Layer -> New Adjustment Layer -> Gradient Map
It will create an adjustment layer above your selected layer, which can be edited and adjusted later.
Afterwards, you go to individual components to your main object. Create a layer with "Color/Hardlight" Mode on; on top. Fill or Airbrush colors for every elements.
Finalizing
After adding in every colors needed for main object, I focused on the background next. As you can see, the background color and the main object is fitting to each other.
Afterwards save your files then duplicate it to PNG to continue editing.
And you're done! It is very easy but of course you'll need to practice and having patience is key!
I hope you are encouraged to use these incredible tools and I also hope that you've learned something new from this tutorial.
Follow meh social media for more works! (≧∇≦)ノ
https://www.instagram.com/angelwithshotgun_ash/
https://www.youtube.com/channel/UC7nETmNSd0aHzrleZrLypcA?view_as=subscriber
Thank khu for staying till the end!💜
Users who liked this post


Comment