
A. Introduction
Hello everyone!
Today I'm going to give some quick tips and tricks on portrait creation and design, as well as show y'all how to create dynamic, colorful portraits from scratch!
Although my tutorial will focus on an animated style, since that's what I prefer for myself, my general tips should work for any style, including realistic, anime, and cartoon.
Let's get started!
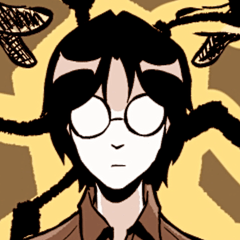
B. Head Anatomy
One of the biggest determining factors in a unique portrait is the head anatomy and face shape. While many artists choose to make these shapes as close to realistic as possible, others prefer to elongate or shrink various features. Although there is no "correct" way of drawing head anatomy, most human heads tend to follow the same general proportions!
The eyes are usually about halfway down the face, and the nose about a third of the way down from the eye lines. The mouth will move a lot based on expression, but it's usually about two thirds down from the eye line.
The head is divided into sections. The skull, which is mostly circular, forms the top of the head, and is why me and many other artists choose to begin drawing a human head with a messy circle.
From there, adding a line across the lower half of the circle gives the eye line. The eyes will line up with each other exactly on this line. I also like to add the center line so I know where to place the eyes. If the character is looking to their left, I'll place the center line a bit to the right, and vice versa.
Afterwards, I add the jaw and chin lines, and it begins to look head like! Yayyy!
From there, I draw in a few simple lines to form the neck and ears. Afterwards, I draw in the eyes, nose, and mouth. I usually leave these details really simple in the sketch, since it tends to add emotion to a piece and clarifies the mood from the start.
If there's any little things I dislike, I also quickly fix them here, making the sketch a bit more messy and loose.
Then you can loosely sketch in the hair above the eyes where the hair line is and add any other details that are important to the character!
And of course, if you'd like to, you can line over the sketch with neater, precise lines!
But that's really all there is to basic head anatomy and drawing a simple head! Easy enough, right?
C. Portrait Poses
Unique and interesting poses really help define a character. Poses that aren't simply staring straight forward into the camera seem much more creative and exciting.
For example, look at the below poses. Each of them gives off a few different emotions, even without any facial features or expression.
I listed a few possible emotions for these poses below them, but there's plenty of others that could be assigned to these!
When you create poses, there's a few things to avoid: in particular, the standard 'straight forward' pose.
This pose lacks emotion and personality, and doesn't stand out to a viewer. This pose relies too heavily on the facial expression itself, and can make the portrait bland or boring.
A lot of artists do this lazy pose a lot, and I can honestly say I'm guilty of it as well. However, adding in animated, action poses can really help develop a character and their personality!
A good rule of thumb when creating poses is to draw lines across the shoulders and the eye line; if they form an angle (usually about 20 to 50 degrees), then that pose is great! If the lines are parallel, then the pose fails and may not be quite expressive enough. Of course, that's just my rule of thumb, and there will always be exceptions
Dynamic poses can take a lot of experience and practice, but once you get the hang of them, I promise they're not too hard!
D. Expressions
An easy way to developing a portrait is to simply give it an interesting expression! When combined with a unique pose, each character quickly develops a personality or a story.
For example, in the first of the above images, what comes to mind is a girl trying to escape a harmful lifestyle through music, her passion. Each of these characters tells a story of sorts, which really adds to a portrait.
When drawing expressions, many people instantly assume that the lips are the most expressive feature. However, the eyes and eyebrows are oftentimes much more expressive.
@tokyolondon has a fantastic tutorial on eyes and their expressiveness that I'll link here, but I'll also do my best to explain my tips about eyes.
Normal eyebrows don't have too much arch, and are for the most part straight. This "normal" expression of the face at rest is drawn very commonly.
However, other emotions like happiness and sadness have different eyebrow and eye positions!
When drawing happiness, the eyebrow is usually higher than in the normal position. It has a sharper curve to it as well. The bottom of the eye is also curved slightly up.
When drawing surprise, the eyebrow is usually much higher than in the happy or normal positions. It has a very sharp curve to it, and the bottom of the eye is the perfect inverse of it.
When drawing sorrow or sadness, the eyebrow curves down. The top of the eyelid and the eyebrow almost touch. The bottom of the eye curves up a little, making the eye slightly smaller.
When drawing anger or a fierce expression, the eyebrow angles sharply down. The bottom of the eye, like wise, angles sharply upwards.
Using surprise for this next example, here's another general rule of thumb about eyes~
The eyebrow direction line is almost always the exact inverse of the direction of the bottom of the eye. Some expressions can be a bit more tricky than surprise is for depicting this, but if you look at the eyes I drew above for several emotions, you'll see that this general rule still fits them.
Of course, this is just my general rule! There's always exceptions, and it's not always true!
Although I'm a firm believer in that you can make any expression with the eyes alone, the lips and mouth can be really useful for further clarifying what emotion you intend!
I've noticed that many artists really struggle with drawing lips--and I know I was one of them. So, on that note, let me first show how I draw simplistic lips.
Step one: First, I draw in simple lip shapes that highlight the important parts of the lips! It's okay to not line certain parts of the lip. If you try to line the lip all the way around, oftentimes that'll look awkward or scary.
Step two: Next, I like to messily color in the lips with Clip Studio's default soft airbrush tool. At this stage, mine usually looks like a weird makeup fail.
Step three: I blend in the edges with Clip Studio's default blend tool. This will blend in the edges of the lips a bit with the skin, helping make it look a little less like a makeup fail, and more like the actual lips!
Step four: I then adjust the lighting. Using a default chalk brush, I use a darker color to add in darker places on the lip. I usually darken the mouth opening more than the rest of the lip, since that will often be heavily shadowed. I also add in whiteish highlights with the same brush.
Step five: I then color in the teeth in the center, and touch up any small details I'm unhappy with. If you like, you can color the line art of the lips here to make the black edges a lot softer.
That's really all there is to a simple lip design. The key to drawing lips is to think of them like blush and shade them as such, rather than shading them like skin or hair.
Expressive lips take time to master!
Good references and lip studies are really useful for drawing detailed, interesting lips. However, in my personal opinion, lips can be a little more bland, so long as the eyes, pose, and other details help convey the emotion of the piece!
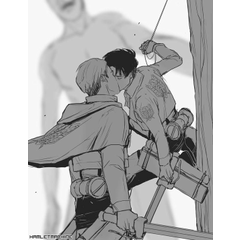
E. Colors
Colors can completely change the mood of a piece! While bright colors can add joy and happiness, darker colors can add mystery, depression, or sadness.
When creating expressive portraits, it's really important to make sure the colors you choose fit the personality and mood of the piece!
For example, in the above images, the first one looks happy and cheerful, while the second looks mysterious and sad.
Similarly, cooler, softer colors, such as blues and greens, can make a character seem more distant, introverted, and shy. On the other hand, bright, warm colors make a character seem joyful, extroverted, and bold.
F. My Portrait Process
There are many ways to draw a portrait, and I guarantee mine is in no way the best or only way of doing this! This is just my personal method for drawing portraits, and I hope it helps someone!
When drawing a portrait, first I always loosely sketch in the pose to get across the mood, and use my general rules to check that it's an interesting pose.
I then sketch in the details of the portrait over the pose.
Then I clean up the sketch for my own personal benefit when I color--although I usually prefer the look of the messy sketch in general.
I then loosely color in my flat colors until I come across something I like. In this case, I chose softer, cooler colors because it helped boost the introverted, awkward vibe of the character I drew.
I then shade in the rest of the drawing as well, focusing on light sources and other details.
I also occasionally add in a simple background as well to help highlight the colors of the character.
And that's all there is to drawing a simple portrait!
G. Conclusion
Well, that's all the tips and tricks I have for you guys today! This is my first tutorial...so go easy on me! I hope you learned something, or at the very least, enjoyed it a bit! Thank you all for reading this far!
If you like my art and what you see here, you can follow me on my Instagram @lightningparabola or check out my website at www.lightningparabola.crevado.com!
Users who liked this post


Comment