
Intro
Hello everyone! Thanks for checking this tutorial.
Today i’d like to share about 4 tips to draw pose in Clip Studio Paint!
You can also check my video below for more details with a video guide! ^^
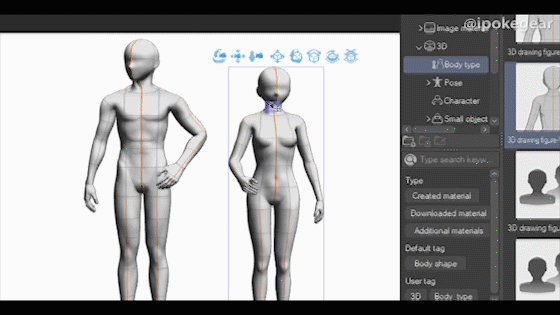
1. Use 3D Model Assets from CSP

CSP has a built in 3D model feature and it's really useful for drawing pose!
We can use the Mannequin Model for pose (male/female body type)
Simply drag the model that you want to the canvas
The button above the model are used to rotate and navigate

If we click on the model, there will be more pointer
Choose one part of the body, then drag the line to rotate it
Each color follows different axis. You can try and pose it as you want!
We can also select the circle area and move the whole limb
If you check the 3D materials, there's also pose templates in there
It's very useful! Simply drag the pose to your model to use!
There's even a separate templates for hands!

After you use the template, you can still edit them
It may take some time to get used to, but it's very helpful!
I think the simple way to use this 3D model for pose is:
1) Start by choosing the template that's closest to your idea
2) Modifying and readjust the model manually
3) Lower the 3D model opacity / change layer color
4) Start drawing in a layer above, following the guide from 3D model!

2. Use Multiple Windows for References

While some people may learn pose by tracing the key shape of a reference,
It's also a great practice to learn pose by referencing it side by side!
You can open the reference in a separate illustration
It can be a drawing from another artist, screenshot, photo ref, or tutorial
(in these examples, i used my own drawing as a ref)

After opening multiple illustration, choose Windows -> Canvas -> Tiled
This option will show all the drawing at the same time
After that, we can arrange it however we like!

Drawing from scratch with reference side by side..
Clearly this method is a lot harder for beginner,
because we have to know the shape and basics of proportion
However, with multiple refs beside your drawing,
you can get a lot more creative with the pose!
3. Line of Action of the Pose
This is a simple tip to enhance your pose
We can start by drawing the "Line of Action" first
To put it simply, start with a line that shows "the flow of the action"!
with a clear line of action, your pose will be less stiff and more dynamic

We can draw the Line of Action with red color in separate layer
After that, we can reduce the opacity of the line if needed
We can then use it as a guide to improve our pose and its flow of action!

Line of action doesn't necessarily have to be drawn first, and it can also be edited
The main point is to adjust our drawing to have a better action flow
Try applying Line of Action to your drawing! ^^
4. Practice with Your Eyes and Hands

Drawing pose is not easy.. it's fun and annoying at the same time
I have to admit that i have a lot to learn myself :'D
But i think the key point to learn pose is by "Seeing" and "Practice"
They're both equally important. Eye for Visual Library and Hands for Skills!
You see, our sense will be more sensitive the more we see art with good poses..
and the more we practice it in our drawing

in CSP alone, we can explore a lot of stuff. There are tons of pose references in Clip Studio Assets made by a lot of people!
But well, you don't always have to rely on 3D models all the time
We can also learn from amazing artwork of another artist, or even tutorial
So keep learning and practicing.. and enjoy your time! :D
Closing
There are many amazing artist that can explain more in depth about pose than me..
This is just 4 tips that i wanna share from my experience in drawing with CSP
Still, I hope it can be helpful!
Stay safe and have a nice day! ^^
Users who liked this post


Comment