
NOTICE: This tutorial was made on pc. If you don’t use Clip Studio on pc, then your layout may be different from my own.
If you have ever made an animation, then you know how difficult it can be.
The most common method of animation inside Clip Studio Paint is frame-by-frame.
Frame-by-frame works by creating a series of drawings to play sequentially.
This is not the only method
Clip Studio has another option,
introducing: Keyframes!
Keyframes are a very versatile option. It’s not inherently better than frame-by-frame, but they have their own advantages which makes them worth learning, such as:
- Key frames are easy to use and learn
- They can save a lot of work
- It’s easy to edit mid-project
Most useful is that Keyframes can mesh with Frame-by-frame seamlessly. You could choose to use only 1, or both at the same time.
If this sounds interesting, then this tutorial is for you!
Here, I will teach you how to start with keyframes, and how you can apply keyframes to your own personal works.
Intro to Keyframes
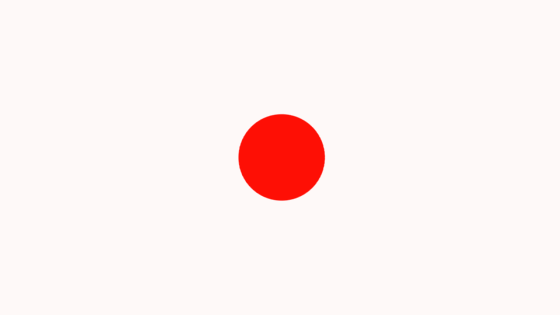
To show you how to use keyframes, I have made this step-by-step guide on how to recreate this red ball using keyframes.

Step 1 - Start by creating a new blank project, then create a new layer and draw a red ball on the left side of the canvas
Step 2 - Create a timeline
Step 3 - Enable keyframes on the red ball’s layer
Step 4 - Find the create keyframe button but don’t press it yet.
Instead, click the box with an arrow sitting next to it.
This will open a dropdown menu. Inside this menu, make sure that it is set to smooth interpolation. You will know it’s done correctly when the create keyframe icon matches the one in the picture above.
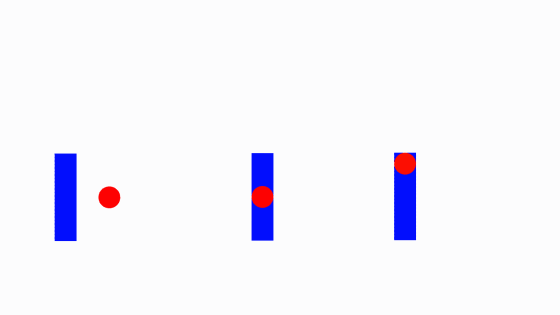
Step 5 - Create the first keyframe at the beginning of the timeline. This will create a diamond shape on the timeline, this is the keyframe.
Step 6 - Move the timeline to about the middle.
Now find the object tool, and use it to drag the red ball to the right.
If done correctly, this will create a second keyframe on the timeline.
Step 7 - Click on the first keyframe. This will highlight the keyframe. Now right click on the same keyframe to open a menu, then select copy.
Now, move to the end of the timeline. Right-click the last frame to open the menu again, and select paste.
If done correctly, you should have 3 keyframes on your timeline.
The animation should now be complete! You should now be able to press play, and it will move right, before moving left again.
How Keyframes Work
To explain what just happened, you need to see a special menu in your object tool.
Select the red ball layer, then select your object tool. Look underneath the tool property of the object tool, and you will see a menu that looks something like the screenshot provided below.
If you do not see the menu under your object tool, make sure you have the ball layer selected. This menu will not appear unless you have the object tool AND a layer with keyframes enabled selected
For simplicity, I have made 2 terms for the Keyframes. Values and Path.
Values are the specific metrics of a layer. From top to bottom on the menu, they are:
X and Y Position (Where is the layer on the canvas?)

Scale Ratio (How big or small the layer is compared to its original size?)

Keep Aspect Ratio (Can the width and height change independently of each other?)

Rotation Angle (Is this layer rotated or at an angle?)

Center of Rotation (Which point does the layer rotate around?)
Layer Opacity (How visible is the layer?)
When a keyframe is made, Clip Studio will lock the Values of the layer. The keyframe will not change unless you change it, and it will be used as a point of reference for Clip Studio’s Path.
A Path is Clip Studio’s calculation between 2 Keyframes.
Clip Studio will compare the Values between the last keyframe it saw and the next one. The Path uses keyframes as a reference, and will actively change the in-betweens it produces with the changes made to the keyframes.
This is how keyframes work:
By changing the Keyframe, we change the Values,
by changing the Values, we change the Path,
by changing the Path, we change the in-betweens,
by changing the in-betweens, we change the animation.
Let’s plug in the red ball as an example.
When we changed the ball, we made it go right.
When we made it go right, we change Clip Studio’s path to go right.
When Clip Studio changes its path to go right, it makes the in-betweens go right.
Keyframe Types
Finally, there are keyframe types.
Next to the create keyframes, there is a menu for keyframe types. These can have a big impact on your animation.
These keyframe types have nothing to do with a layer’s Values.
Instead, they affect how Clip Studio calculates its Paths.
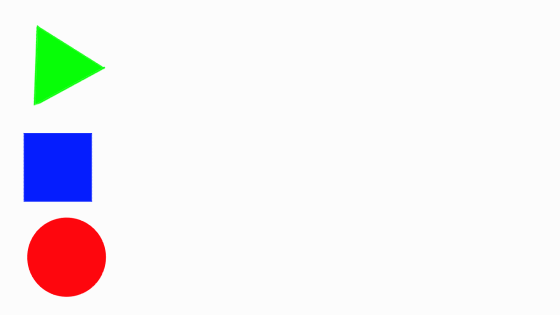
These 3 shapes have the same Keyframes copied and pasted. Which makes them move left to right. The only real difference (Aside from shape and color) is their Types of keyframes.
The triangle used hold interpolation
The square used linear interpolation
The circle used smooth interpolation
Congrats! You now know how to use keyframes.
The next step is to learn how to apply this information.
For this next section, I’ll show you how I apply keyframes in my own projects.
Keyframes for Backgrounds
Every character exists somewhere, which is why we need backgrounds. Backgrounds in art can be difficult to approach, even more so in animation.
On top of your own character to animate, you now have a background to deal with too.
Consider keyframes for the background!
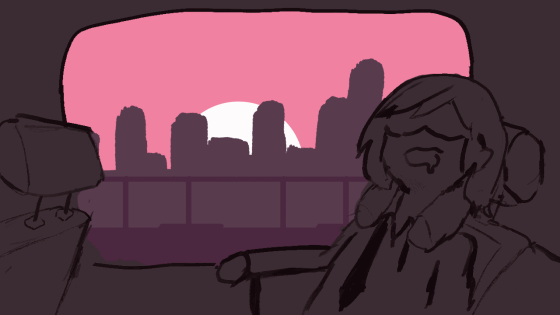
For this example, I have animated a scene of a man sleeping on a train using just keyframes.
This was divided into 4 pieces:
The man and the train
The rails
The shadows of the buildings
The sky
The sky has no keyframes because it doesn’t move.
The rails and buildings use linear keyframes because the train moves at a constant rate (It also makes it easier to loop). For an added layer, I made the rails faster than the buildings because the rails are much closer to the window than the buildings are.
The man and train use linear keyframes to bounce up and down. Linear is clunky, which I find fitting for bumps on a train ride.
Keyframes for Comedy
If you have ever wanted to make a low effort comedic short, keyframes are an exceptional choice.
Below is a YouTube short I animated almost entirely with keyframes.
I intentionally left the man unanimated, because it’s harder to animate him actually walking and I also find it personally amusing to have him slide around like a paper cut-out.
I also animated the text with keyframes. Here, I have them slide about the screen with the cereal, box, and bowl. It gives a weird layer of appeal, while also serving as a strange kind of narration.
The question mark was animated using keyframes on its opacity. I use it here alongside the blinking outline and music cutoff to change the mood. Instead of saying that there is milk, it now asks where is the milk? And thus, begins man’s journey to get milk.
Keyframes for Planning
Here is an example of Keyframes and Frame-by-Frame working together.

This poor sap who fell from the thumbnail was animated with frame-by-frame, and planned using keyframes.

I began with a rough animation by creating all the drawings I need, in this case:
- The girl dropping from the top of the screen
- The impact she makes with the ground
- Her bouncing through the air
- Her second impact with the ground
When I have these drawings, I animate it further with keyframes, using subtle motions to enhance it.
Then, I turn down the opacity of the layer, and animate over the top of it.
Keyframes have a wide variety of uses, so I doubt I listed everything here.
Maybe after reading this, keyframes can find a place in some of your own projects.
or not.
Hope this helps,
Thank you for reading
Users who liked this post


Comment