
muy buenas a todos, aquí vengo con otro tutorial sobre el Lo-Fi usando como bases los modos de combinación y las Acciones Automáticas para obtener una imagen genuina inspirada en algún anime o videos de youtube que se ven similares. sin mas preámbulos comencemos
english version:
Good morning everyone, here I come with another tutorial on Lo-Fi using blend modes and Auto Actions as a basis to get a genuine image inspired by some anime or youtube videos that look similar. without further ado let's begin
1.-añadiremos un fondo solido con un color claro usando la cubeta
english version:
1.- let's add a solid background with a clear color using Bucket
2.- luego dibujaremos alguna cosa que se nos ocurra, en este caso una mano, pero si queremos una textura parecida a la de un lápiz de grafito, usaremos la siguiente herramienta:
english version:
2.- Then we will draw something that comes to mind, in this case a hand, but if we want a texture similar to that of a graphite pencil, we will use the following tool:
¡a hacer lineas!
english version:
let's do lines!
3.- una vez hecho el lineart, debemos colorear la mano de color piel usando la pluma G
english version:
3.- Once the lineart is done, we must color the hand in skin color using "G" pen
4.- lo siguiente es poner sombreado en la imagen de la mano (específicamente una nueva capa entre el lineart y la capa de piel) con la misma pluma G
english version:
4.- the next thing is to put shading on the image of the hand (specifically a new layer between the lineart and the skin layer) with the same G pen
nota: en caso de que te hayas perdido el orden de las capas, aquí hay una demostración:
english version:
note: in case you missed the order of the layers, here is an example:
5.-ya que sabemos el orden de las capas, pondremos otro fondo solido por encima de las demás con el color de preferencia con la herramienta "cubeta" (otra vez)
english version:
5.-since we know the order of the layers, we will put another solid background on top of the others with the color of preference with the "bucket" tool (again)
y el orden de las capas quedaría así
english version:
and the order of the layers would be like this
6.-ahora después de poner el fondo, como en los otros tutoriales usaremos la opción de listado de modos de combinación (el tipo de combinación queda al gusto de la persona principiante)
english version:
6.-now after putting the background, as in the other tutorials we will use the combination modes list option (the type of combination is left to the taste of the beginner)
7.- una vez seleccionado el modo preferido, pondremos una acción automática llamada Uniform Static, los ajustes quedan a decisión del principiante)
esto con el propósito de que tenga una textura un poco pixelada.
english version:
7.- once the preferred mode is selected, we will put an automatic action called Uniform Static, the settings are left to the beginner's decision)
this with the purpose of having a slightly pixelated texture.
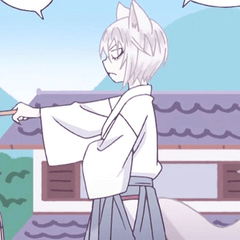
y asi es como queda el resultado:
english version:
and that's the result:
hasta aquí acaba el tutorial lo-fi hecho con clip studio paint , espero que te haya gustado y si es así puedes dar un corazón o un favorito o un comentario, eres libre de leerlo y si te sirvió me alegra.
sígueme en mis redes sociales que puedes encontrar en otros videos de YouTube de tutoriales
hasta luego.
english version:
This is the end of the lo-fi tutorial made with clip studio paint, I hope you liked it and if so you can give a heart or a favorite or a comment, you are free to read it and if it helped you, I am very happy.
follow me on my social networks that you can find in other YouTube videos of tutorials
Bye now.
Users who liked this post


Comment