
very good to all, here I come with another tutorial on the Lo-Fi using as bases the combination modes and the Automatic Actions to obtain a genuine image inspired by some anime or youtube videos that look similar. without further ado let's begin
spanish version:
Good morning everyone, here I come with another tutorial on Lo-Fi using blend modes and Auto Actions as a basis to get a genuine image inspired by some anime or youtube videos that look similar. without further ado let's begin
1.-we will add a solid background with a light color using the bucket
spanish version:
1.- let's add a solid background with a clear color using Bucket
2.- Then we will draw something that comes to mind, in this case a hand, but if we want a texture similar to that of a graphite pencil, we will use the following tool:
spanish version:
2.- Then we will draw something that comes to mind, in this case a hand, but if we want a texture similar to that of a graphite pencil, we will use the following tool:
to make lines!
spanish version:
let's do lines!
3.- once the lineart is done, we must color the hand in skin color using the G pen
spanish version:
3.- Once the lineart is done, we must color the hand in skin color using "G" pen
4.- the next thing is to put shading on the image of the hand (specifically a new layer between the lineart and the skin layer) with the same G pen
spanish version:
4.- the next thing is to put shading on the image of the hand (specifically a new layer between the lineart and the skin layer) with the same G pen
note: in case you missed the layer order, here's a demo:
spanish version:
note: in case you missed the order of the layers, here is an example:
5.-since we know the order of the layers, we will put another solid background on top of the others with the color of preference with the "cuvette" tool (again)
spanish version:
5.-since we know the order of the layers, we will put another solid background on top of the others with the color of preference with the "bucket" tool (again)
and the order of the layers would be like this
spanish version:
and the order of the layers would be like this
6.-now after putting the background, as in the other tutorials we will use the combination modes list option (the type of combination is left to the taste of the beginner)
spanish version:
6.-now after putting the background, as in the other tutorials we will use the combination modes list option (the type of combination is left to the taste of the beginner)
7.- once the preferred mode is selected, we will put an automatic action called Uniform Static, the settings are left to the beginner's decision)
this with the purpose of having a slightly pixelated texture.
spanish version:
7.- once the preferred mode is selected, we will put an automatic action called Uniform Static, the settings are left to the beginner's decision)
this with the purpose of having a slightly pixelated texture.
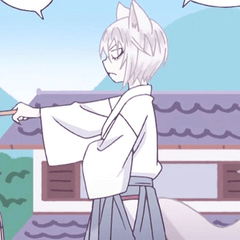
and this is how the result looks:
spanish version:
and that's the result:
This is the end of the lo-fi tutorial made with clip studio paint, I hope you liked it and if so, you can give a heart or a favorite or a comment, you are free to read it and if it helped, I'm glad.
follow me on my social networks that you can find in other YouTube videos of tutorials
Bye now.
spanish version:
This is the end of the lo-fi tutorial made with clip studio paint, I hope you liked it and if so you can give a heart or a favorite or a comment, you are free to read it and if it helped you, I am very happy.
follow me on my social networks that you can find in other YouTube videos of tutorials
Bye now.
Users who liked this post


Comment