
What is Steampunk?
Steampunk is a genre that is present in a lot of media like comics, mangas, cartoons, movies and so on. It reimagines the past with elements of science fiction and sometimes fantasy with technologies powered by steam, clockwork, gears and so on. This leads to the presence of airships, steam-powered machinery, and automatons as well as the involvement of industrialization, creative innovations and unique fashion.
Steampunk usually takes place during the Victorian era or a similar historical period, somewhere during the 19th century. It doesn’t need to be set in the United Kingdom but it is usually the common setting.
Steampunk Elements
There are a lot of elements that are associated with steampunk, it is usually up to the artist’s creative liberty to design whatever they want.
A lot of artists like to take something in our real world or an idea they come up with and incorporate it with steampunk. This is to create something new that is considered under the steampunk genre.
A very common example is incorporating fantasy magic with steampunk. I also used to have ideas about incorporating steampunk with my east asian characters, creating an interesting blend of steampunk and east asian aesthetics.
But, for the sake of this tutorial, we will be going through the common styles that usually found in the Steampunk genre.
⛓Brass/Copper Accents and Different Textures on Metal🎑
Steampunk designs often incorporate brass, copper, and other metals. This is why steampunk designs tend to be warm as there are a lot of hues of yellow, orange, red, and brown, giving a vintage, nostalgic feeling.
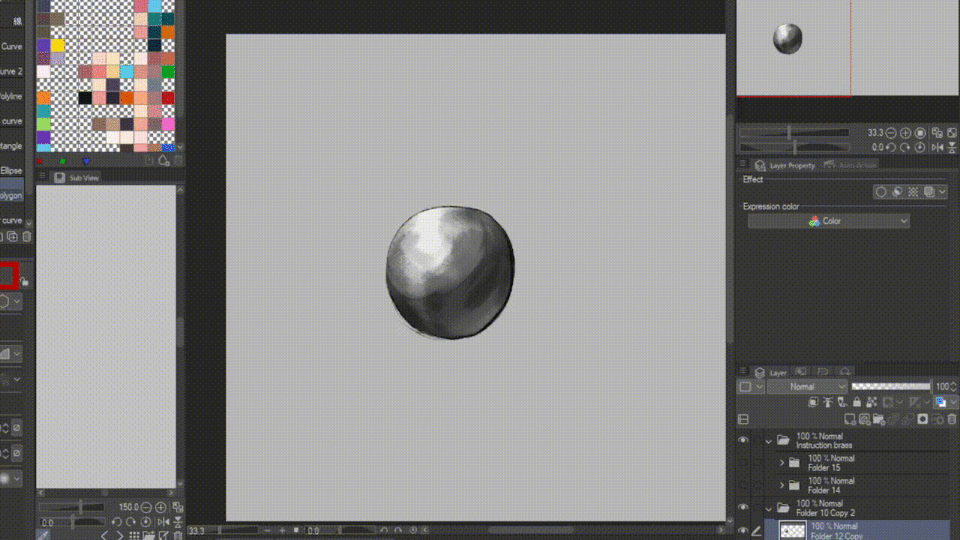
Painting Metal Ball
Let me show you how to color something to look metallic.
The brushes I will be using is the default CSP brushes from Ver.1.10.9.
1. Pick a base color for the brass metal ball. It is advised to pick a shade that is not too saturated, as later on we want to add in lights, which is supposed to be the most saturated part.
2. Use the default Airbrush and pick a darker color for the shadows.
3. To create some reflective effect on the surface of the ball, use the same Airbrush and the same color as the base color, and gently brush over the shadow.
4. Add and clip a new layer on top of your base layer, and set the Blending Mode of the layer to Glow Dodge. Using the default Gouache brush and the same shade as the base color, paint the top part of the ball where light would shine.
5. Add and clip another new layer on top of the Glow Dodge layer, and set the Blending Mode to Multiplayer and Opacity to 77%. Using the same brush and same shade at point 4, paint the intersecting parts of the shadow and the base color.
6. To make it more shiny, add and clip another new Glow Dodge layer on top of other layers. Using Dry Gouache and still using the shade of the base color, paint the lightest part of the ball to create shine.
Paint Metal Ball using Gradient Maps
There is also another quick way to add color and texture very easily, and that is using gradient maps!
These are the gradient maps you can try using, and it is super helpful when it comes to brainstorming the right color scheme. Here are some cool gradient map sets you can play around with:
You can follow the exact steps as before but this time you only need to paint in black and white.
Right-click on your coloring layer > Add Correction Layer > Gradient Map. It will bring up a window for you to pick from a gradient.
If you have not added the gradient set I shared earlier, click on this Spanner icon > Add gradient set. Then another window would appear. You should see your downloaded gradient sets like the right image shown below.
Choose the gradient set you want to add and click Add.
For the gradient, I will be choosing WARM Golden Metals > dark brass.
With the black and white metal ball ready, I can now apply the gradient on top of it and adjust the slider for each color point to my own liking.
See how easy it is!
⚙️Gears, Cogs and Rivets🛞
It can’t be steampunk if you don't have gears, cogs, and clockwork mechanisms. These things are important to showcase how things work in the steampunk world, and how your character would interact with it. Gadgets, vehicles, tools, mechanical limbs and even clothing can have these mechanisms associated with them, so it is intriguing to look at.
Before we jump straight into drawing gears, let's learn a few tools to help you.
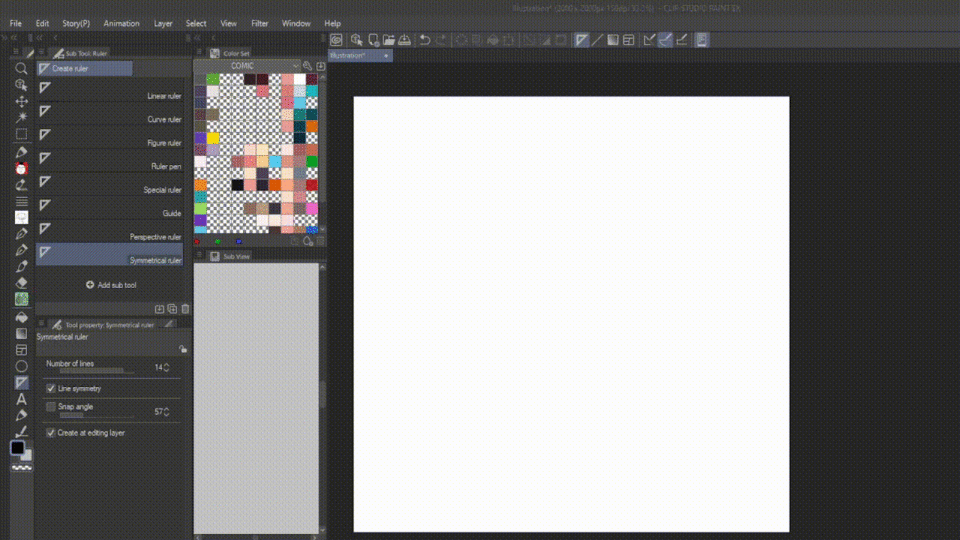
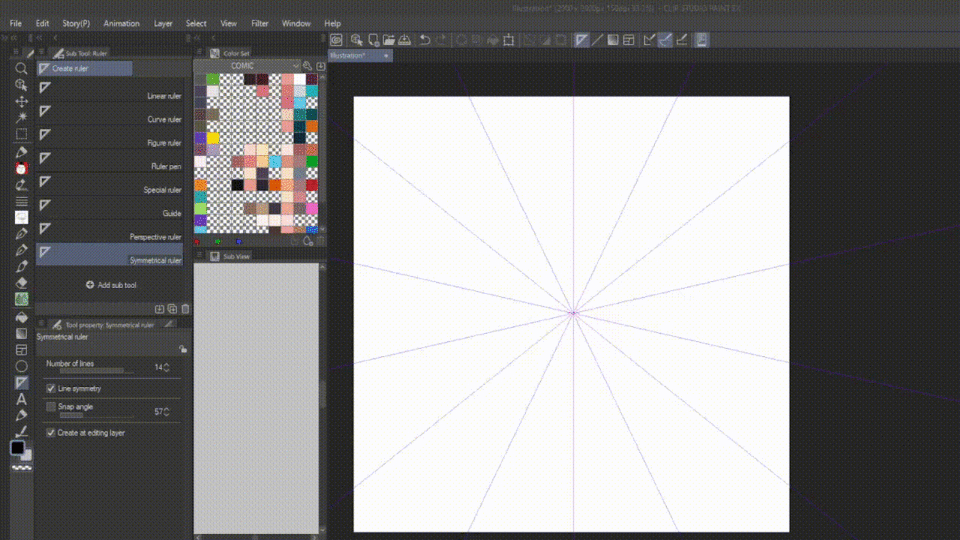
Tools used to draw Gears
Symmetrical Ruler
Use a symmetrical ruler and set the Number of Lines to any even number, the bigger the number the bigger the number of teeth of the gear. Remember to check Line Symmetry.
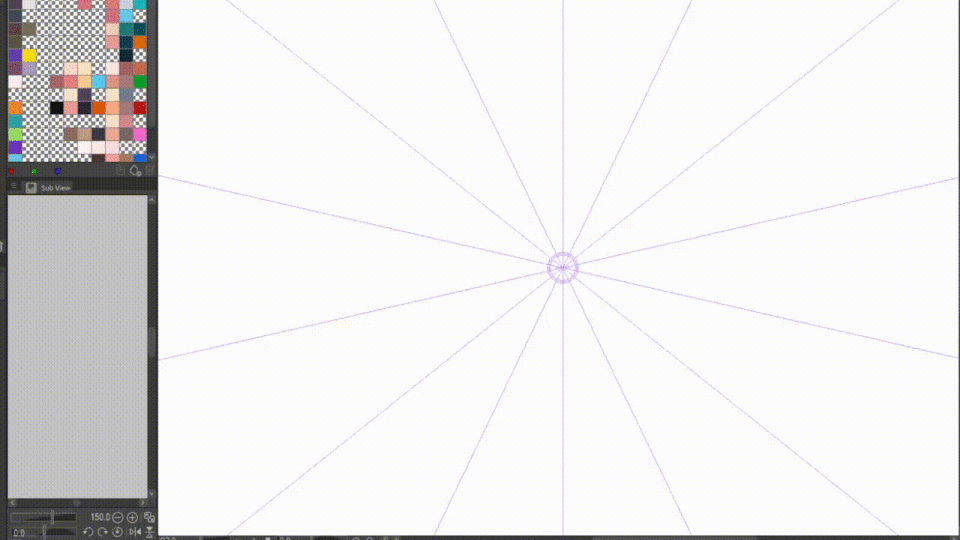
Special Ruler
Use a Special Ruler and set it to Concentric Circle, this is to allow you to draw a perfect circle.
When you have two rulers stacked on each other, it is probably impossible to draw based on the particular ruler you want to follow. For example, if I draw the Symmetrical Ruler first and then the Special Ruler, I am only able to draw a perfect circle for the Special Ruler.
To draw on the Symmetrical Ruler, you can hold down Ctrl on your keyboard, and click on the ruler you want to make “inactive”. When you click on the ruler, there is this tiny white diamond with a blue border that appears beside the center point, click on it to make the ruler inactive. Active rulers are in purple while inactive rulers are in green.
Types of Gears
Spur gears - straight teeth that mesh with the teeth of another gear.
Using the rulers that is demonstrated earlier, here is a simple front-facing gear design I drew.
Using the Transform Tool, adjust it in a way that is viewed from another angle.
Then copy the same gear to the back to create depth.
Since Spur Gears have straight teeth, make sure the corners of the teeth are aligned to each other.
Helical gears - similar to spur gears, but teeth are cut at an angle.
Same as before, the steps are the same as Spur Gear. Though unlike Spur Gear, Helical Gear has its teeth cut at an angle. One way to draw this is by not aligning the teeth when drawing corners to corners, instead, align the teeth off by one tooth. This way you will create this slanted look.
Many of us probably find drawing gears pretty daunting, even if it’s not, it’s exhausting to keep drawing the gear over and over again.
Introducing gear brushes that you can use to speed your drawing process!
You can also use 3D Assets to help you too, I typically would use these two.
Types of Rivets
Rivets are another common motif in steampunk fashion and gadget design.
Solid rivets - A type of mechanical fastener. Each has a solid shaft with a head on one end and headless on the other. The head comes in different shapes and sizes.
They join two materials with each other. In the steampunk setting, you will usually find them on metallic surfaces of machines, gadgets, buildings, vehicles and so on.
Decorative rivets - for aesthetic purposes, come with different designs and finishes. Can be used on clothing to create an interesting overall design. (this will be useful for us when drawing characters later) They sometimes are used to attach buckles and straps too.
Using the same rulers that are used when drawing gears, you will be able to create intricate designs like these.
🎩Victorian Fashion and Aesthetics🪶
There are a lot of elements that come with Victorian fashion, such as shirts, pants, hats and so on. This section will show you the common ones. To make it to have more of the steampunk edge, you can add details like brass buttons, gears and even rivets that we just went through in the previous section.
Upper Body
Upperwear
White button-down shirts - the classic, can be used as a base layer.
1. Contour lines help to define the shape of the shirt.
2. Apply a gap when drawing collars to give a sense of thickness
Victorian blouses - feature high collars, lace trim, and other intricate details
1. High collars that cover around the neck
2. Victorian blouses also like to incorporate ruffles so that the blouse would look elegant
Corset
Corsets are often worn by women above the waist but who is stopping men from wearing them too? (Wink wonk)
The corset gives shape to the body and creates a more interesting silhouette for the person wearing it.
Underbust corset - starts below the chest and down to the hips
Overbust - worn over the bust, and can be worn over clothing or alone as it is.
You can also add interesting details like buckles and belts to give them a steampunk edge.
Corset goes well with full skirts, but it’s also up to you if you want your character to wear trousers too. 😉
Waistcoats
Waistcoats are also very common like corsets, usually worn by men, but again, who is stopping women from wearing them too. (Wink wonk)
Buttons on waistcoats and tailcoats can be either single-breasted or double-breasted
1. Single-breasted waistcoat with only one column of buttons
2. Double-breasted waistcoat with 2 parallel columns of buttons
Steampunk waistcoat comes with different designs than your typical Victorian waistcoats. Just like corsets, you can add buckles, belts, patterns onto your waistcoat to give it the steampunk flair.
Lower Body
Trousers
Trousers are widely worn as part of steampunk Victorian fashion. They are typically designed with details such as stripes and pockets.
Skirts
Skirts are also a common element of steampunk Victorian fashion, they are usually long and flowy. Some of them would come with ruffles too.
Bloomer Pants
A type of loose-fitting pants that are usually gathered the knees. It goes well with high boots.
Overall
A loose-fitting one-piece garment that is worn over ordinary clothes for protection against dirt. This is useful for engineers and mechanics who needs practical wear for their job.
1. Buckle or fastener, to secure the straps with the bib. Can come with different designs and materials, in terms of steampunk, it could be brass, copper, iron or any other metals.
2. Pockets at the side of the pants to give accessibility to items that the wearer tends to need, like screwdrivers, spannar and so on.
Head
Goggles
A classic element to add for a steampunk character, often worn on the head or around the neck. They can be either functional or decorative.
1. The frame of the goggles can be made of any kind of material, such as copper, brass, iron and other kinds of metals.
2. The lens of the goggles can also come in different kind of colors like green, brown, grey, orange or no color at all. Green is a common choice as it complements the warmness of the goggles and they have a warmer color scheme.
You can try reiterate ideas with the designs for the goggles. Experiment it by tweaking the glass design, adding littles details like a small torch light and other functionalities like a magnifying glass.
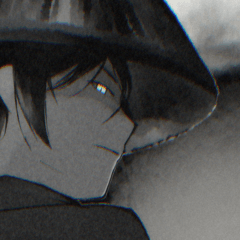
Hats
There are quite a few kinds of hats that are seen in Victorian steampunk fashion.
Top hat - a cylindrical hat with a flat crown and a narrow brim, usually a show of status and wealth
1. Top Crown
2. Crown
3. Brim
4. Underside of the top hat
Adding a bit of a curve at the side the side of the top crown, makes the hate feels more dynamic and less rigid. The brim tends to curved up a bit at the edge.
Bowler hat - a round-crowned hat with a narrow, upturned brim
1. The edge of the crown is rounded
2. A narrow brim
Combining with steampunk-style decoration like gears, chains, belts, buckles, feathers, metals plates, other metal flower decorative ornaments can really help to enhance your steampunk hat design.
Fascinators
Fascinators are decorative headpieces that are worn on the side of the head with a headband or hair clip.
Catering to the steampunk genre, you can add gears, screws, rivets, clocks, feathers, chains, jewels and other steampunk elements.
Feet
Boots
Available from ankle boots to knee-high boots, they are usually made with materials like leather and suede.
Steampunk boots are designed with?? You guessed it, it is the usual elements like gears, belts, buckles, ornaments, straps and other metalwork.
Oxfords
They are kind of lace-up shoes that have a low-cut profile and a closed lacing system
Here are some design examples for steampunk-style Oxfords.
Accessories
Pocketwatch
A small and portable clock that usually comes with a chain and can be kept in pockets or attached to waistcoats. The case of the pocketwatch can be designed with detailed engravings. These engravings can be a symbol of an organization, a family crest or something else special to the owner of the pocket watch.
You can be creative with the pocketwatch design, other than its case, there are quite a variety of ways to create different shapes for the clock hands too, to give it a unique feeling that links back to the steampunk genre.
Play around with curves and edges to create an interesting design.
Locket
A locket is a pendant where the wearer commonly would store a photograph of a person they love.
1. An opening slot for the clasp of the locket to lock on. This is to keep the locket closed securely.
2. A small photograph of the person the wearer cherishes.
Using similar techniques mentioned in the section on drawing gears with the rulers, you can use the Concentric Circle ruler and Symmetrical Ruler to create intricate pattern designs on the locket.
Brooches
Ranging from simple to complicated designs, brooches can be beautiful with the use of well thought-out engravings and incorporation of precious gems and metals.
1. A pin attached at the back of the brooches, to securely place it well on clothing.
In the context of Steampunk, you can add gears and chains, as well as an out-of-world design style to indicate elements of fantasy.
Gloves
Depending on the material used and design, gloves can be used as protection or a fashion statement.
Gloves for protection tend to be made of leather and used as protection by engineers to work with machinery. In contrast, gloves that come with laces and soft fabric serve more as an aesthetic and a touch of elegance and sophistication.
Draw Steampunk Characters
When ideating on design and drawing a character, it can be helpful when you have the character's occupation and role in mind, such as a scholar, a doctor, a maid or an officer.
This is because, given an occupation or role, it helps you to have a clear objective on what your character should look like, as well as conveying your character's nature, personality and other aspects properly. As one said before, a picture can say a thousand words, and this too applies when designing characters.
Common Steampunk Character Archetypes
There are a lot of archetypes available under the steampunk genre, here are some examples to help you have some ideas:
- The Inventor: creative and innovative, full of idealistic ideas and theories they want to make real, passionate about designing and creating useful gadgets, tools and machinery for the people.
- The Mechanic: practical and skilled at what they do, tend to focus on effectiveness and functionalities when repairing, maintaining or developing machinery, gadgets, automatons and so on.
- The Explorer: charming and adventurous, willing to take risks by venturing out into the world of the unknown to find big discoveries, be it a new land, ruins, new materials, treasures and so on.
- The Detective: analytical and observant, they want to make the world a better place by solving crimes and uncovering mysteries in the steampunk society.
There are many more to this list, for this guide we will be going to create the most common archetype: The Inventor
🧑🔬Steampunk Inventor
Let’s come up with a few personality details of our Inventor to put a visual in our minds before designing him!
Personality Traits and Habits:
- Passionate: Can be absorbed by their projects and lose track of time which is why he looks tired all the time.
- Doodling: Likes to sketch out ideas in his notebook
Unique Trait:
- A Mechanical left leg
Backstory:
He broke his leg in an accident and wanted to invent a mechanical leg to help people similar to him
Character Appearance Design
Now that we have an idea, let’s draw out a concept design for this character.
Overall Character Design
1. White shirt with rolled-up sleeves so it’s easy for the character to tinker.
2. Belts around the arms to make the design interesting.
3. A pair of leather gloves with some electronic mechanisms to add a point of interest.
4. A striped single-button waistcoat, with belts as decoratives on top of the shoulders.
5. A notebook strapped on the belt along the waist for easier access.
6. Dark-colored trousers with the left side rolled up for the mechanical leg.
7. A mechanical left leg with pipes and pistons.
8. A pair of oxford shoes to make himself presentable.
9. A worn-out suitcase filled with tools and materials to tinker on the go.
Face and Behavior of Character
Unique Features
1. Tired yet energetic-looking eyes for working too passionately on a project day and night.
2. A monocular goggle with a magnifying glass attached to it for convenience while working on projects.
3. A messy beard and hair indicate this inventor is just too busy building his project.
Illustration
Now that we have the concept down, it’s time to draw an illustration of our inventor. Yay!
Imagine him in his lab during sundown, where the sunlight shines through his windows. He is very tired for the day, so he decided to pack up his things in his old suitcase and prepares to leave the lab.
Sketch
Similar to how photographers use grids to capture a good photo, try to position the important subjects in the intersecting points of the grid.
For example, the inventor is placed inside the 4 intersecting points so that our audiences would know that this is a subject they should focus on.
Lineart
Base Color
The background in mostly in greyscale as we are going to use Gradient Maps, reusing the technique we learnt in the Painting Metal Ball section.
Adding Depth
The grayscale parts are now painted with Gradient Maps on top.
A bit of gradient airbrushing and cell shading are applied to the colors used for the Inventor, this is to give depth instead of one flat look.
Rendering
To make the scene more cohesive, we are applying an overall shadow on the entire piece using Multiply blending mode.
Since the windows are the brightest, they can be excluded from this step.
Using Add Glow and Glow Dodge, use a warm color like yellow, orange and red to add the sunlight coming from the windows.
To give it a more vintage, nostalgic feel, you can add noise by going to Filter > Effect > Retro Film and play with the settings.
And this is the final result!
Conclusion
I hope you find this tutorial helpful for you in creating steampunk characters. Until then, see you next time.
Users who liked this post


Comment