
Introduction
I want to switch from analog to digital, but I don't know how to do it.
I'm currently in the process of switching over, but I'm having trouble.
For people like you, I'll teach you some tips for switching over to digital.
I've also prepared a video, so if you can understand Japanese, please take a look.
Tips for the digital transition
I'll start with the conclusion.
The trick to switching to digital is...
You don't have to go all digital all of a sudden!
You don't have to go all digital all the time!
I'll explain it in detail.
I used to draw manga with analog too.
I started drawing manga at a comic studio in 2011,
and at first I did the inking with analog, and did the finishing work such as filling in, toning, and adding dialogue digitally.
It was more intuitive and easier to do that way.
I continued doing it that way for a while,
and then I went all digital after I bought an LCD tablet.
However, even now, in some cases, I sometimes take the following steps:
sketch with analog → load it into Dropbox → ink it.
Depending on my mood, there are also some parts of analog work.
In the manga industry, the COVID-19 pandemic in 2020 led to work from home, and the number of cases where people who had always drawn analog drawings were switching to digital rapidly increased.
It seems that many places had difficulty in switching to digital at this time,
and it seems that it is difficult to suddenly change your environment.
Even if you are an artist who likes analog work, having a digital environment as an "option" can be a form of insurance in case of an emergency. Some artists who like analog pens do a rough sketch digitally, then print it out and ink it analogically, then scan it to finish it. One Piece's Eiichiro Oda uses analog techniques, but if you watch the video of the cover illustration, you can see that the rough sketch is done digitally. There are also many analog artists who use digital. Each person has their own way of using digital tools. Whether analog or digital, they are just tools and art materials. There is no need to be bound by existing methods. Just draw in the way you like.
Let's try using it little by little
The trick to going digital is to digitize only the parts you like. To do that, you first need to know to some extent what you can do digitally. Crysta has a lot of useful tools, but it's difficult to master them all at once. So first, simplify your work environment and try using only a few tools. The tablet/smartphone version has a simple mode interface with limited functions and display tools. Try this if you're new to digital. As of August 2024, it's not available on the PC version. **
Tools to use
- Pen (shortcut: P)
- Eraser (shortcut: E)
- Fill (shortcut: G)
If you remember these three, you will be able to draw at a minimum level. **
The tools used to finish off your manga, add dialogue, and create frame borders will be
introduced later on.
Let's start drawing manga step by step, starting with the following items.
EX: Shortcut keys
Palm: Drag the screen while holding down Space
Rotate the canvas: Drag the screen while holding down Shift+Space
Zoom in: Click the screen while holding down Ctrl+Space
Zoom out: Click the screen while holding down Alt+Space
Switch between main and sub colors: X
Switch between drawing and transparent colors: C
You'll be able to work more comfortably if you learn these shortcuts, but it's also enough to just remember
- Undo with CtrlZ
- Redo with CtrlY
Finishing the scanned line art
Scan your line drawings with the Dropbox app
Scan your analog line drawings and finish them in Clip Studio.
If you don't have a scanner,
Use the "Scan Documents" feature in the Dropbox app to import images.
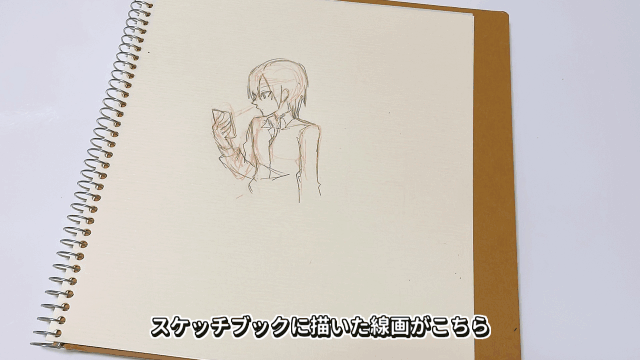
Let's import the line drawing you've done in your sketchbook.
Open the Dropbox app and click the + icon at the bottom.
Select [Scan Document] from the menu that appears.
When you take a photo with this function, it will result in straight, corrected line drawings!
There may be more distortion than if you scanned it with a scanner.
Select the file format [PNG] and press the upload button,
The image will be saved in the selected folder.
Correcting line drawings
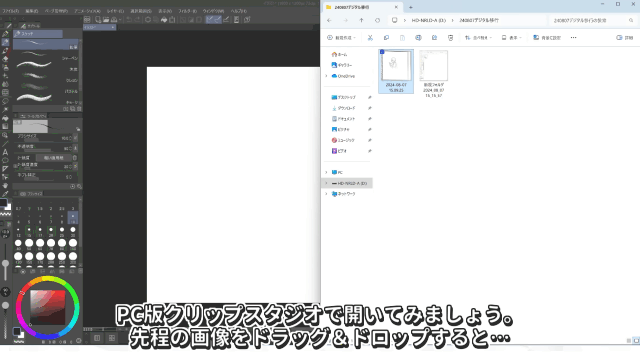
Let's open the image from earlier in the PC version of Clip Studio.
The line art data will open when you drag and drop the image from earlier.
It's difficult to work with a white background, so
extract only the black parts of the line art.
With the line art layer selected,
select [Edit] → [Color Correction] → [Brightness/Contrast].
Make the black and white parts clearer.
Then click [Edit] → [Convert Brightness to Transparency]...
In an instant, only the line art parts remain, and the white background part has disappeared!
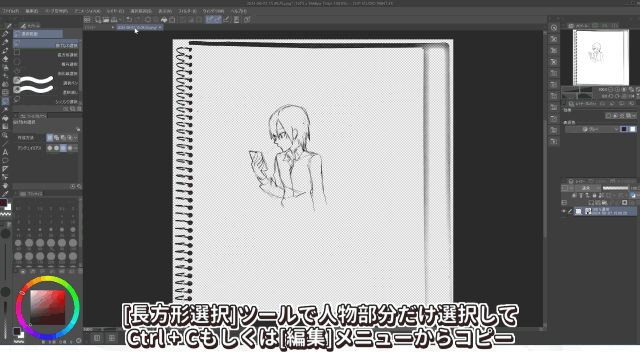
Use the [Rectangular Selection] tool to select only the person,
and copy it using Ctrl+C or from the [Edit] menu.
Paste this line drawing layer into a .clip file,
and start working on it here. **
Change the [Expression Color] in the [Layer Property] palette to monochrome.
Clicking the + sign to the left of the button that says monochrome
will display the settings for converting to binary data.
Adjust the values while looking at the preview to create the appropriate line drawing.
Correct your lines with a pen and eraser
Correct the line art with a pen and eraser.
This time I used line art drawn with a mechanical pencil,
so there is more dirt and stray lines
than with inked line art, and there is a lot to fix.
I drew the frame border lines with the [Rectangle] tool.
Let's finish this off!
Let's paint the solid color
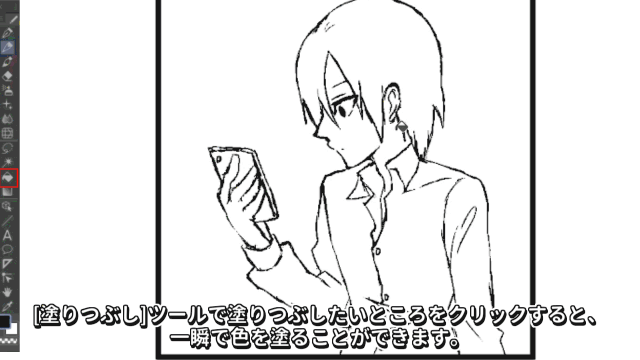
Click on the area you want to fill with the [Fill] tool and you can fill it in instantly.
When using analog, you have to be careful about things like overflow and uneven coloring, but now it's so easy to fill in solid colors!
The top of the head had a broken line, so the fill went over the edge.
If the line is broken, add it with a pen
so that it doesn't go over the edge, then fill it in. **
Then you can finish by adding solid parts with a pen,
or by changing the drawing color to white and adding shine to the hair.
Create a tone layer
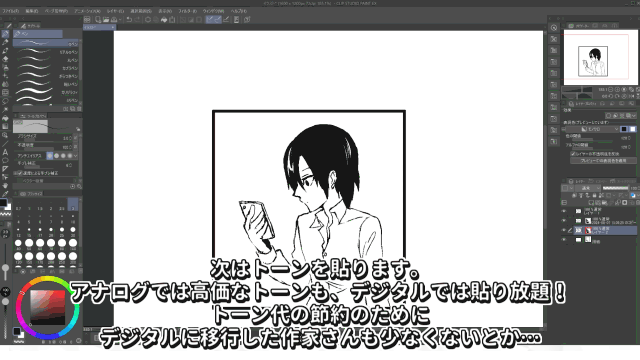
Next, apply a tone.
Tones that are expensive in analog can be applied as much as you want in digital! **
Many artists have switched to digital to save on tones...
Select [Layer] menu → [New Layer] → [Tone],
The [Simple Tone Settings] dialog will be displayed.
You can set the tone type, frequency, and density here.
This time, let's create a tone layer with a density of 10%.
The tone will be applied to the entire canvas, so erase it with BackSpace.
If you use the [Fill] tool with the tone layer selected,
you can apply the tone in an instant! **
It's more like "painting" than "pasting".
You can also add to the tone layer with a pen or erase it with an eraser.
Create a gradient tone from a selection
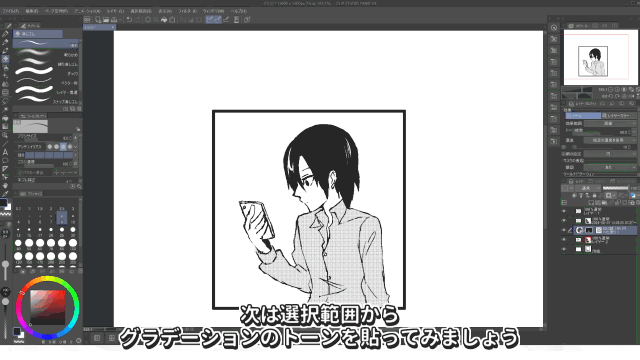
Next, let's apply a gradient tone from the selection.
From the [Auto Select] tool, select the [Reference other layers for selection] subtool, and click on the area where you want to create a selection.
From the [Gradient] tool, select the [Manga gradient] subtool, and drag. A gradient tone with a darker tone at the bottom has been applied.
If you want to adjust the shading of the gradient, use the [Object] tool.
Create tones from the selection launcher
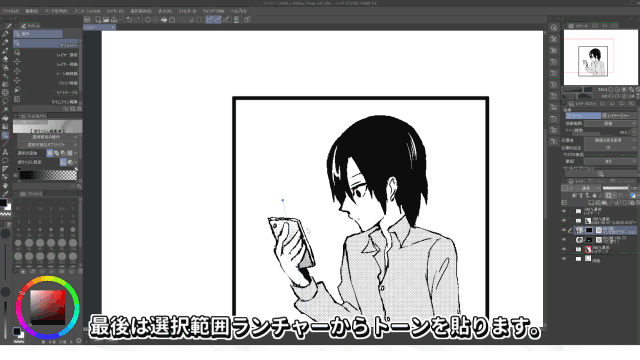
Finally, apply a tone from the selection launcher.
Select the Rectangular Selection tool from Selection and drag the desired area.
This is the selection launcher,
which appears when there is a selection.
Clicking the second icon from the right will display
the [Simple Tone Settings] dialog
and allow you to set the tone in the same way as before.
Clicking OK will apply the tone to the selection.
Solid Tone Completed
The solid colors and tones have given it a manga-like finish.
Good job!
With the knowledge you have gained so far, you can now do the line art, solid colors, and tones digitally.
This article continues, but new knowledge is constantly emerging, so you can continue on another day.
Let's draw a simple three-panel comic
Next, let's try drawing a simple three-panel comic.
Three panels lined up with dialogue and speech bubbles make it look a lot more like a comic.
Creating manuscript paper
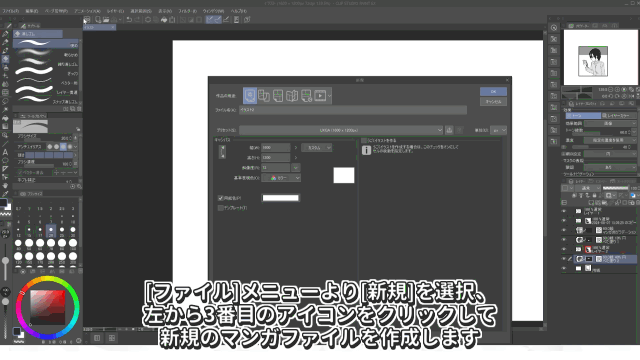
Select [New] from the [File] menu,
and click the third icon from the left
to create a new manga file.
The manuscript size should match the terms and conditions of the destination for manga submissions,
and the terms and conditions of the destination for doujinshi submissions.
This time, we're assuming a doujinshi,
so we'll create a finished size of B5 with a 5mm trim width.
You've created manga manuscript paper.
Let's place the frame borders here.
Placing and editing frame border materials

Clicking on the icon on the left, Material[Manga Material] will expand the material folder.
Various frame templates are registered here.
This time, select a simple three-frame material.
Clicking on the icon in the middle of the palette bar at the bottom of the material palette will allow you to **
paste the material in the center of the canvas.**
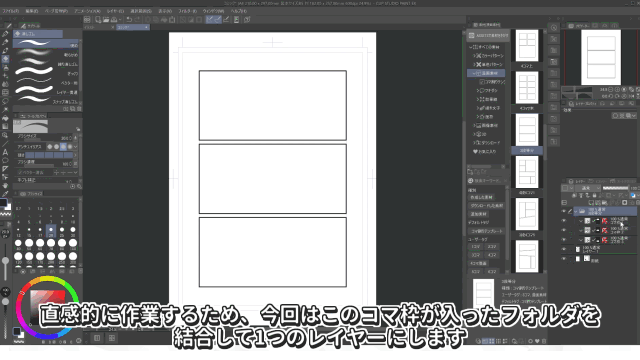
To work intuitively, this time we will combine the folders containing the frame borders
into one layer. **
Right-click on the folder, select [Convert Layer], and click OK.
The frame borders are now one layer. **
Then click outside the frame border and fill it with white.
Now, if you draw on a layer below this layer,
it will not go beyond the frame border. **
Entering and editing text
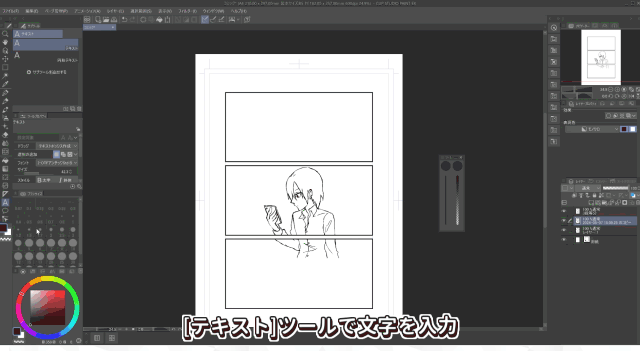
Next, we'll add the dialogue.
Enter text with the [Text] tool. **
After you've finished entering text, you can rotate or resize the text by manipulating the square line (text frame) around the text. **
The character ratio is strange because [Fix aspect ratio] was not checked.
Change the settings in the tool properties,
and drag the text frame again to change the text size.
If you want to re-enter the text, select the [Text] tool and click inside the text frame to edit it. **
You can move the position of the text with [Move Layer].
You've entered text!
EX: [Text] tool and [Object] tool
To enter text, use the [Text] tool.
To change the settings of the text layer after entering text, use the [Object] tool in [Operation].
Use the [Object] tool if you want to change the font of the text you entered or if you want to change the text direction.
Creating a speech bubble
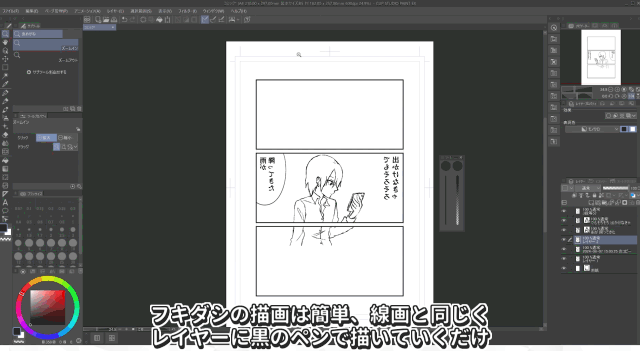
Drawing speech bubbles is easy! Just like with line art, draw on a layer with a black pen,
and erase any unnecessary parts with the eraser.
Next, paint the background of the speech bubble with white.
Select [Reference other layers] from [Auto select] and click on the inside of the speech bubble.
If you want to create multiple selections,
set [Creation method] in [Tool properties] to [Additional selection].
This will allow you to select multiple areas across locations.
Once you've finished selecting, create a layer for the base and
fill the selection with white.
Press + CtrlD to cancel the selection and select a layer below the base,
and you'll be able to draw a line below the speech bubble!
You can also draw a square speech bubble with the [Rectangle] tool in [Straight line drawing].
Create background frames using image materials
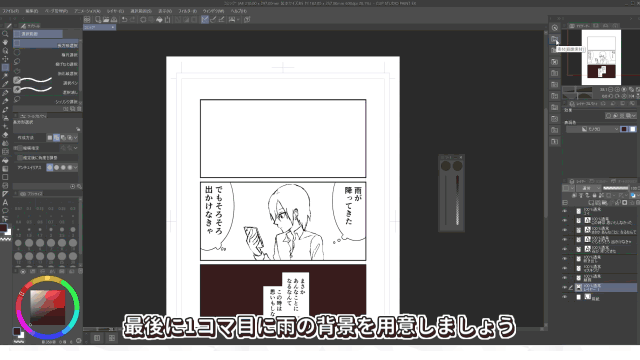
Let's prepare a rainy background for the first frame.
Click Materials[Background] to expand the material palette and find rainy image material.
If a cloud-like icon is displayed in the upper right
It is in a "not downloaded" state.
Pasting the material to the canvas will start the download,
and you will be able to use it once it's completed.
You can paste the material onto the canvas by dragging and dropping it.
If you paste a material onto the canvas with a selection,
the image material will only be displayed within the selection,
so this will make the rain image only appear in the first frame.
Drag the light blue frame to adjust the size,
and your rainy background frame is complete!
Let's draw handwritten characters
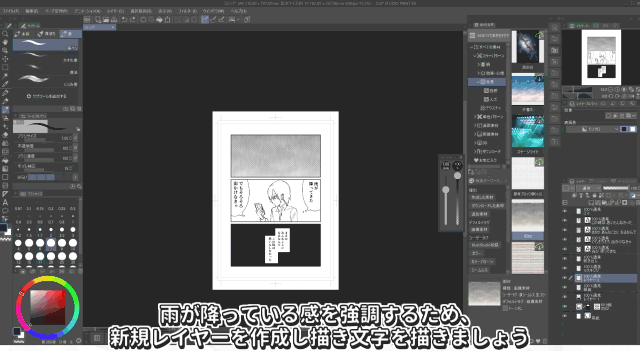
To emphasize the feeling of it raining,
create a new layer and draw some handwritten letters.
Select [Brush] from the tool palette,
and draw as you would with a pen.
If you wanted to add a border to handwritten letters by hand,
you would have to trace around it with white, but...
With Clip Studio Paint, it only takes a few clicks.
Select [Border Effect] from [Effects] in [Layer Properties],
and click [Border].
You can create borders of any color and thickness you like!
By using borders, you can easily create elaborate lettering. Here, a white border is layered over a black border.
Summary of this item
Thank you for your hard work! In this section,
Using frame border materials
Adding dialogue and creating speech bubbles
Using image materials
Creating handwritten characters
You can now do so much.
These are all functions that take advantage of the strengths of digital.
Learn them bit by bit and try to make use of them little by little!
Try splitting the frame yourself
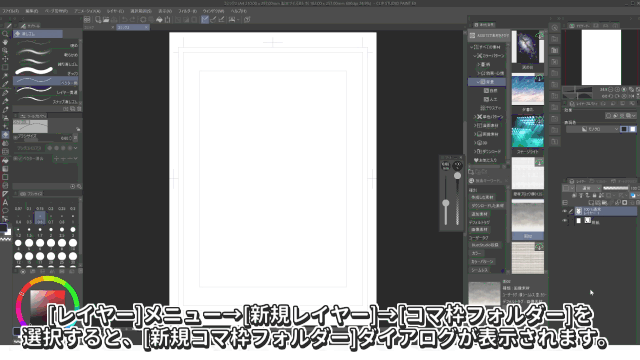
Creating a frame border folder
Taking it a step further, try dividing frames freely using the Frame Border Tool.
Once you can do this, it's no exaggeration to say that you'll be able to draw manga freely!
Select the [Layer] menu → [New Layer] → [Frame Border Folder]
to display the [New Frame Border Folder] dialog.
Set the border thickness etc. and press OK,
A frame border folder will be created on the canvas.
If you want to change the border thickness later,
select the [Object] tool and change the [Brush Size] value in [Tool Properties].
Dividing a frame
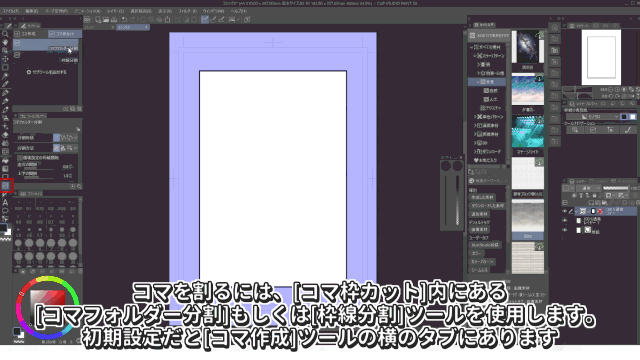
To split a frame, use the [Frame Folder Split] or [Frame Split] tools in [Frame Border Cut]. **
By default, it is in the tab next to the **[Frame Creation] tool.
Drag hard to split the frame in any direction!
The space between the frames is narrow, so let's change the settings.
As the number of folders increases, it becomes difficult to work intuitively,
This time, we will split the frame with [Frame Split] and proceed with the work with one frame border layer.
Change the values for the horizontal and vertical spacing in the **[Frame Split] tool properties.
Many manga seem to have a larger vertical spacing than horizontal.
Even after splitting the frame, you can move or transform it with the object tool. **
Creating independent frames
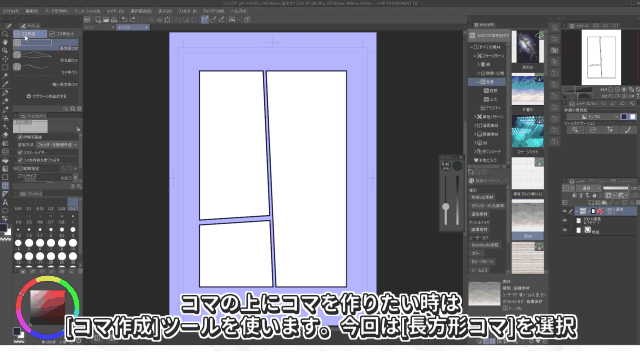
If you want to create a frame on top of another frame, use the [Create Frame] tool.
This time, select [Rectangular Frame].
By dragging, you can create a frame border folder of any shape.
The border line was thin, so change its thickness with the [Object] tool.
Move the position of the frame with [Move Layer].
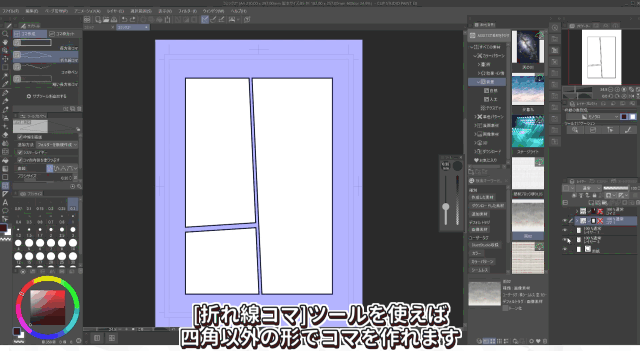
The [Broken line frame] tool lets you create frames in shapes other than squares.
The [Frame border pen] tool lets you literally draw frames of any shape you like with a pen.
Frame Folder
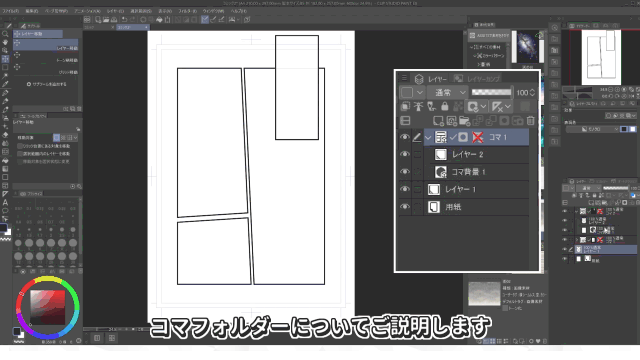
Let me explain about frame folders.
Click the triangle to the left of a layer folder to open or close it.
If you create a layer in this folder and draw on it,
it will not go beyond the frame borders.
Whether you create a frame border folder for each frame or just use one layer is up to you.
Summary of this item
Create a frame border folder from [Layer]
Divide frames with [Cut Frame Border]
Edit frames with [Object]
Create your own frame with [Create Frame]
You can now do all of the above.
Now you can create frame borders freely! Good work!
EX: Use templates
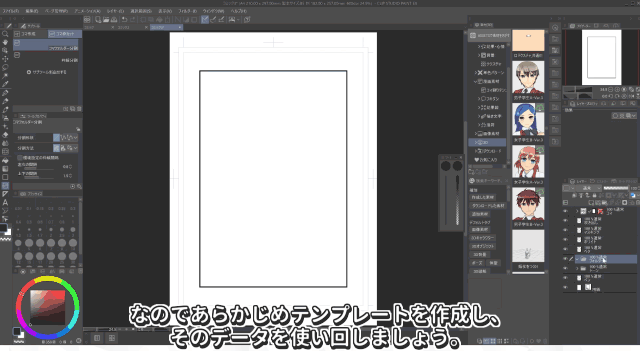
If you want to work efficiently, be sure to read this.
It's a pain to create all the layers needed to draw manga every time.
So create a template in advance and reuse that data. **Save a file with all the layers you need,
duplicate it and reuse it.
It's easier than making lots of layers every time!
If you don't know how to make them yourself,
I've also distributed materials I've created on CLIP STUDIO ASSETS,
so give it a try.
summary
Start with a partial transition
Work digitally only on the parts you like
Learn the tools you use little by little
These are the "tips for transitioning to digital". What did you think?
There was quite a lot of content, so
try out what you can do little by little.
I hope your creative endeavors are fruitful!
Users who liked this post


Comment