Turn your Illustration into Animation in Clip Studio PAINT
Hello! In this TIP called Turn your Illustration into 2D Animation in Clip Studio PAINT you will be able to learn in a simple and step-by-step way how to animate your illustrations in Clip Studio PAINT.
Whether you have the PRO or EX version, this tutorial is for you, since we will only animate in 24 frames.
What we are going to do:
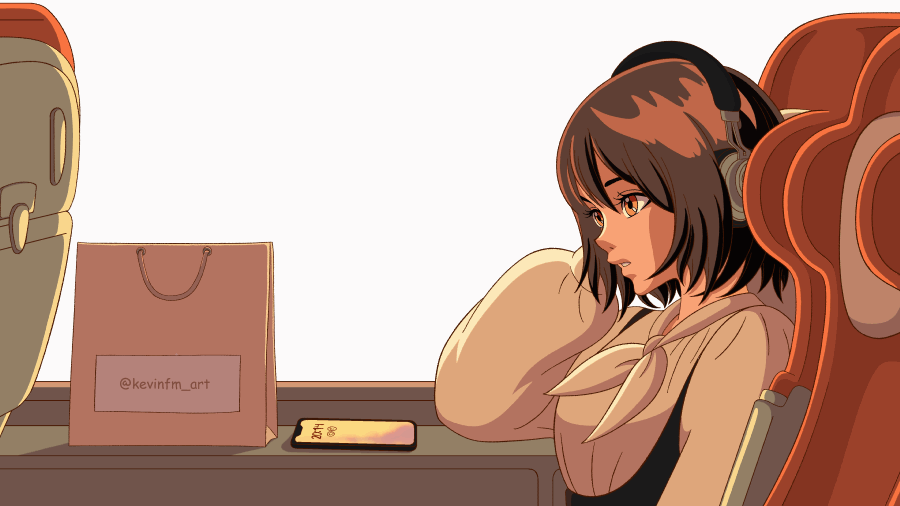
We will start with this Illustration
To transform it into this Animation

As you can see, it's easy to do, especially if you want to start in the world of 2D animation. This can be a good start :)
Then I invite you to see the following:
Your Illustration in 2D Animation in Clip Studio PAINT (TUTORIAL)
Remember to activate the subtitles in your language, you will surely find it :)
What did you think of the video?
As you could see, it was very easy to turn an illustration into an animation. This was just an example, but you can add more things.
Step by step tutorial
Now I want us to see the step by step through images.
1. Duplicate the project
We are going to duplicate the original illustration file. To do this, go to File, Save Duplicate. And choose .clip (CLIP STUDIO FORMAT file)…
We change the name and save it.
2. Timeline
We open the duplicate Animation project in File - Open.
Let's go to Window, Timeline.
And we're going to create a new timeline.
With the following features:
- Frame rate: 8
- Playback time: 24
Thus, both Clip Studio PAINT PRO and EX users will be able to follow the step by step :)
3. Eye animation
We deactivate the light and shadow layers, the reflection and the background.
We select the scene layer and activate Change layer color.
To be able to draw on the illustration.
In the timeline we create a new animation folder.
Inside the new animation folder we create a new layers folder.
And inside the layers folder we create the following layers:
ColorLine(Caparasterized)
Line(Vectorial layer)
Lights(Caparasterized)
Shading(Caparasterized)
Color(Caparasterized)
Now in the timeline we activate Assign cel to frame.
And we select drawing 1 and click Ok.
We select the pen tool to draw
At Subherramienta we choose Real G Nib or any other one you want.
And we draw only the open eyes.
Let's go to frame 9 and create a new animation cel.
We activate the onion skin to see the previous drawing.
And we draw the closed eyes
Now we go to frame 12 to create a new animation frame
And in frame 13 we activate Assign cell to frame
We select drawing 1
We go back to frame 12 and draw the eyes almost open.
We move the drawing from frame 9 to frame 10
It is also important to move the eyebrows in the Animation, we do this with the Operation tool, we take the strokes and move them.
Remember that it is important to have made the eye line in a vector layer, so we can move the strokes independently.
And so we get the following animation:

4. Subview
Now we go to Window, Subview.
We activate the dropper in this new panel
And in the folder icon we select the initial project, that is, the original illustration.
And we can see our illustration in the Subview panel, this will be very useful for what we are going to do next.
5. Eye Animation Color
We return to the layers panel and select the Color and Shadow layers, since in these layers we are going to paint the animation of the eyes.
We activate the Subview panel and we will select the colors from the original illustration to paint the animated eyes.
We can paint the animation of the eyes with the pen tool.
We are going to do this with each of the drawings, achieving the following result.

Don't forget to remove the eye lines from the fixed drawing, as you will also need to paint over some areas to avoid any mistakes.
This way, once you make the eye animation visible again, it will look fine.
As you can see below:
6. Background Animation
We activate the background layer since now it is what we will concentrate on to animate.
We select it with the operation tool and we can see that it is a horizontally infinite background, which is perfect for this animation.
This background comes by default in Clip Studio PAINT, so we can use it without any problems :)
To animate the background we select the folder where we have our background and in the timeline we activate: Activate Keyframes on this layer.
In frame 1 we activate the option: Add Keyframe.
And on frame 24 we move the background to the right, remember that you must do this with the operation tool.
Here we have to try to have the background in the same place as in frame 1.
A technique that I use is to extend the background animation, that is, until frame 25, so we move the last keyframe to this new frame to achieve a perfect animated cycle :)
Achieving the following result:

7. Phone reflection animation
We go to the layers panel, select the background layer, and right-click and activate Duplicate layer.
We position this duplicated layer below the girl scene and rename it. And we create a new layer and we can put the duplicated background animation inside this new layer folder.
Inside the scene folder, where the drawing of the girl and the elements are, we are going to deactivate the phone screen, leaving it empty.
We select the folder where the duplicate background animation is and in the timeline we activate Activate Keyframes on this layer.
And what we do is simply move this background down, so that the clouds are visible in the reflection of the phone, remember that we will always move the layers with the operation tool.
We lower the opacity of this folder so that the reflection looks more realistic.
Now we create a new layer folder above the duplicate animated background, we put the animation inside this new folder that we will call: Mask.
Now with the Auto Selection tool, we select the area of the phone screen.
And in the layers panel, we select the new layer folder called Mask and activate: Create layer mask.
This way we get the new duplicated live background to be visible only on the phone's mirroring.

8. Animation of the lights
We make all the layers of our project visible, to focus on the lights of the scene. To do this, we select the layer where we have the lights and shadows.
We select the lights layer and put it outside the folder, since we are going to do something with the lights separately.
In the timeline we create a new animation folder.
We change the name of the animation folder to Lights, and we put the light layer inside this animation folder, we do all this in the layers panel.
We go to the timeline and activate Assign cel to frame, and select the light layer.
In the layers panel we select the light layer
Activate: Activate Keyframes in this layer
In the timeline we will learn about a tool that I have never taught, but this is a good opportunity, it is the Graph Editor.
The timeline changes and we select Opacity.
In frame 1 we add a Keyframe.
We also do it in frame 24
And finally on frame 12.
And we take the Keyframe of frame 12 lowering it just a little and in the scene you can see that the light tends to look less, it will be a subtle animation of the lights but it will help add more realism to our animation.
Achieving the following result:

9. Details
Let's go to the scene folder, select the line layer and I'm going to delete the time and the elements of the phone screen.
Why do I do this? Because if it's going to be an animation cycle and the illustration always shows the same time, it won't show that the animation is taking place in time.
Using the Selection Area tool, we select the elements and delete them.
10. Exporting the Animation
Go to File, Export Animation, Movie.
We can export either as a movie or as an animated .gif.
We can change the name
The size
And we wait for our animation to be exported
11. Final Animation

This is the animation we made in this TIP, we went from an illustration to an animation, try doing this with your illustrations, you will realize that the world of animation is fascinating!
See you in the next TIP!





Comment