
How To Create Pop-Anime Style Illustration
Create an illustration with cutesy pop color style, quit your comfort zone while having fun!
Getting tired for repeating a same rendering process while making art? Getting bored with the muted color scheme? Sketching a proper composition and human proportion begin to bald your head?
All you need is only a simple refreshment in creating an illustration! Maybe let’s try make something that is rather … vivid and radiates fun? ╯︿╰ ) …
First of all, let’s understand what “Pop” in art means and how it connects to specific color and pattern use!
The word “pop” in art begins when Pop Art (also known as neo-realism) invented in British art form in mid 1950s. The “pop” word itself come from “popular” word, which the arts theirselves represents popular culture. The main characteristics and goal of “Pop Art” is pursuing popular interest by showing uniqueness and novelty in design. One of the strongest element of Pop Art is the strong use of color.
The Pop Art invention has bring a new perspective of seeing colors in art, as it shown until today. Pop Art, especially its color, finds its way to influence art style even until today. The strong, contrast, vivid use of color, solid strokes of lines and colors, and solid patterns are still found in how people creating art these days.
The unique way of coloring and how the colors are combined but still pleased your eyes are something that might interest people to create illustration that are inspired by Pop Art. But, where should we begin?
I’ll share my process of creating a cutesy pop-anime style illustration along with pop colors step by step. Before we start, here are some tools you need to prepare in order to make a sparkling pop-anime style illustration:
☆ A solid brush for lineart for lineart
☆ A solid brush for coloring
☆ Several types of screentone brush
Here’s assets that I use for making this illustration, but you can pick them yourselves based on your preferences! The assets linked below are also in order for lineart, base color, and pattern usage.
Let’s begin the process! Like I mentioned earlier, we want to make the process fun! Let’s quit our comfort zone by creating something in pop, vivid color. Before that, there are some important tips when you create a pop-anime style illustration so that your illustration will be more appealing and sparkling.
A. Body Proportion
To create a cute pop-anime style illustration, the first thing to think is about the body proportions. The main keyword of aiming the cute pop style are to have fun, so you don’t need to make a sketch based on proper body proportion.
If you interpret popular culture is by showing stylized proportions, then you should do so! Let’s make a cute-stylized body proportion for your character!
You can simply make the character to look shrink a.k.a smaller from the usual proper body proportion. To maximize the silhouette look, you can put some extra size to fill the doll-like silhouette at some area, like head, hands, and their feet. But please note that this process should not limit your style preferences! This process want to help you have fun, so create your own stylized proportion as much as you like.
This process is also similar to creating chibi, but with some stylized parts up to your likings. Chibi styles are also different among artists, so don’t worry about make differences!
This process not only to cutify your artstyle, but also help to maintain a proper shape language when you begin lineart-ing.
What is shape language and how is it going to help creating your illustration? Let’s get going to the next step!
B. Creating Fluid Poses
We reach the first step, that is sketch the whole pose for your character! Adding fluid and flexible pose will add more dynamic in your pop-anime style illustration. You can use perspective tool as help, or simply sketch it as you imagined it.
In this drawing of mine, I tried to use bird-eye view with hint of fish-eye lense pose for the character. This way, the drawing looks so much fun and dynamic with different size proportions of the hand on top of the head and the small pumps at the bottom. The character’s focus area such as head, hand, and torso would be highlighted more than making it with human-eye’s perspective. However, perspective is not only way to make the pose look dynamic! You can customize and experiment with the pose and view as well!
C. Line and Shape Language
Not only coloring, lineart-ing is also an important process in making a pop-anime style illustration. To maintain a high contrast between colors in pop style illustration, you need to make a firm and solid-looking lines. Strengthen the shape language is also important so your illustration would looks much more vivid and bold.
I also mentioned earlier it’s better to use a solid, thick, opaque brush style to maintain a bold line and create a contrast between the colors and objects. I personally use a slightly softer brush in case hard brush might be too hard to use for some artists. As long you aim a different result and different technique from your usual style but also having fun, it should be no problem!
If you look closely, the lines here are sharp and zigzag-ish. The shapes will be much more clear and consistent if you focus on shape language while making your lineart. Controlling pen pressure and thickness in several area are also important! I usually thicken the lines in several areas such as outer lineart, line curves, and where I want to emphasize the object differences depth and position. In this case, you can see how I lineart-ed the outer line of the tee thicker than the cartoon mascot on the tee. I also tried to create thickest lines at the outer areas, as seen on the character’s hair lineart.
In making the lineart, I draw quick straight lines and create some zigzag-ish lines along the object shape.
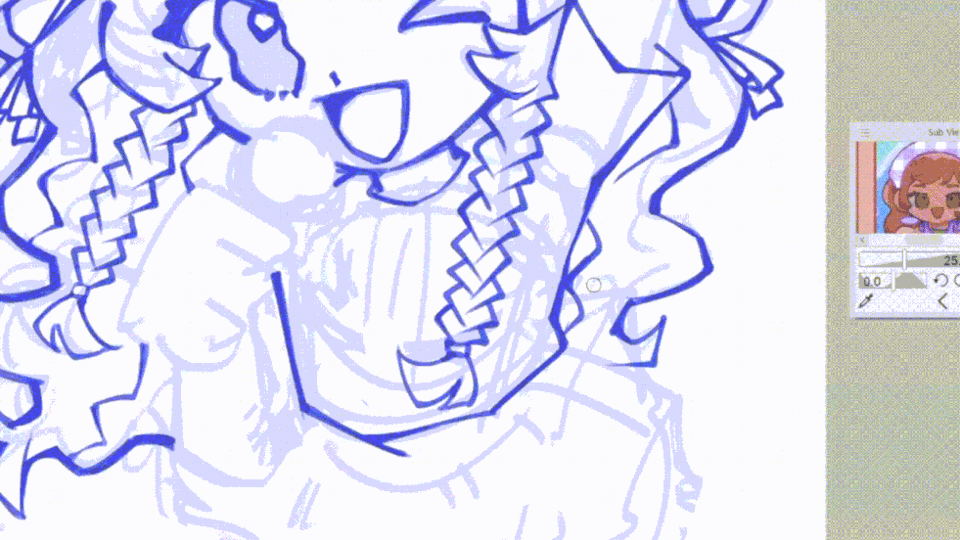
Above is a little demonstration of how I did the lineart. I usually do some rough painting or a very fluid and stable lines, so doing it out of your comfort method is pretty fun!
Try use some deep-saturated colors for your lineart so they still give a proper contrast in your illustration. You can pick colors from middle right to bottom right area in your square digital palette. Try use color that are familiar to your soon-to-be “pop” palette too!
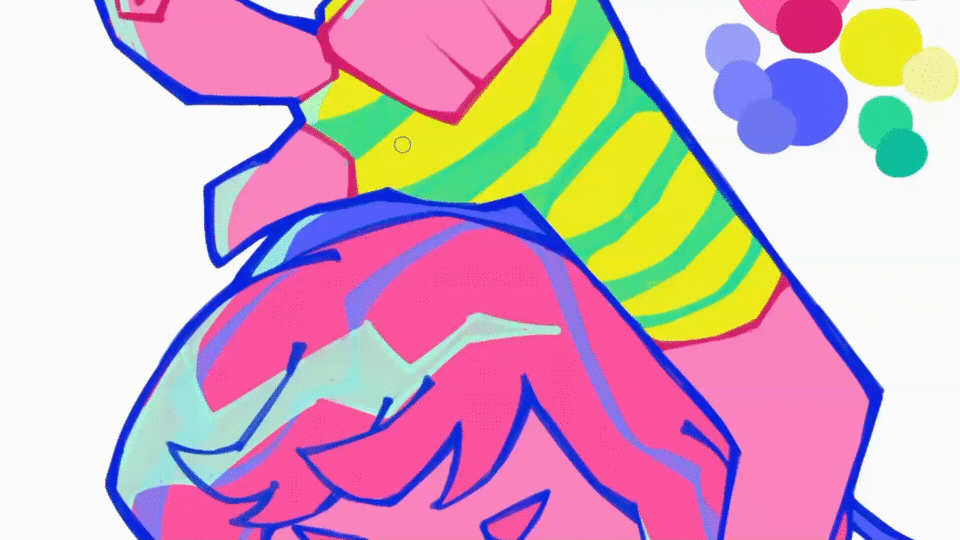
D. Creating a Pop Color Scheme
Before heading to decide what color to add to your illustration, let’s study some color theory bits! Adding “pop” color in your illustration not as simple as choosing the saturated and bright colors. You need to know what colors are identified as the “saturated”, “bright”, and many more, and how you combine them. Let’s check the images below!
Learn Basic Color Theory!
Here’s a little explanation about each color theory, from left to right!
1. Monochromatic is coloring method using a hue with their tints and shades. Tints refer to how the color mixed with white (brighter), while shade refers to how colors mixed with black (deeper).
2. Analogous are hue that shares common color side-by-side, like on the example above, let’s call it simply as blue, purplish blue, and a purple.
3. Complementary are colors that placed exactly face each other at a color wheel. They create optimal color contrast to each other, like example on the image above, yellow and purple.
4. Split Complementary refers to color that each side-by-side by the complementary color. In this case, purple that yellow’s complementary color replaced by fuschia (red-ish purple) and violet (blue-ish purple).
After looking at this color combination by order, the color variation are somehow get more rich. By understanding the basic above, you might start to understand how to get colors that look good together and how to find the right hue.
Yellow and purple combination creates a great contrast. In order to get a pop color, we would like to have some contrast color with good color combination. In this case, we can experiment with the complementary, split complementary, and using analogous color as option for getting deeper and brighter color combinations.
For example, to get a truly “pop” color, you might want use yellow and purple with fuschia shade as the darker color for purple instead of purple shade. Not only get complementary colors, you also get some analogous shading to create more rich color combinations.
Next one is triangular and rectangle shape color composition, from left to right:
5. Primary Colors refers to the main basic colors that are resulted to have more hue in between each colors. We can call it as the starter colors, as we also use them to mix each other to create new hues when we make traditional artwork.
6. Secondary Colors are the exact color in between each primary colors, such as orange as the result of red and yellow mixed, green as the result of yellow and blue mixed, and purple as the result of red and blue mixed. Even though the chart aren’t visible above, you can see the exact upside down triangle on primary colors have these secondary colors in their place.
7. Double Complementary / Square shows two pairs of complementary colors, forming a shape of square. As seen on the example above, yellow-green is the complementary color of fuschia and orange is the complementary color of blue in order to create reach colors combination.
8. Double Split Complementary / Rectangle shows in-between/split complementary of 2 colors, forming a rectangle shape. The example above shows how yellow and purple that are complementary colors forms double split complementary by the combination of the split colors that clamp these colors, which is violet and fuschia for purple; mustard and yellow-green for yellow.
These color combinations above are the examples for optimal rich color combination that you could use as the reference for combining “pop” colors.
Next one is the famous, warm and cool tone colors!
9. Warm Tone are collection of colors that are creating the higher temperature in color scheme, such as red, orange, yellow, brown, and yellow-green.
10. On the other side, Cool Tone are the opposite collection of colors that creating a lower temperature in color scheme, such as blue, purple, violet, and teal.
Both tones aren’t strongly indicate a strong “pop” colors, but it’s important to have a balance temperature when you combine both tone for making a “pop” color palette. Pop colors are usually something in between and rather have balance using of these 2 sides.
And last but not least, the saturation family to optimize your understanding when choosing colors!
11. Saturated Colors, the middle one, are color combination that are chosen from the upper-right colors area in your square digital palette. These colors are usually creates huge contrast and popped out more than the rest area of the palette.
12. The left one, Desaturated Colors, refers to color collection that usually placed at the bottom-left area of your square digital palette. These colors are usually look deep and tend to muted.
13. Desaturated Colors that are shown on the right side, are the brightest, pale, and least contrast colors collection. They usually placed on the top move to the left side closer to white on your square digital palette. Desaturated colors are also familiar with the term “pastel colors”.
By understanding the difference of color saturation, you would understand what’s best use in order to create “pop” color palette. Pop colors are looks best with saturated colors, but you can use different tint and shades as well slightly so your illustration would still fun to see, rather to confuse your vision when you see combination of colors.
Conclusion of The "Pop" Color Study
After learning some basic color theory, you can decide what’s best on resulting a proper “pop” color palette. To get pop color, each color should complement and contrast to each other, include balance primary and/or secondary colors and/or with the splits, have rather balance temperature, and tend to be saturated as well. By consider these points, you can started creating your own palette.
In my own illustration, I decided to use colors that are close-but-not-directly primary colors. I choose fuschia-pink hue that are not as strong as red and blue with a little hint of purple with saturated yellow as well. These colors are contrast to each other and has balance temperature between warm (yellow and pink) and cool (blue and deep teal as accent) as well. These colors use are also similar to double split complementary colors, which also create optimal contrast and color combination.
It is also important to controlling the amount of each colors you used and their derivatives. The good balanced color combinations are not the ones that used each color with even amount. Even amount of many colors in 1 subject will only make people who sees it confused by processing too many different colors. You can sort which color is used as the primary, secondary, and the accent color instead. In this illustration, I use the fuschia-pink hue as the dominant primary color, both yellow and blue as the secondary sub-color, and teal green as the accent.
You can use any bucket tool or solid hard brush for filling the base color. Make sure the base colors cover full area of your character illustration so the clipping layers above it will work perfectly.
Don’t forget to put the color layer below the lineart layer!
E. Rendering Your Illustration
These steps will be focused on how to make your character’s illustration in pop-anime style are more appealing. All steps in these section are using different layers that each are clipped to the color layer with lineart layer on the uppest position, so everything stay inside and below the lineart layer.
1. Adding Pattern
After deciding the colors for my illustration, I added some patterns to the character’s clothes. However, it’s not “pop” if the decorations are not maximized! Just make sure don’t overdo it so your illustration would still have some appealing point.
I make the pattern with a layer above the base color, so in case there are changes, it won’t damage the color layer. The layer is also clipped with the color layor below it, so there won’t be any messy colors. As always, the lineart layer are on the most top between all layers while we still focus on rendering the characters only.
The patterns are also made by following the line and shape language, so the patterns will support the overall shape as well.
2. Multiply Shading
Shading is important to make the value in your illustration visible. In this illustration creating process, I choose the simplest and easy shading method by cell-shading with deep fuschia color and multiply blending mode. I put the shading layer on the top of the pattern layer with 60% opacity, and of course, this layer also clipped with the color layer. The details are shown below!
Just like the lineart and pattern, it’s important to keep the sharp-ish shape language! However, lines and cell-shade shapes have different method, so I make them in triangular and rectangular shape like. Here’s a little demonstration on how I did the cell shades.
3. Lighting
As important as the shading part, lighting will help make your illustration more appealing. The shape language works like both shading and lineart, but on the opposite side where the shadings are placed.
I put the new lighting layer above the shading layer and clipped to the base color layer. The color used is the bright cyan, using the same brush I used for lineart and shading. Since the color is appealing and contrast enough to the rest of the color, the blending mode are still set to normal, but you can explore other blending mode such as overlay to make it results optimal lighting.
4. Add Value & Slight Fade Lighting
To add more value and softer lighting one by one, I add some additional value and slight fade lighting. I use a screentone brush (same one with I linked in this tutorial earlier) with smaller dots pattern. Layers placement, color using, and setting shown detailed in this picture below.
Both additional value and slightly fade lighting are placed in lighting and shading places. While the slight fade lighting is in outer area of the lighting, the additional screentone value put in deeper places inside the shadings, with deeper colors usage as well.
The intention is for make the color transitions look more natural but still in the “pop” coloring keyword as well, so we don’t want to use any directly soft textured brushes. The fading effects are resulted from the small dots from the screentone brush. It also similar with patterns/screentone use in original pop art movement as well!
5. Shading & Lighting Fade
As the final step of rendering the character illustration, a simple blocking with bigger dot size screentone brush could be used to give a proper transition of the shading & lighting. You can add them in bigger outer area of both shading & lighting.
The layer placed on the top of all clipped layers while still in clip mode with the base color layer. This will be the last layer placed under the lineart layer! The brush used is still from the same brush pack but with bigger dot pattern size.
Good work! Now you already complete the character rendering process, let’s move on to background and decorating parts!
F. Decorating Your Pop-Anime Style Illustration
After creating the pop style character with pop coloring, now we need to add the fun in the pop ambience itself. Let me guide you to one of the simplest and easiest way to maintain the pop and fun atmosphere for your illustration!
1. Background Colors
You can add some color gradient combination at 1 layer below the base color. Try to use colors that are not as saturated and contrast as your character’s colors so that your character will popped out more. You can use any brush with airbrush type or soft-blending type to blend the colors, then add some screentone brush to emphasize the color combination.
Check how I use these brushes in the images below!
You can also add a border effect (available on layer property) on your character by duplicating the base color 1 layer below of the actual layer and blend the colors so your character will popped out more. This way could also create a bolder contrast between the character and the background. The border effect layer should be put under the base color layer.
2. Sparkle Deco and Confetti
And for the final touch, you can add some decorations such as sparkles and confetti. The detail explanation on how I do it written and shown in the image below!
Both deco layers for sparkles and confetti should be put on the top of other layers. I make some demonstration video of how the confettis are created in easiest way: you only need to copy paste and/or duplicate each particle, merge each confetti layers, color them, and add some screentone brush.
(I forgot to manually record the confetti process so I make another one. Hope this helps!)
(∩^o^)⊃━☆ Ta-dah! Here’s the final result of the “Pop-Anime Style” Illustration!
Thank you so much for consider visiting my tips! Hope this tips help you to create illustration, especially in pop-anime style. If you like and find this helpful, kindly like my tips and feel free to visit my profile and social medias.
Until next time~! (❁´◡`❁) /
Users who liked this post


Comment