
In this tutorial we will teach the different techniques that we can use to create masks in Clip Paint Studio. The masks are useful tools that speed up the work, allowing you to organize and divide the illustration into sections at ease. There are many different ways to achieve the same result, the basic tools provided by the program will be explained first and gradually the most complex ones.
Selection
We start with the most fundamental tool to create a mask, the "selection tool". We access it by clicking on the rectangle icon with the dashed line spacing.
Within the tool we will find different versions, all related to the selection function. The first two, "rectangle" and "ellipse", allow us to select areas on the canvas using these shapes.
With "loop" we can make the freehand selection, while with "polyline" we will be restricted by the use of straight lines.
Finally, the "selection pencil" option acts as a brush that, like the "loop", allows you to freely draw the exact shape we need to select. When used on the canvas it will appear with a green tone to facilitate the vision of what is being defined. The color will disappear once we have finished the form. The "delete selection" option acts as an eraser that will be used to deselect the fragments we don't want in that way.

Another option to deselect with any of the tools explained is to keep the "Alt" key pressed while using them. A subtraction sign will appear at the bottom of the cursor, which means that we are in the deselect function. On the contrary, if we want to add more shapes to our selection, we press the "Shift" key. As a consequence, a sum sign appears at the bottom of the cursor.
The select function is used to create a momentary mask on the canvas where you can only paint within that selection. It is a very useful and fast tool to be able to give great brushstrokes without worrying about getting out of the way.

Automatic selection
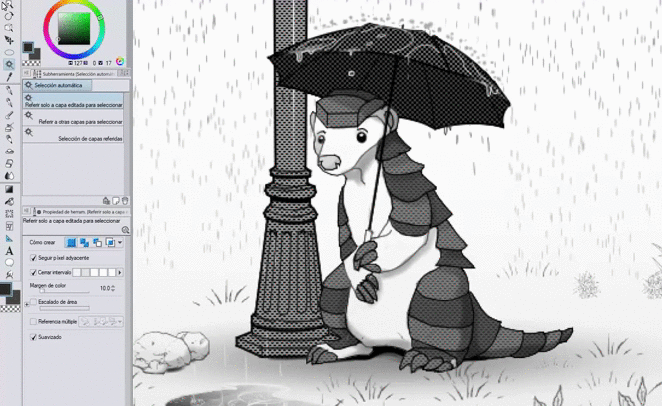
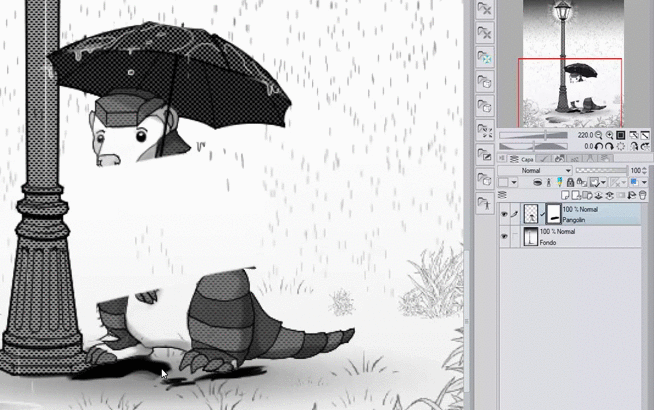
Clip Paint Studio offers a tool that makes the selection automatically, so that the program itself detects the different figures on the canvas. To access it we have to click on the magic wand icon located below the "selection tool".
Inside we find the option to "refer only to the edited layer to select" and "refer to other layers to select". They work the same, the difference being that the first one will only detect the figures within the layer in which we are located, while the other will look for the figures taking into account all the visible layers on the canvas. To use the tool, we simply have to click on the figure that we want the program to detect so that it can proceed to select it.
Like the "selection tool", this function allows us to create a temporary mask in a fast and efficient way. While active, you can only draw within the selection. In this example, everything but the animal is selected to shade around it.
The "Alt" and "Shift" keys maintain the same functions as in the "selection tool".
If we want to paint outside the selection but do not want to cancel it, we can go to the top menu of the interface in the button Select> Invert selected area.
Block transparent pixels
We can find this function at the top of the layers menu with an icon consisting of a padlock and a small square of different gray tones. To activate it we will have to place ourselves in the layer we want to use and click on the icon.
This function blocks all transparent pixels in the layer, which means that we can only use the areas of the layer where there was previously paint. In this example, the layer is blocked with the animal to be able to shade without leaving the figure.
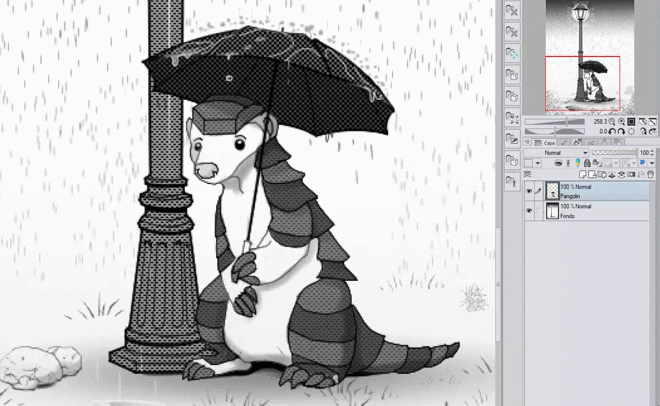
In this way, we generate a mask using the layer itself as an indication of which parts of the canvas we can paint and which not. With a good organization, it is a really useful tool to generate a mask quickly. The great advantage is that we can activate and deactivate it when necessary.
Fit to the bottom layer
To find this function we have to locate the icon composed of two overlapping ovals in the layers menu.
When activated, the selected layer appears with a red line to its left, this indicates that it is adjusted to the lower layer. It means that of everything we paint in this layer, only the areas that match the paint in the lower layer will be visible. In this example, the animal is shaded using a layer fitted over it.
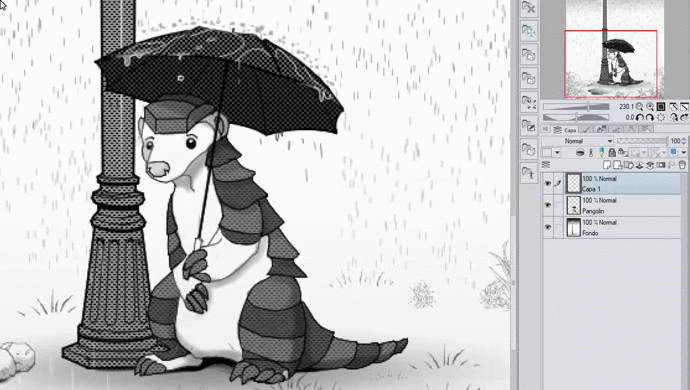
With this function we use a layer as a mask for your superior. Unlike in the previous methods where we can only paint in the selected area, with this form we can paint anywhere on the canvas. However, only paint that is within the boundary of the layer used as a mask will be visible.
Cover mask
This tool is complex for beginners, but once it is mastered it is essential when it comes to speeding up the drawing process. This tutorial explains its use in detail so that anyone can master it.
We start by locating how to activate the function. To do this, we have to go to the icon in the layers menu that appears as a black rectangle with a white circle inside.
By clicking on it, a white layer is created to the right of the selected layer. This is the "layer mask."
As we have already seen with the previous tools, the masks serve to delimit in which parts of the canvas the painting appears. In this case, the mask layer on the right is the indicator of these zones. The parts in this layer that appear white will be the areas where the paint will appear, while Black will be the areas where it will not be visible.
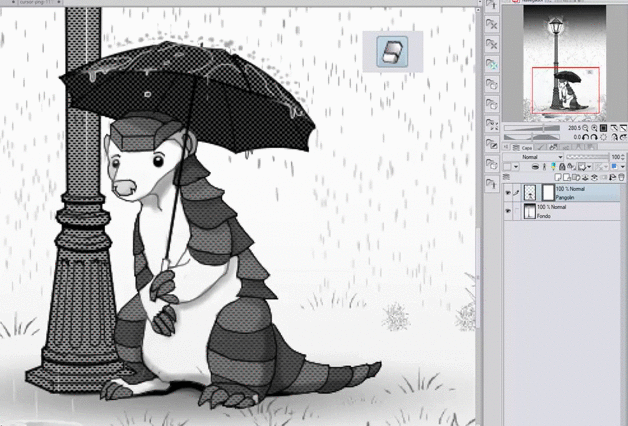
The mask appears automatically in white, which means that the paint on the left layer is shown in its entirety. To create black areas - define the parts that we want to be not visible - we have to take the "eraser tool" and erase them inside the mask. It is important to click on the mask, not the layer.
When erasing we can verify that, although the paint in the layer is intact, only the areas of this that the mask allows are shown. If we want to rectify, it is as simple as taking our preference brush and painting with the white color on the mask the areas that we want to be visible again. The example shows how, using the "eraser tool", the black areas inside the mask are generated that make the paint in the layer stop seeing. Then, with the pencil tool and using the color white, it is painted again on the mask so that the drawing on the layer is visible again.
An alternative to using the "eraser tool" to generate black areas is to use the color that works as transparency. In this way, we can use any brush to fulfill the same function as the eraser.
If we want to visualize exactly where the black zones of the mask are located on the canvas, we have to click on the mask while pressing the "Alt" key. In doing so, they will appear marked with a bluish tone on the canvas. To deactivate this function it is a matter of pressing the mask again by pressing the "Alt" key again.
It is possible to combine the "automatic selection tool" and the "layer mask" to quickly generate black and white areas. To do this we have to go to the layer we want, use the "automatic selection tool", choose the elements that we want to be visible - in other words, that constitute the white areas - and click on the mask icon to generate a taking that selection into account. In this example, the exterior of the animal is selected and a mask is created, which causes the animal to be defined as a black zone and not visible.

If we want to remove the mask completely we have to right click on it and click on the "Remove mask" button. If on the contrary we want to join the layer and the mask so that the paint in the black areas disappears definitively, we have to select the option of "Apply mask to layer".
Finally, this tic between the layer and the mask indicates that they are linked.
This means that if we use the "move layer" or "free transformation" tool -Edition> Transform> Free Transformation- it will affect both one and the other.
On the contrary, if we want to modify the layer or mask individually, we will have to unlink them. To do this, click on the tic to make it disappear. Once unlinked, if we click on the layer and use the "move layer" tool, only the content of the layer will be moved. On the contrary, if we click on the mask and use the tool in it, then only the contents of the mask will scroll.
As we have seen, the "layer mask" is a very versatile way to organize our illustration. The great advantage of this method is its ability to edit as many times as necessary the mask without losing the paint in the layer.
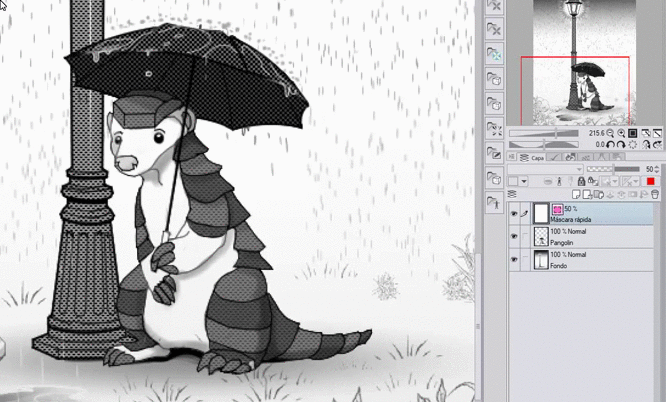
Quick mask
This function can be understood as an agile fusion of the "selection tools" with the "layer mask". To access it we have to go to the top menu in the Select> Quick Mask button.
When activated, a new white layer titled "Quick Mask" will appear.
As with the "layer mask", in this layer we can use any brush or tool of preference to draw freehand what we want to select. It will appear on the canvas with a reddish hue to facilitate the vision of what is being delimited.
If we wish, we can change the red tone to another color by clicking on the red box located in the layers menu.
To correct the brushstrokes we can use the "eraser tool" or the color that works as transparency - as explained in the "layer mask" - to erase until we have the exact figure we need.
Once we have the precise form of what we want to select, it is a matter of returning to the top menu in the Select> Quick Mask button, to exit the function.

As we can see in the example, the "quick mask" layer no longer appears and instead we have a selection with the exact silhouette of what was drawn on it. The greatest virtue of this function is undoubtedly its speed, since it functions as an instant "layer mask".
Store selection area
Finally, the "store selection area" function will be explained. To access it we have to go to the menu above in the button Select> Store selection area.
A new blank layer titled "selection 1" is created.
The tools in this layer are applied in the same way as the "quick mask". The first visible difference is that the tone of the stroke in the layer is shown with a green color instead of a reddish one.
However, we have already learned in the "quick mask" section that the color can be modified by clicking on the color box at the top of the layers menu.
Unlike in the "quick mask", this layer is not deactivated. In other words, it is a permanent "quick mask." This helps us to collect different forms that we want to save for future selections and thus speed up the illustration process. If we want to create more, it is as simple as repeating the process of going to the Select button> Store selection area.
To select the shape created in the layer, we have to click on the green icon to the right of the selection layer.
Once the form is selected, it is a matter of going to the layer we want and painting within the selection. If we want the selection layer to stop being visible, we have to hide it by clicking on the eye icon on the left.
Even if the layer is not visible, we can select the shape drawn on it by clicking on the green icon to its right.
This type of mask stands out for allowing to save the number of different selections we want, and thus be able to use them at any time during the illustration process.
Here ends the tutorial on the different ways to create masks in Clip Paint Studio!
Users who liked this post


Comment