
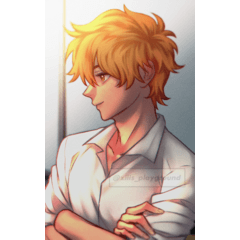
Hello everyone, in this video I’ll go over the workflow I use in clipstudio to shade a painting in what I find is the most efficient way between speed and precision.
This video does not use lineart in the final image, but you always keep your lineart if you desire, these tips are independent of that.
Flats Colors
First we will need our flat color layer, use the lasso tool to create the shapes of our subject. Here there will just be one color for the sake of simplicity, but if you most likely have multiple colors in your drawing, I like to paint them all on this layer using the lasso tool and the fill tool.
Painting the shadows
Next we will create a new layer and start painting in the shadows. The shadows should not be black but a darker shade from the color underneath. Still during the painting phase, I’ll just select a middle or dark grey to paint in the shadows. I’ll use the lasso tool to select big areas and then use the airbrush to shade the shapes globally. Before going again with the lasso tool and adding smaller details with darker color for dark shadows in creases, or erasing a bit of a big shadow to create bumps on the shape that take the light.
Create sharp lines of shadows for sharp features, and soft ones for the softer parts of your subject. For example, a cube would have the most sharp shadows, and a sphere soft ones. In the human body, everything is a bit in between these. Elbows, chins, noses, ears and the such can have hard shadows, while breasts, thighs and so on are softer. Apparent muscles create harder shadows than softer bodies.
I do not use the clipping mask on this layer because it messes up the next step, so you can just select your layer with the flat color, and use CTRL+click on it, or a right click to add the layer to selection. Then you can use this selection to invert it to go back on the shadows layer, and quickly erase everything outside your subject on the shadows layer, if you painted roughly.
Coloring the shadows
Now we will add the colors onto the shadows layer. First make sure your shadows layer has grey tones and not black, otherwise they will not be colored, if it’s black you can lock the pixels of the layer, select a grey tone and use the bucket icon on the whole picture. Now duplicate your base color layer, put it above the shadow layer, and set it to color mode, and then use the clipping mask to affect only the shadows layer. This will keep the luminosity of your shadows how you painted them, but quickly change all the colors based on your flat colors. If you want, you can then merge these two layers.
Coloring the terminators
Next we will be adding some color to the terminators of the shadows, this is the part where the shadow meets the highlights. You can use the airbrush and select a more saturated color of your shadows, and paint over the soft part of your shadows, while ignoring the sharp shadows. You can then set this layer clipped to your shadows, and use a blending mode such as add, and reduce opacity to your liking to make this layer subtle and not to overpowering.
Painting the Highlights
And finally we have our highlights. For this layer I like to use the selection of the shadow layer and invert it, then I’ll quickly use an airbush to paint only on the spots most touched by light, and finally also use the selection of our color layer to invert it and erase everything outside.
When this layer is done, you can set it to a mode like add glow, our color dodge glow, and lock the transparency of the layer. Now just try picking different colors and using the fill button to see what color of light you prefer, and what intensity of light.
Adding the Ambience to suit the background / mood
We are all done with our basic shading, but you might want to add a creative lighting setup, maybe different colors and so on, depending on where and when is your scene taking place.
For this there are numerous techniques, but I favor using adjustment layers for their flexibility and non-destructive way of working. I just group all my layers and create, then clip an adjustment layer on top of the group.
You can create a color balance layer, and use it to push or pull different colors, into the shadows, highlights and mid-tones. Here I will push cooler tones in the shadows by adding cyan and blue, while pushing more warm and reddish tones in the highlights. The tickbox preserve luminosity also has an impact on the global piece, I recommend trying it.
The second adjustment layer I use is the curves, with this one you can go into different color channels and also push the same tones as the color balance layer in the shadows or highlights. And when you're on the RGB curve, you can also adjust the contrast of your whole image.
These layers can allow you to quickly change the entire feel of your image, to make it go from a hot day, to a winter sunset, or the night, or even any scenario with artificial lighting. And all of this while keeping your basic shading you did before.
Les utilisateurs qui ont aimé cette publication


Commentaire