
Introduction
Hi
This is a tutorial on how to paint realistic skin, we'll look at the different stages of a painting, plus a few specific diagrams.
Blocking In
This is the first stage of the painting after having finished the drawing , the idea is very simple, establishing the base colors of the image and eliminating the white from the canvas since it's usually too bright compared to the rest of the illustration.
It's a good idea to start from a middle tone, something that's not too light or too dark, in order to have space for painting shadows or highlights without problem.
A round brush is good for this stage, it's not necessary to include any textures, we're just trying to establish the colors in general places, and round brushes work really well at big sizes.
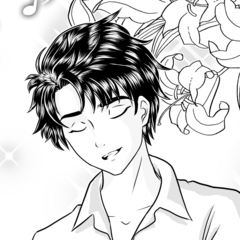
The image below represents what the portrait looks like converted to grayscale, as you can see there aren't any dark accents, besides the hair of course, and even the white of the eye is not too bright.
Lighting and Brushes
After establishing the base colors, we can move on to placing the lights on the illustration, we can establish a key (or main) light, and a fill (or secondary) light to create a three-dimensional form.
Using a sphere we can see the steps from light to shadow; from the place where the light hits the object or Center Light, the part where there's a transition between light and shadow, or Halftone, the darkest place of the object or Core of the Shadow, and the Highlight, which is where we can see a reflection of the light source.
For most of the portrait I use these brushes below, a flat brush with soft borders to avoid having sharp edges, good for establishing shapes. A soft round brush with some texture on the borders, this helps a lot with transitions, and the default soft airbrush, useful for really soft transitions. I made the first two based on oil painting strokes. Here's an example of how the shading looks with each brush.
If the edges of the strokes are too hard they can always be blended later using the Blend tool in Clip Studio Paint, I used the blur option for these spheres, but the blend option also works great.
The idea is to not blend everything until it's completely smooth, this removes what's interesting about the brush strokes, we can still see some of them, especially the first one, which gives it a more painterly look. It's not necessary to blend the airbrush, since it's the softest option there is for painting.
Back to the illustration, we can immediately see how it helps to have the block in finished, since the lights now look brighter in comparison to the rest of the image.
In this case the key light comes from the left and above, so it first hits all the planes of the face that are pointing in that direction, in this case the forehead, part of the nose, the top of the mouth, and so on.
Here's a diagram showing the places where the key and fill lights hit the face, it's noticeable how all the planes point to their light source, so they can be grouped together.
Zones of the Face (for portraits)
We can usually find three main color zones in the face. These can be extremely subtle in real life, but we can exaggerate them a little to include variety in our paintings.
The first zone is the forehead, which is usually a little more yellow since there aren't many muscles under the skin in that area, on the contrary the nose, ears and cheek tend to look more red because of the capillaries carrying blood near the surface. The bottom part tends to be gray-ish or blue-ish, from microscopic hair, so it's more noticeable on men, although this effect can be played up so it can contrast with the red of the lips in the case of women.
These are generalities so there can be exeptions, but it's a good idea to keep them in mind when painting a portrait.
Variety of Color
Part of what makes painting skin fun is the variety of colors it can have, it's easy to think of skin as having a single color, and while it might be mainly one shade, there are a lot of subtle changes in it.
We can see here some of the colors in this painting, there are parts where the skin is more olive, red or yellow. It's important to keep this in mind when painting skin and of course use references, these changes are not the same in every person, and skin tones vary a lot, we can only learn the subtleties from observation.
Sub-surface Scattering
Another characteristic of the skin is that it's not completely opaque, light can travel through it especially in some places where it's thinner. We can easily observe this by placing our hands against a strong light source, the fingers glow a very strong red, and that's because light is traveling through them and bouncing around inside.
We can observe this in other parts when we see the skin against the light, and although the effect is not as exaggerated, it's noticeable on the tip of the nose and ears in the face, and on other parts of the body.
Here's the close up of the tip of the nose, the color is a lot more saturated than on the rest of the face.
Texture
After painting the shapes with their tone and color it's time to paint some texture on the skin. Textures can help with the transitions between zones and make the skin feel real.
There's a balance between soft transitions and the texture of the skin, in general we can see more of the texture in the middle tones, where there's a transition between light and shadow, since the light hits the form there at a shallow angle.
If we look at a sphere again, we can see how the texture is more noticeable in the halftone, since the shape is changing from light to shadow in that place.
To create this effect I made a new brush with an oval shape and a photo of gravel for texture, these are my settings for the brush but it's important to play around with these options to find what works best.
This is the texture I used for the brush.
Highlights and other Details
The last step is working on small details and placing the highlights.
If the objective is to create realistic skin, it's a good idea to include some spots and other details that everyone has, real skin is not completely smooth.
Highlights are usually the brightest spots in the painting, so they should be placed last, when the rest of the image is complete, it's always a fun part of painting since they help the image pop out a lot more.
I also uploaded the timelapse video to Youtube, you can see the complete process for the painting there.
That's it for this tutorial I hope it was useful and you enjoyed reading it, there's a lot of info so feel free to revisit it if you have any doubts.
Thanks for reading!
この投稿を「いいね!」したユーザー


コメント