
Intro
Hello everyone! Thanks for checking this tutorial. Today i’d like to share about CSP figure tools basic, and an example of using figure tools for animation!
I'm gonna go over the summary in here, but I highly recommend you check my video below for more details with a video guide! ^^
1. What is Figure Tool?
With figure tool, you can easily create simple shapes such as lines, curves, circles, etc.
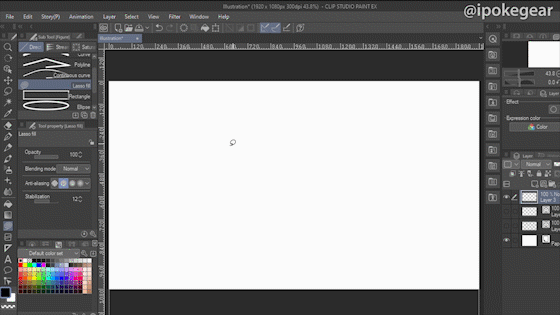
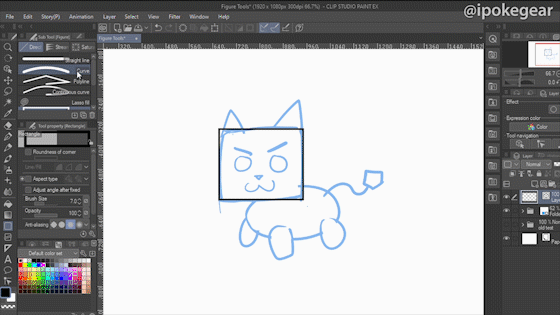
You can find figure tool in the image i show you above.
In this tutorial I'll cover the basic of this Direct Draw subtool.
Before you start, make sure to create VECTOR LAYER first!
You can notice vector layer by the icon beside it.
Why use Vector Layer? It's so your line can be EDITABLE!
This is important for Figure Tool so make sure to recheck before drawing.
2. Straight Line, Curve, and Lasso Fill
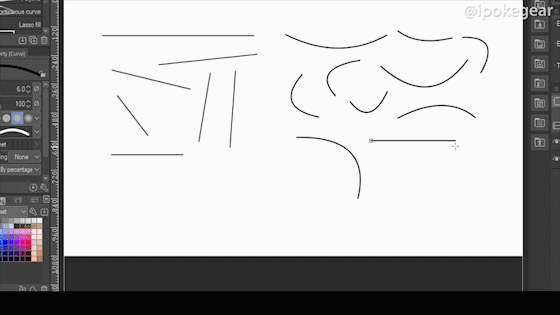
Straight lines and curve tool is pretty simple, you can just click and drag to create the lines.
For curve, you can drag and click again to adjust the curve.
If you hold Shift while you drag, you can snap the line in horizontal, vertical, or diagonal axis.
Lasso fill is a bit different, it can't be used in vector layer, so you have to use raster layer.
Basically you use it to quickly fill the area that you select.
You can use it to quickly draw symbol or other things.. (i don't use it that often)
3. Rectangle, Ellipse, and Polygon
For basic shapes, we can use Rectangle, Ellipse, or Polygon tool.
As usual, click and drag to create object. Hold Shift to make perfect circle, box, or polygon.
For Polygon, you can edit the number of corners (triangle, diamond, hexagon, etc.)
You can also edit the roundness of the corner.
There are other perimeter as well such as Fill, Adjust angle, Opacity, etc.
Feel free to try it and use it according to your needs!
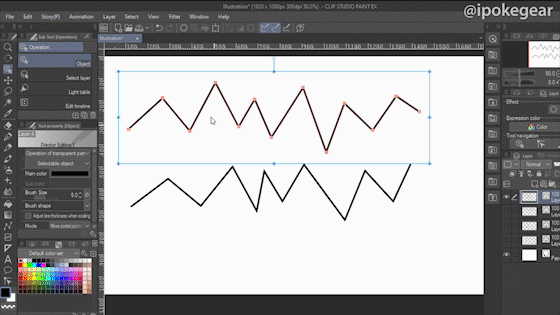
4. Polyline, Continuous Curve, and Bezier Curve
With Polyline, you can create a series of straight lines.
Whenever you click, it will keep creating lines based on the last point.
It's the same thing with Continuous Curve and Bezier Curve.
The difference is, you can adjust the curve by click and drag.
Bezier Curve is a bit mixed of curve and straight lines.
You probably tried these tools and thinking to yourself..
"How to stop this thing from making more lines..?!"
Well, there are 3 way to stop these tools:
1) If you hit ENTER, you'll stop the lines based on the last cursor.
2) If you hit ESCAPE, you basically undo all the lines.
3) If you HOLD CTRL then CLICK, you'll stop on the last point.
5. Editing Lines and Shapes + Vector Eraser!
Let's say we got the shape but messed up a bit, can we change it?
YES! we can edit them easily as long as we use VECTOR LAYERS!
You can edit point, line, and curve by using OBJECT TOOL (shortcut: O)
Click on the object, select the point then edit it however you like.
For more advanced correction you can use CORRECT LINE TOOL (shortcut: Y)
You can add/delete points, adjust many things individually.
You can also edit the line thickness just by using Object Tool
Simply select the object then change the parameter, and it will change the entire shape!
There's one more useful thing if you're working with vector layer: ERASER TOOL!
You can use your default eraser, just make sure that vector eraser is checked
There are three options for vector eraser:
1) The left one lets you erase as usual like a brush
2) The middle one lets you erase the intersection line
3) The right one lets you erase all the line together
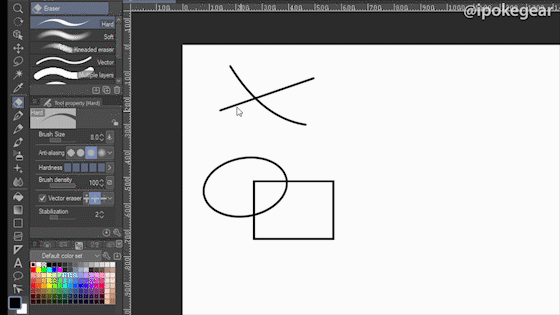
Quick tip: Always make your line longer, then just delete the intersection later.
This also works with shapes too.. so it's pretty neat!
6. Draw Lineart using Figure Tool!
Now that we've got all the basics, let's try it in our drawing!
I'll explain the process from lineart to animating here, but i highly recommend you check my youtube video in the intro.. because it'll be easier to follow with video guide ^^;
I also encourage you to try this as you read/watch, so you can tell me what you've made! :D
The first thing is sketch. Here i've made the sketch of a cat (?) using default brush.
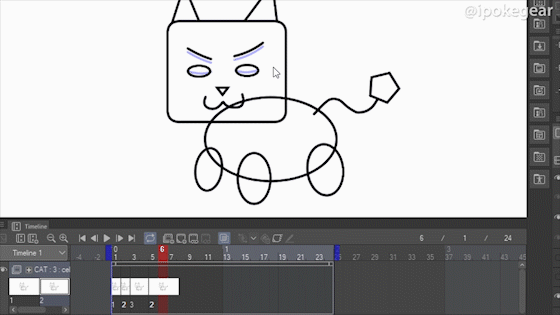
Next we'll use Figure Tools for the lineart! What i did was:
I used the tools that are close with the shape that i want.
Use Object Tool to adjust the position and curve.
Use Vector Eraser to delete the intersection line.
However, I did not erase the intersection in the body because i may animate them later.
7. Work with the Timeline!
First we have to open the Timeline window (windows > timeline)
If your timeline is blank, you can click Add New Timeline.
For this tutorial, i used 12 fps and 24 frame duration.. so that CSP Pro user can try it as well.
To make animation, we need to create Animation Folder.
After that, we put the lineart of the cat inside the animation folder.
Don't forget to rename it to "1" to make it less confusing later.
(this is because CSP will automatically rename the next layers with numbers)
"Oh no, after I put it in the animation folder, the drawing is gone!"
You have to select Specify Cells (icon with the chain), then select your layer name.
This will put your layer in the timeline!
Quick Tip: Layers that are not on the timelines are just stored.
You have to specify cells to make it appear and have a duration!

Next, I simply duplicate the vector layer of the cat (Right click > Duplicate Layer).
And then Specify Cells 2 or 3 frame beside the first one.
Next, we edit drawing layer number "2". I'm just gonna change the eyes using transform tool.
You can turn on ONION SKIN to check previous/next drawing easily.
Repeat the steps on drawing "3".. Duplicate, Click the Timing, Specify Cells, Edit.
Work with your Timeline!
Use Specify Tool to REUSE drawing that you've made.
For example, my blinking cat timeline is actually like this: 1 - 2 - 3 - 2 - 1
So it's actually only consist of three drawing!
I also tried making the cat wave and moving it's tail.. but you can explore it by yourself too!
Once I'm satisfied, I continue to use eraser tool to delete the intersection line.
That's right, you have to do it to every layers.. so enjoy your time! :'D
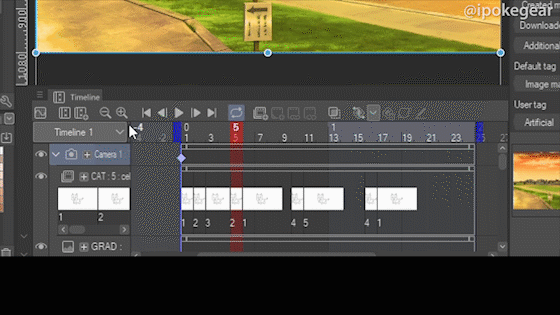
Here's the final lineart timeline and preview of the animation:

8. Coloring, Shading, and Finishing!
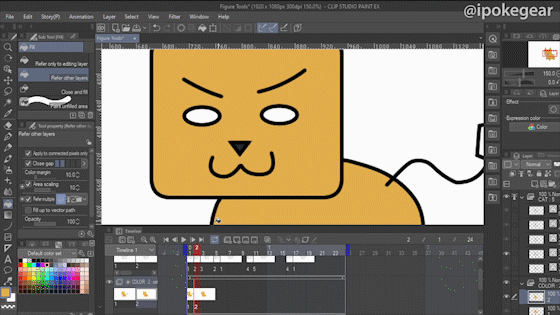
Now that the lines are done, let's continue to coloring!
To do that, we'll have to create another Animation Folder.
But within the folder, we'll create Raster Layer this time instead of Vector.
Place the color animation folder under the lineart animation folder.
Following the guide from lineart, we just will it with color using Fill Tool.
Don't forget to make new layer and Specify Cells again like in lineart.
The process is very similar, but this time we have a timing guide.
So we just have to match the lineart animation timing.
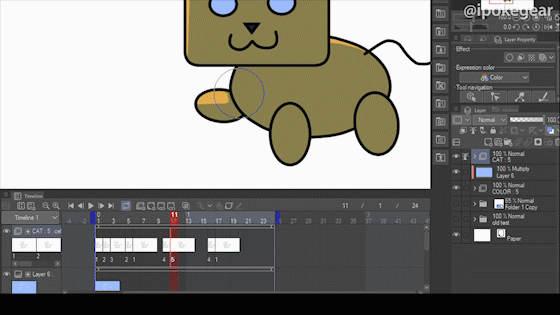
As for Shading, Clip a new layer with Multiply above the color animation folder.
I fill the multiply drawing with color, delete a few parts, then adjust hue & saturation.
This is just static and simple shading, so make sure to play and recheck for mistakes.
Next I add a Drop Shadow in a separate layer, placed under the color.
Feel free to add more effects such as Gradient, Change Line Color, Etc.
Now for the Background, for this tutorial, i used the default material from CSP.
To use it just drag and drop the materials and place it under the drop shadow.
You can also add Zoom Movement by using 2D Camera Folder.
First, move all the folders and layers inside the camera folder.
Next, click on Add Keyframe Button. That will be the first keyframe in camera folder.
Choose the timing for the second keyframe, then click add keyframe.
Now, in the keyframe that you want to edit, use Object Tool to Resize the Camera.
If the camera movement doesn't show, go to Animation > Playback Setting > make sure to check "Render 2D Camera"
You can adjust a few things like moving the keyframes and testing the animation.
Lastly, to export as a video, click File > Export Animation > Movie
(make sure to check Apply 2D Camera effects if you do use camera)
Or you can export it as an Animated GIF.
(It will be much smaller and played in a loop)
Closing
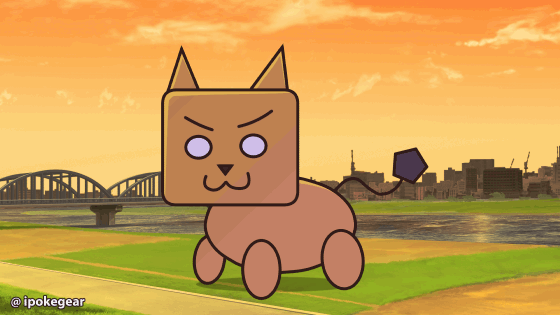
Here's the final result! (Animated GIF)
Thanks a lot if you read this or watch the video until the end. This is my first tutorial post so I apologize if i made a few mistakes (and sorry if it's too looong haha).
I'm still working with my Youtube and planning to post other tutorials in the future. It's still small, so every support is really appreciated!
I'm also curious with what you guys made with this tutorial..
feel free to tell me in the comments below! :D
Lastly, I hope you enjoy this tutorial and find it helpful!
Stay safe and have a nice day! ^^
この投稿を「いいね!」したユーザー


コメント