
Hello everyone!! Sometimes, we got some ideas for a character art, but have no idea or no time for the background.
Let’s make collage art!! It is an interesting and time saving way to present your character art, and it’s very easy to make with Clip Studio.
In this tutorial, I will show you how to create simple handcraft-style collage materials such as paper cut, paper tearing, decoration tapes and ink stamping.
Video tutorial
watch things in action !!
Preparation
Collage art is the combination of materials in decorative ways,
let’s start by downloading the materials from Clip studio assets.
In the Clip studio start page, go to menu icon on the top left and [Search for materials]
It will open Clip studio assets.
In the search box, you can set the filter for the more specific results.
For the collage art, I recommend applying filters :
Image material for the collage assets, and
Gradient set for recoloring the assets
If you’re new to Clip studio asset, you can find the material you downloaded in
Material library : Download ([Windows > Material > Download])
Let’s start with the character display on the collage art!
#1 Paper cut
Left some white edge to the art will simply create the paper cut looks.
Creat a new canvas for the collage art,
set the [Paper color] to any color(except white).
It will be easier to work with the transparent object.
Import the artwork: go to [File > Import > Create file object]
I recommend importing the artwork as a file object, it’s easier to move and edit without touching its detail.
You can open the original file to edit with the menu in the tool property panel of the [Object] tool.
Delete the paper layer of the original file to make the transparent background.
When you save the original file, the imported object will be updated automatically.
Note : If it’s not automatically update, you can click this icon in the [Object]’s tool property panel.
The sticker edge
To add the edge like it’s cut by the sticker machine, you can simply apply the border effect to the layer by the [Effect] option on the [Layer property] panel
The paper cut edge
Let’s make the edge that looks like it’s cut roughly with the scissors.
Create a new layer under the file object layer
(When we create a new canvas, it already comes with a blank layer, you can use it too, just make sure it’s under the file object layer ^_^)
Pick white color,
then go to the [Figure] sub tool,
select [Polyline] and set the [Line/Fill] option to [Create fill]
Draw the area roughly around the artwork.
When complete the shape, it will create the paper cut edge. Very easy!
Put the layers together in a folder, so you can move them together with the [Move] tool.
The paper effect
To make it looks more like a paper piece,
here is the auto action that I’ve made for my old tutorial :
Papercut style flat art is easy with Clipstudio
Download and drag it to the [Auto Action] panel.
To use this auto action, just collapse the layer folder, select the auto action and click the [▶] button.
Now the art looks like a paper cut piece
Time to add more decoration on the background!
#2 The paper tearing edge
Paper tearing edge creates the handcraft feel to the collage art.
To make the paper tearing edge, let’s start by downloading the brush I’ve made for this tutorial
To install the brush, just drag it to the sub tool panel.
You can change colors of the brush.
Here I set it to black and white, so there's a little gray shadow on one edge.
Create a new raster layer and draw a line for the torn paper.
Add a new layer under the line layer
Use the [Auto Select] tool, set [Area scaling] to some small value and select on the canvas.
Open the material library, then drag the image material on the canvas.
The layer mask will automatically appear on the material layer!
Note : This is the seamless material I used.
Use the [Object] tool to adjust the pattern.
If the material color doesn’t fit your color theme, you can re-color it with the gradient map.
Put the pattern in a new layer folder, then drag the mask to the folder.
Select the pattern layer,
go to menu [Layer > New correction layer > Gradient map]
You can pick the preset, and it will change the color of your pattern.
You can also adjust amount of color by the arrow under the gradient bar
If you download the gradient set from Clip studio assets,
you can add it by the menu [Add gradient set]
I also apply the auto action to make the paper look on the layer folder.
If you want to change the pattern,
you can just drag a new image material over the old one, very comfortable.
You can apply this color changing technique on any material in your collage art. ^_^
This is the paper material I used:
#3 Tape decoration
Tape decoration is the tape with patterns, It’s wildly used for decoration on handcraft collage arts.
you can use both brush and image material to make it.
Using Brush
This is the brush I use in this tutorial
Create a new vector layer.
So, you can freely adjust the tape later
Pick the brush.
Click on the canvas where it will start,
hold [shift] key and click again on a point to make a straight line
Use the [Object] tool to select the line.
In the Tool property panel, you can also adjust the size of the line.
Duplicate the line by [CtrlC] and [Ctrl+V]
Using seamless image material
Select the pattern on the canvas with the [Object] tool,
then set [Tiling direction] to [Only vertical] or [Only horizontal],
and you got a decoration tape!!
To cut the tape.
Rasterize the layer, right-click on the layer and [Rasterize]
Create a selection like the tape is torn off with the [Lasso] tool
Invert selection and press [Delete] button, and now the tape is torn off!!
To change color of the tape : go to [Edit > Tonal correction > Gradient map]
If the pattern doesn’t fit for making the tape by just setting the [Tile] option…
Disable the [Tile] option.
Create a new raster layer under the material object and draw a rectangle with the [Figure] tool : [Rectangle].
Clip the material layer with the rectangle.
Hold [Shift] key and select both layer, then [right-click > Convert Layer].
Set the type to [image material layer]
You will get a new image material layer, use the [Object] tool and enable the [Tile] option, and it’s a custom tape pattern for your usage!
#4 Ink stamping
Ink stamping also gives a handcraft feel to your art.
Pick a single color art for the stamping will give a more handcraft look (like they've been made by a real stamper).
To make the ink stamping is very easy, put the material on the canvas.
If it's an image material object, rasterize it.
Use the spray [Noise], pick transparent color and paint on the art.
It will look like an ink stamping art!
you can also use the [running color] spray for more rough pattern.
To edit the color for the ink stamping, you can apply the color by just using the [layer color] effect
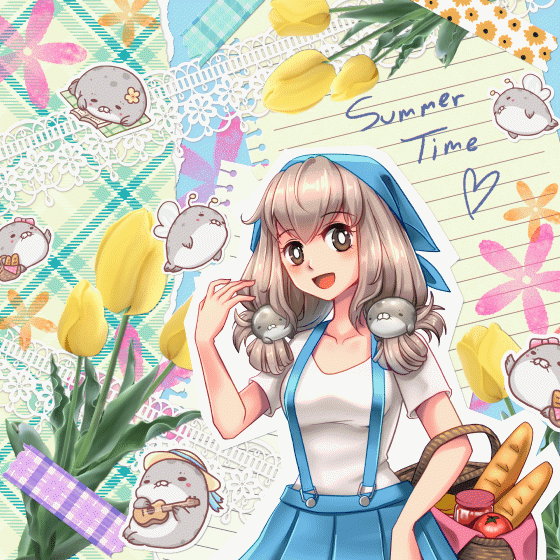
Making collage art is relaxing! And also help to get more inspiration!
I hope my tutorial get you some idea for your art, have a good summer day and have fun with your collage art!!!
이 게시물에 '좋아요!'를 누른 사용자


댓글