How to use the cubic Bezier tool

-
 MVP ◆This user has contributed greatly to the management of the community, by posting many great responses to the questions asked. Once every three months, MVPs are determined based on the points earned during that period and will be recognized accordingly.
 -
 New Valuable Player (NVP) ◆These are the next-best contributors to the community after MVPs. This is awarded to users who have not yet won an MVP award, based on the number of points they have earned.
 -
 Official Expert ◆Chosen out of all MVP awardees, who are already proof of excellence, this is a testimony of outstanding correspondence in the community. After careful screening, they are appointed by CELSYS and assume their position.Note: Formally called “Evangelists”
 -
 CELSYS official moderators ◆Moderators are official CELSYS staff members who are fluent in Japanese as well as various other languages. As moderators are not experts on software or creative work, they will not be able to directly answer your questions. However, moderators will provide communication and language support to ensure that everyone can smoothly communicate with each other.
 -
 CELSYS officialThis is the official administrator account.
Bezier curves are made using Control points (Anchor points and Direction points) to define the shape of the curve.
This tool is useful when you want to draw a smooth, controlled curve that would be difficult by hand.
See the following to learn how to use the continuous curve tool (quadratic Bezier).
1. What is a cubic Bezier curve?
Cubic Bezier curves consist of multiple control points, which can be either Anchor points or Direction points.
If you draw it on a vector layer, you can adjust the Anchor points and Direction points after drawing the line.
However, you cannot adjust the Anchor points or Direction points if the line is drawn on a raster layer.
Go to the [Tool] palette > [Figure] tool and choose the [Bezier curve] sub tool.
Note: In the initial settings, the specification method of the sub tool [Bezier curve] is set to [By drag].
However, if it is set to [By click], the tool will behave in the same way as the quadratic Bezier curve, and you will not be able to use it as in this lesson.
2. Tool basics
Straight line/Angled line
Click to specify control points without specifying Direction points, connecting them with straight lines. Click the final Anchor point and press the [Enter] key to confirm.
- You can also confirm by clicking outside the canvas.

Draw a curve
Direction points can be set by dragging the cursor after clicking and specifying Anchor points.
Lines that extend from the first control point will curve according to the direction and length of the Direction point.
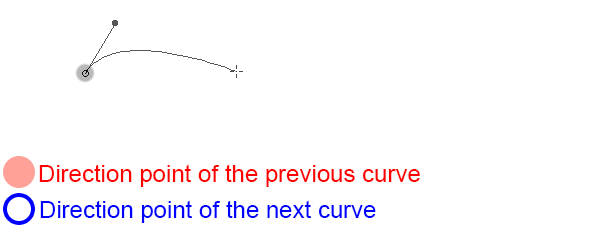
After setting a second Anchor point and its Direction point by clicking and dragging, press the [Enter] key to confirm and draw a simple curve.

When setting the second Anchor point and dragging to create the the second Direction point, two Direction points will be drawn in opposite directions. The Direction point created on the dragged side is the first Direction point of the next curve.
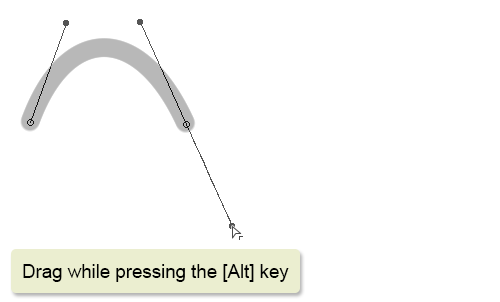
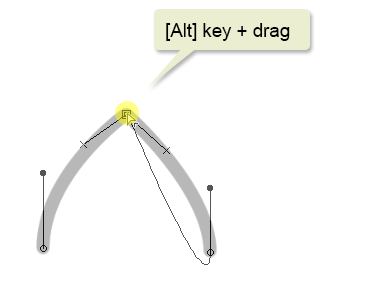
Switch curve direction
By pressing the [alt] key while dragging a Direction point, you can switch the corner your are editing, and edit each Direction line individually.
Here, the Direction point stretching from the second Anchor point was edited individually, making a corner.
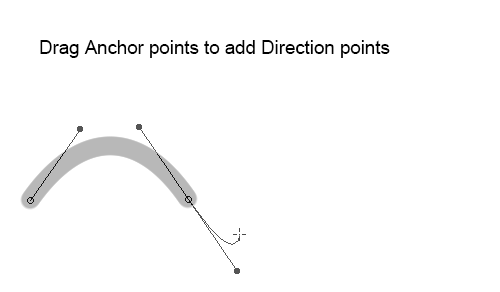
While drawing a curve by dragging, you can click the previous Anchor point to cut (delete) its Direction point.
While drawing a straight line by clicking, you can add a Direction point by dragging the previous Anchor point and draw a curve.
Note:
You cannot use Undo for Bezier curve operations.
Instead, you can press the Delete or Backspace key or right click while using the Bezier curve tool to undo the most recent step.
How to make adjustments while creating a Bezier curve
While dragging or holding the left mouse button, you can move the Anchor point by holding the [Space] key.
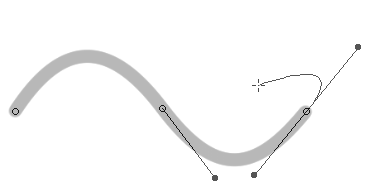
You can add and delete Anchor points by clicking on previously drawn sections of a curve.
Dragging while adding an Anchor point will set the Direction point as well.
- The function can be toggled with the [Continuous curve] > [Add/delete control points while drawing] option on the [Sub tool details] palette.
Using the modifier keys on the keyboard, you can make fine-tune adjustments to the Bezier curve.
By pressing the [ctrl] key ([command] key on Mac and iPad), you can edit Anchor points and Direction points.
By pressing the [ctrl] key ([command] key on Mac and iPad), you can switch Anchor points and Direction points into corners.
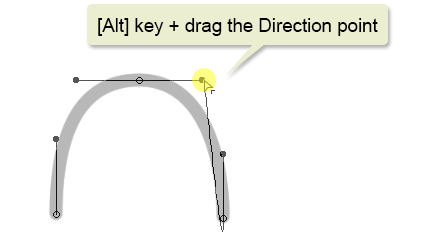
Anchor points can be converted to corners by holding down the [Alt] key and clicking an anchor point.
By dragging a corner’s Anchor point while pressing the [Alt] key, the corner will be converted to a curve, enabling Direction line editing.
By dragging a Direction point while pressing the [alt] key, each Direction line can be edited individually.
3. Adjusting control points
If you are drawing on a vector layer, you can adjust the Anchor points and Direction points afterwards to reshape the lines.
If you select a line drawing using the sub tool [Object] of the [Operation] tool, you can readjust Anchor points and Direction points.
■ Adjusting curves
Direction points extend to the left and right at the Anchor point between the curves.
Adjusting a direction point will move the opposite Direction point in point symmetry.
Direction points represent the vertex of the curve.
■ Adjusting straight lines
Move the Anchor point at the end of the straight line to adjust the length and direction of straight lines.
The [Control Point] sub tool of the [Line Correction] tool allows you to edit Control points more precisely.
When using [Switch corner] on a Anchor point, the two Direction points extending from the Anchor point are will be switched.
When using [Switch corner] on a Direction point, the direction points can be edited individually.
Note:
Please read the following Instruction Manual to learn more about the Bezier curve sub tool.
Please read the following Instruction Manual to learn more about editing Bezier curves with Control points.
Users who liked this post


Comment