
Hello Hello !
Many people say that digital drawing does not reproduce a realistic, traditional effect.
With this mini tutorial, I will finally prove to all that even digital, it is possible to imitate almost a perfect technique of traditional drawing, here: WATERCOLOR <(¯)¯)>
1 - Choose the "paper" -
First of all, before we start drawing, we need a paper, a support for our work of art, here we will use "DRAWING PAPER" in the materials.
Once the base is in place, we can "work" somehow to make it ideal, because there, it is too "zoomed" and dark (this is only my opinion) for watercolor.
After narrowing the paper that will serve as a basis, we will make it clearer. To do this simply go to "PROPERTY OF THE LAYER" and then put the effect "COMBINING THE TEXTURES" then set the paper as on the screen if above to get this:
Our paper is ready to welcome a digital watercolor worthy of the name! (((O ( ° ▽ ° ) o)))
- IMPORTANT -: THIS PLATE MUST ALWAYS STAND UP!
2 - A fast Lineart
Before attacking the lineart, I made a quick draft on a normal layer.
It does not have to do like this, but I prefer to draw a quick draft to know where I am going during my line.
Using the material "REALISTIC PENCIL", I realized a lineart not too detailed and fast enough, as one could do it in a traditional way with a real pencil and a real leaf.
The lineart being finished, I can therefore switch to the colorization of my digital watercolor. (O'∀`o)
3 - The coloring "Watercolor"
I then use the brush "DARK WATERCOLOR" set this way.
Then with a red / orange color, I will gently come to shad and blush some points of the face, giving it a porcelain skin, very white, with a very soft effect.
Always with the same brush, I take a very light beige, and I come "paint" everywhere with on the face. The practical side of the watercolor in clp is that it is not opaque, so by passing on it, it does not disappear.
Always with the same brush (we do not change a team that wins), I just darken the shadows with a warm plum color.
Without changing brushes for all this part, and what will follow, I create a new layer over it, and with the same color plum as for the previous step, I go a little like a cloud that by the eye for evaporate further behind the head.
With a fuchsia color much more "flashy", I just put light touches of color to make it more nuanced and alive I would say.
Then with a very light blue, I just put keys here and there on this little cloud.
I'm sort of trying to give it a spatial look.
We will finally change the brush!
So I take in the category "AEROGRAPH" the brush "SCRATCHING TINT"
Adjusted like this, with a white color, I come to sprinkle the little purple cloud with white dots.
Starting from the eye, they are closer and more numerous, then the further we go, they evaporate like the cloud towards the end of the head;
Here is what it gives after using airbrush.
With the brush "DARK WATERCOLOR", I then returned to the layer of the skin, and with white, I gently made the tear from the eye.
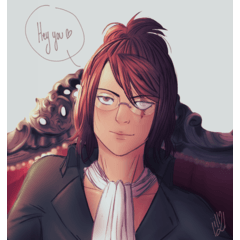
4 - FINE
Here is what gives our digital watercolor in the end! (≧ ◡ ≦)
I hope this little post has helped you understand how to imitate watercolor on a digital medium!
You could find me on my different social networks where I only post my drawings and other artistic things:
Instagram: Hédonie_Art
Devianart: Imari22222
# MonthlyTIPS201904
#TraditionalStyle
Users who liked this post


Comment