
Introduction
Hi everyone,
In this tutorial, I am going to demonstrate how to create and use seamless textures for 3D environments and for concept art purposes using Clip Studio Paint and prepare the Maps for 3D models.
What are seamless textures?
A seamless texture is an image texture of which the edges seamlessly match up with each other (top, bottom, and side to side). It is a very common method to cover large scale areas in 3D environments with these.
However, I also use them for concept art by creating rough 3D blockings with a basic light setup to get many different compositions right away.
Here is the video I recorded of the same process. Please go through it for better understanding:
Final tileable texture:
1. Create Squared Canvas
For this tutorial, I am using a canvas of 1024 x 1024 pixels. You can go for higher resolution as well.
Squared canvases are best for tileable textures to avoid any kind of stretching on the 3D models. If you are only going to use these for 2D purposes then you can use customized sizes as well.
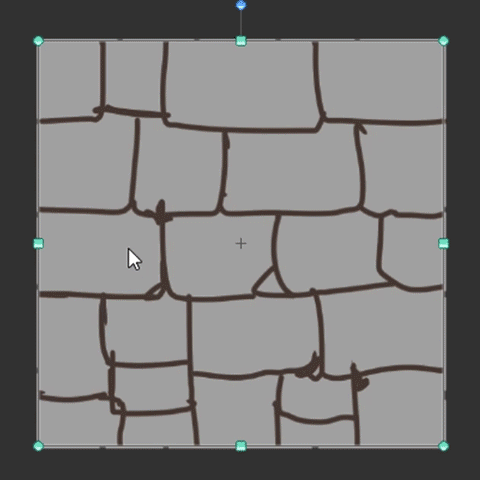
2. Sketch: Sample bricks
I am choosing bricks as an example for this tutorial as it's easy to understand the process due to their simplicity
So, I begin by drawing rough brick lines without worrying about the boundaries or their alignment.
3. Tiling
Now, there are two ways of tiling the texture:
- First: convert the rasterized image into the material layer

- Second: create a pattern and reuse it to clean up seams.
Both methods are useful and their use completely depends on your choice.
For this tutorial, I am going with the 1st method i.e.
:: MATERIAL LAYER METHOD::
[Select] Brick Layer -> Right click -> Convert Layer (H) = “Convert Layer” window appears.
Change “Raster Layer” to “Image Material Layer” under [Type(k)] option and click [OK]
Once you have converted the layer into a material layer,
Select [ Operation tool ] and click on the [ Object ] sub tool.
Under the [ Tool property ], enable the [ Tiling ] check box.
After enabling the [Tiling] option, you are able to move and scale your image to see the seam problem as shown below:
::PREVIEW::
After offsetting the image, it's time to [Rasterize] your image so that you can paint on the layer to fix the seams.
For that, please select the Layer -> Right Click -> [Rasterize]
Now, you can paint over and draw on the image to match the lines.
1) Repeat the same tiling process to check whether the problem is solved or not.
2) Offset the layer and clean up the seams. Also, you can erase the lines freely if you don’t like the pattern.
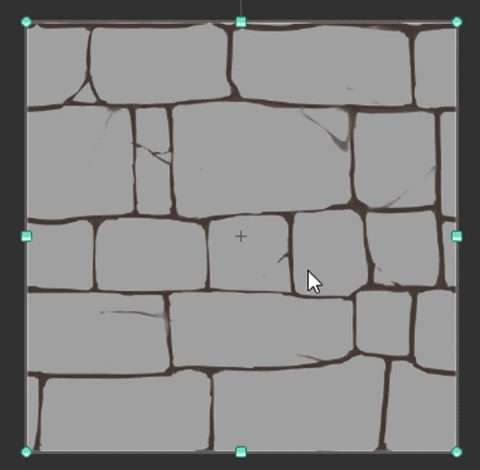
3) Add some more details and clean up the lines to resemble real-life bricks.
Preview::
Here is the preview of complete seamless texture:
With this process, you can create many different shapes and pattern textures according to your requirements. If you like a texture which is reusable, you can store them in the “Pattern folder” of Clip Studio Paint and re-use them later.
You can find the materials (pattern folder) here:
Window -> Material -> Material [Color Pattern]
Moreover, you can create your own folder under the material slot to be more organized. To do that simply right click and select “Create New” as shown in the image below:
Drag your layer onto the pattern folder or your custom folder to reuse anytime as shown in the above image.
Now, just drag and drop your saved pattern anytime into new projects. It will automatically tile your texture and give you the freedom to scale up and down according to your requirements.
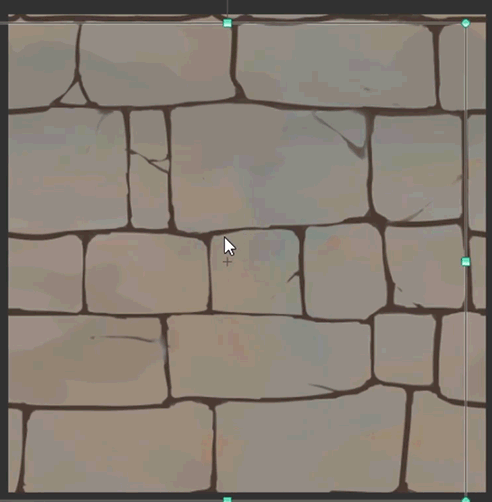
4. Painting: Bricks
After dragging the seamless brick texture from the material palette, it is time to paint the actual bricks. To do that, I am going to use the default watercolor brushes, but you can use your own preferred way of painting. This section completely depends on individual creativity.
Now, create a [New layer] -> move it under the [Brick tile layer] -> Start adding colors freely without worrying about the bricks-lines.
After adding the colors, I polished the texture and used the same tiling process to clean up the seams.
Please check the image below for the full process.
///-----------------------------///
This step is not that necessary but if you know about the different maps then you can follow that.
Now using the created “Diffuse map”, I created a “Specular map” and a “Bump map”
The specular map doesn't need to be black and white. You can even choose a particular color which you want to show in the mesh.
A Bump map is a grey scale map where white color (256,256,256) is used to pull out details above the surface and black (0,0,0) is to push them inside the surface.
50% Grey (128,128,128) means no effect.
Please check the image below for the full process.
4) Setup Maps
Here is the quick preview of the brick map in Blender 3D.

** Final tileable brick textures:
With following the same process,
I created some of the tileable textures which I am going to use for the 3D environment:
3D output:
I hope this tutorial proves helpful to you. Please let me know in the comment section if you require help with any point.
Cheers!
About me : Surendra Rajawat
My name is Surendra Rajawat and I am currently working as a Concept Artist in the video game industry.
Portfolio:
Users who liked this post


Comment