
Intro
Hello! I'm LibertyFreedom, a concept artist and manga artist. I've been using Clip Studio Paint as my main digital art tool for the past 7 years.
A few months ago, with the upgrade to Ver2.2, a fantastic new feature was introduced: the ability to set hierarchical relationships to your 3D materials. Now, you can attach accessories or any 3D objects to your 3D figure and pose them together.
This feature is incredibly convenient and helpful, especially when drawing the same character with multiple poses, as often needed in comics, manga, and animation.
I'll walk you through all the steps of how I leverage this feature in my manga/comic drawing.
Step 1: Creating Panels
First, start by creating a new comic project.
To initiate the paneling process, I utilized the [Polyline Frame] or [Rectangle Frame] sub-tool to establish the page's panels. You can create multiple panels to fulfil the page, but for this tutorial, I only create two panels for simpler and clearer demonstration purposes.
Step 2: Sketching / Reference Gathering
After establishing the panels, I proceed with a simple sketch. This sketch is to help me to conceptualize the overall composition and the posing and position of the 3D figure and objects later.
If you have difficulty sketching the pose, you can instead search for a reference photo and pose the 3d figure accordingly later.
-Save a duplicate of your sketch as JPEG.
-Open the saved file or any reference photo you found, then position it aside as a visual guide for manipulating 3D objects later.
It is not mandatory to pose your figure exactly like the sketch or photo reference as they serve as a reference only. You can still explore various possibilities with different poses and camera angles. But in this tutorial, I am sticking to the sketch.
Step 3: Setting up 3d Workspace and Importing 3d objects
To begin working with 3D, ensure your workspace is configured correctly:
-Head to 'Windows'
-Open both [All Side Views] and [Sub Tool Details].
Keep these panels visible for optimal 3D work (I'll explain how they work with each other later).
-Close the sketch layer.
-Go to 'Windows' again, select [Material].
-Click [Material Body Type], and drag a drawing figure onto the canvas.
To interact with the 3D model, use the [Object] sub tool. I recommend setting a shortcut key for this tool because you will be using it most of the times in selecting and operating 3D objects .
-Navigate to 'File,' click 'Shortcut Settings',
-Choose [Tools] from the Category,
-Scroll to the bottom, expand the [Operation] panel,
-Set a shortcut key for[Object].
Click the second icon at the bottom to adapt view to editing target.
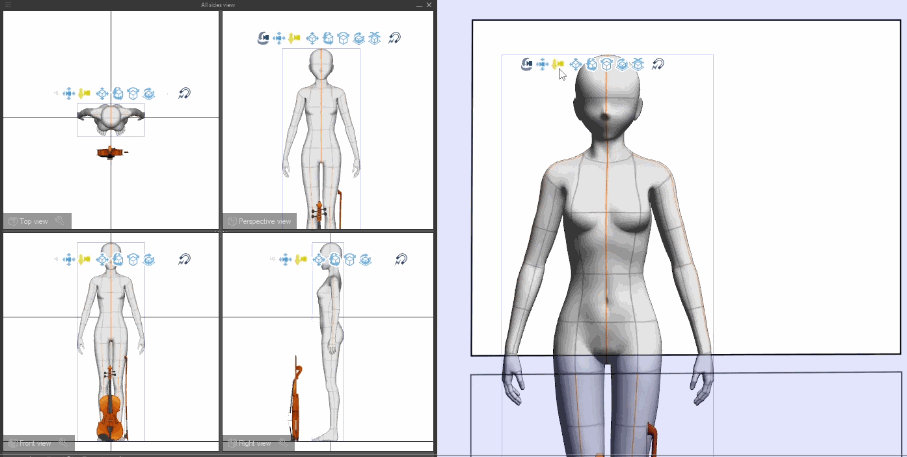
Now, drag any of your downloaded 3D models onto the [Top view.]
If you're following along me, select [3D] from the material palette, type 'violin' in the search box, and drag these objects into the Top View panel.
Position them in front of the figure for scale comparison.
If needed, adjust the scale of the models. In this case the violin and the bow seem a bit smaller. To enlarge the scale,
-Click [Object List] from the Sub Tool panel, select the violin and hold 'Shift' to choose the bow.
-Go to [Transform] , tick the [Fixed Ratio] box and increase the value to enlarge the size.
-You can hold [space bar] to hide the manipulator to see the 3D objects clearly.
Step 4: Understanding the functions of 3D Workspace
Alright, let me explain my method of manipulating 3D objects.
Basically you can treat all the panels from your canvas as the final shot of your manipulated 3D objects.
You just need to control the camera angle to get the angle shot you want in the panel.
This means you do not need to manipulate the 3D objects directly in the panel.
Instead, perform all the 3d manipulation in these 4 viewports, each offering a different angle perspective.
What's advantageous about the [All Sides View] window is that you can adjust the 3D model from multiple angles simultaneously instead of just one angle directly from the panel. This provides a comprehensive view of the effects applied to all other views, including the canvas.
By selecting and adjusting the manipulator from four different angles simultaneously, you can easily create your desired pose without the need to keep changing the viewport angle to manipulate the 3D model.
You can also always check the final result of the adjusted 3D objects from the panel all the time without having to move the camera back and forth.
You can also switch to a different view layout by clicking [Select view layout] icon at the bottom. I usually toggle between the first and forth one to switch between the right and left side view.
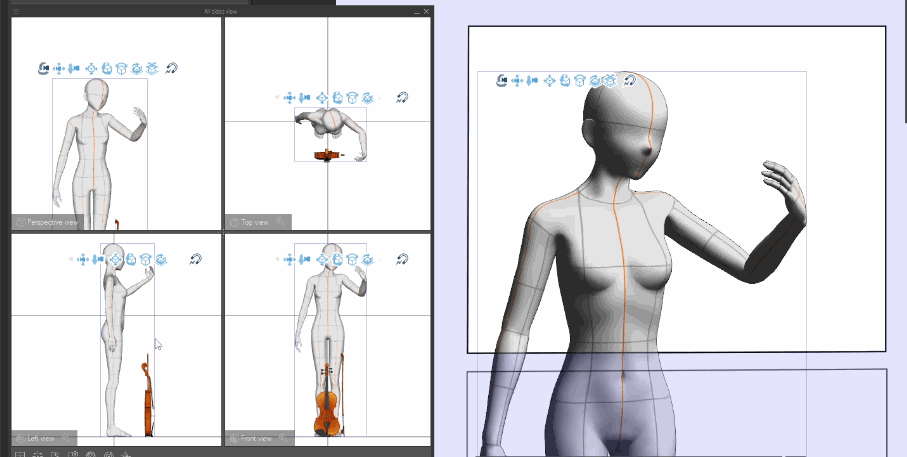
For the hand posing, instead of moving the joints of each finger, you can use Hand Scanner to capture your hand's pose with your camera and apply it to the figure conveniently.
Furthermore, you can also download poses from Clip Studio Assets. In my case, I downloaded a suitable violin pose from the assets and dragged it to the figure from the [Download] folder.
Step 5: Setting Parent-Child Hierarchy
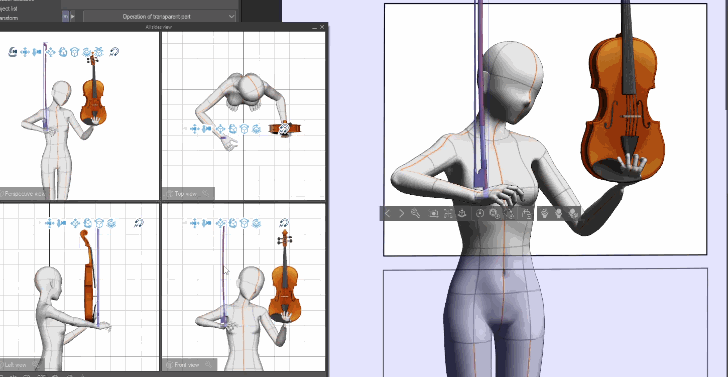
After achieving the desired pose, it's time to attach the violin and the bow to the figure.
-Navigate to [Object List], hold Shift and select both the violin and the violin bow.
-Hold and drag them into the figure to make them children of the parent (figure).
-Set attachment points for the child materials; in this case, the left hand for the violin and the right hand for the bow.
To remove the hierarchy, drag the material outside of the object list until you see a red line appear around the edges of the entire palette and then drop it.
Once the attachment points are set, any movement or rotation of the figure's hands will be reflected in the violin and bow. However, the violin and the bow are not in the correct position. Let's position the child materials accurately by manipulating them simultaneously in the four viewports.
Before proceeding, we need to adjust a few settings to ensure precise positioning.
For precise rotation, click [Rotation step] and reduce the rotation step to a smaller degree.
Remember to change the rotation and movement axis to [Object Axis] so that the manipulator follows the direction of the rotated object.
Head over to [Operation] to enable the snap function to snap the 3D objects to the figure, although manual adjustments may still be required for precise placement.
In this case, the violin doesn't snap to the neck precisely so you'll have to readjust manually, but it works well for the bow to snap to the violin.
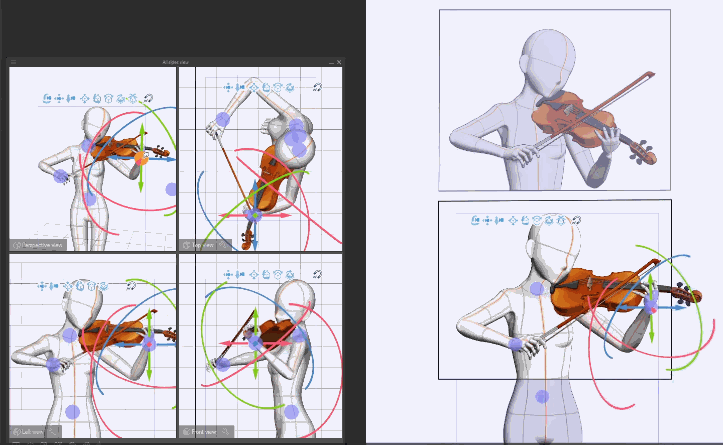
Step 6: Changing Pose
-Duplicate the 3D layer by right-clicking the layer name(not the icon) and drag it to the layer of second frame/panel.
-Then Adjust the camera angle to fit the figure inside the panel.
Now, here comes the fun part. By selecting the parent, you can effortlessly change the pose of the duplicated figure along with the attached models to create a fresh and dynamic look!
Take note it doesn’t only limit to the attachment points(left and right hand) we set earlier. Whether you move the arm or torso, the violin and bow will move in tandem. It's as simple as that!
Step 6B: Changing position to create Depth
At this stage, suppose you have multiple 3D figures and attached props.
With the parent-child hierarchy established, not only can you effortlessly adjust poses with attached models, but you can also easily create Depth by moving the position of multiple 3D objects at once.
For example, in this scene, after I have completed the posing and setting up the parent-child hierarchy, I aim to enhance the sense of depth. If I move the parents' position from the top view, the child material will also move correspondingly, allowing me to easily create depth in the scene.
This feature significantly saves time compared to manually adjusting each 3D model individually.
-If the manipulators are overlapped and hard to control, you can disable the rotate and scale manipulator from [Operation].
-Select the parent model from the front view and adjust its position from the top view.
Step 7: Saving Poses for Future Use
Once you are satisfied with the pose, you can save the new pose to the material palette for future use.
-Right-click on [Pose Material] to create a new folder.
-Navigate to the [Object] tab in the Sub Tool Detail.
-Click on [Register Material].
-Rename the new pose and save it within the folder you just created.
Now, you have a convenient library of poses that you can effortlessly apply to your 3D figure anytime by simply dragging and dropping. Enjoy the flexibility and efficiency of reusing your custom poses!
Step 8: Converting 3d Objects into Line Art and Tone
You can lower down the 3D layer opacity as a reference layer and draw on top of it .
Or, to integrate your 3D creations seamlessly into your artwork, consider converting the 3d layer into line art and tone.
In my case, I chose to convert the violin and bow only, leaving the 3D figure as a reference for me to draw on top of it.
To hide the figure only, you have to to get rid of the hierarchy first, because if you hide the parent material, the child material will follow along too.
-Go to [Object List] ,
-drag the child material outside of the object list until a red line appears around and drop it.
-Now you can hide the figure only.
Then, right-click the 3D layer, select [Convert to Lines and Tones].
Tick the Preview box and you can tweak the settings to see which is the best result for you.
My preference is using vector layer with a lower line width value.
Feel free to experiment with different settings. You can always come back to try again because the original 3d layer will still be preserved after converting into lines and tones.
Step 9: line Art and Refinement
When you are finished with the 3d manipulation, close the windows and focus on the canvas.
-Focus on the line art version of the 3d objects first by hiding all the screen tone layers.
-Then, use [Object] tool to select the outline layer and change the Brush shape to match your drawing brush or drawing style.
In my case, I don’t want the jagged and pixelated lines so I change the [Expression color] to [Grey] and change the brush shape to [Finger Tip] or any brush that has softer edges.
-Unhide the figure, then lower the opacity of 3D reference layer
-Hide the line art version of the violin and bow.
-Create a new layer and draw your line art directly on top of it.
Bring back the violin and bow. Erase and refine the line art.
Step 10: Adding Tone and Refinement
Create a new layer beneath the line art layer to introduce tone to your line art.
-Gradually reveal the tone layer(s) and, one by one, select the masking icon to perform cleanup or redraw screen tones as necessary.
In my case, I erase some screen tones to create some lighting effect.
Step 11: Background and effects
-Create a layer at the bottom of your artwork to draw the background.
-In my case, I applied toning first
-Then I use a effect brush to create a shine moment mood.
-To achieve screen tone effect, click [Tone] in the Layer Property.
Finally, I finish by adding a layer above the line art layer to draw some special effects. In my case, I draw musical effects.
Repeat all the same steps with the other panel.
Conclusion
That concludes the step-by-step guide on how to effectively utilize 3D material hierarchies in manga drawing.
Once you've become familiar with the intricacies of operating 3D functions, you'll be able to tackle more complex scenes, featuring multiple characters striking dynamic poses with props seamlessly attached.
Addressing a Common Concern
You might be wondering if posing these models is time-consuming and whether it's worth the effort.
Answer: Initially, yes, it does take some time to pose the models, but the long-term benefits are undeniable, especially in the realms of comics and animation. Clip Studio Paint enables you to permanently save all the poses you create, establishing a convenient library for future use. Furthermore, with the added feature of setting 3D Material Hierarchies, the creation process is significantly streamlined.
For instance, in a music-related comic where similar poses may recur multiple times, I can efficiently import previously saved poses and other objects, then link them together to establish a parent-child hierarchy.
(Note: Figure poses and other 3D objects are saved separately; repositioning and re-establishing the hierarchy is required.)
Alternatively, for a quicker workflow, follow these steps:
-Navigate to the [Object List].
-Select the Parent-Child Hierarchy materials (ensure both parent and child are selected).
-Press [Ctrl+c] to copy the materials.
-Go to a new panel/frame of a new canvas and press [Ctrl+v] to paste the materials at once
-Adjust the camera to find a new angle
With 3D Material Hierarchies set previously, you can change to a new pose easily.
Repeat the same process with other Parent-Child Hierarchy 3D models.
This approach not only saves time but also allows for the swift generation of new variations by adjusting the model's pose and camera angle as needed.
As demonstrated in this tutorial, I can now utilize these 3D objects as a strong reference layer for drawing atop them, or alternatively, convert them into line art and tone, or even a combination of both methods.
Thanks for tuning in! I hope the tips I shared are helpful in your art journey.
See you in the next tip!
Users who liked this post


Comment