
Hello! In this tutorial I want to show you several ways to make stickers, I hope it helps you a lot and you do beautiful things. 💛
1. A LITTLE THEORY
The stickers, although they are relatively new, have come to position themselves in a very significant way in our communication, because they can express feelings that many times the text cannot achieve.
A small list of tips for making stickers:
🔸 Stickers can be used in our conversations if they have generic expressions or have actions that we usually do, such as smiling, being sad or celebrating.
🔸 They have to be easy to understand. If what the sticker represents is difficult to understand, it will not be comfortable to use it. The stickers are usually simple since their size is small and too many details will not be seen.
🔸 Characters are always a good choice, but that doesn't mean you can't use other things. With the characters you can clearly express some action or expression, but for certain moments or if you want your printed stickers even if you can not use any food or other object in the same way as a character in a conversation, it will be very nice decorating a notebook or in your instagram stories.
🔸 Remember that if you want stickers for a specific social network you have to check if they have any requirements regarding size and other things.
🔸 The sticker packages follow the same graphic line, that is, in the same sticker package we could not put a realistic style rabbit drinking tea and in the other a cartoon style rabbit exercising, if they follow the same style it will be seen as a set where each harmonizes with the others and there are social networks where this is necessary, such as Line.
🔸 Making stickers is so much fun, take your time making them while having fun! The truth is that if it makes you happy and it is for you or your friends you can do them as you want.
2. PACKAGE OF PRETTY STICKERS
We are going to make a package of stickers, I will use the measurement 370 x 320 px. We start by preparing the canvas.
We go to [File> New], Type of work> Illustration.
I want to make a pack of stickers of bunnies doing different things, like lying down or throwing a kiss, I really like bunnies so I had a lot of fun with this.
I made the sketches of 8 bunny stickers in 8 different layers.
Now I made a layer folder for each sketch and made the lines clean. I wanted the stroke to be thick, I used Pen> Textured. Inside each layer folder I also painted them in a simple way.
You can paint it in the method you prefer, if you are going to use a filler cube like me, make sure it covers everything correctly, you can put a layer of a different background color to notice the spaces that may not have been painted.
In the end I did not like a couple of stickers so I changed them and I realized that one (the bunny that is celebrating) also looks nice crying and celebrating so I made two versions of that one just copying the folder and turning it horizontally.
To save them, go to [File> Export (one layer)> .png (PNG)]. Make sure you have disabled the view of the paper layer to make it a transparent background.
After choosing the location where we will save the file, we get this png export settings window, I leave it with the default values, I only notice that "For illustration" is selected in [Scaling Processing].
If you have the option "Preview rendering results on exit" checked in [Preview], you will get another window that allows you to see how your work would look once it was saved.
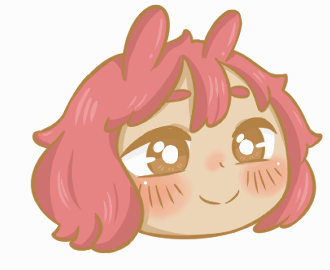
So they were at the end, they are 9 stickers that as you can see they all have something in common, they are the same character (a bunny) that does different things and more the colors it shows that they are part of the same package of stickers, this is important if you want them to see each other in harmony.
3. A LITTLE MORE OF THEORY
We are going to talk about some terms that the truth when I started did not understand anything of what they were, I hope this can make things a little easier for you.
🔸 Frames / Frame: They are the different images that make up an animation or movie, depending on the number of frames that are in a certain period of time, the project will look more or less fluid.
🔸 Fps: It comes from Frames per second or frames per second, it is a measure to know the number of frames there are in one second.
Els Cels: They are the cells where each image is made.
For example here we can see the difference in fluidity between an animated sticker of 3 frames to one of 10 frames.
There are different ways to make stickers, some simpler than others, but generally making a sticker with more frames involves more work, so if you are starting I recommend making fewer stickers until you get used to it. Luck!
4. BEAUTIFUL ANIMATED STICKERS
4a. Stickers frame by frame from scratch
We start by opening a new file, we go to [File> New], we will make a sticker type gif, I will use the size 320 x 270 px again and as it will be made for screens and not to be printed I will use a resolution of 72 that is enough .
To make stickers, which is something simple, I see it easier to work with Type of work> Illustration than with Animation, but you can also.
I select [Create moving illustration], I will make a 3 cels sticker at a speed of 6 frames per second.
If the timeline does not appear at the bottom, go to [Window> Timeline] and it will appear.
On the right you can see that there is an animation folder that contains the 3 cels that we specified when we created the canvas, each one of those cels corresponds to those in the timeline, those indicated by the arrow.
If you are going to make a sticker in motion you will have to paint each drawing part of the animation, repeating colors, it may not seem necessary if it is a slightly simpler sticker like the one we will do now, but if it is one with more frames like the From the one I used in the "a little more theory" example, it is very useful to have the color palette we are using at hand.
If I don't have the color set open, I go to [Window> Color Set] and when it appears I give the icon next to its name that says "Edit color set".
We get a window to edit the color set, I give "Add new settings" and put the name I want in the text box, I put "stickerconejo" and we accept.
We see our set of colors called empty rabbit sticker, if you have a previous color palette that you want to use you can locate them now, I will first paint a drawing where I will decide the colors and from there I will place them in the color set.
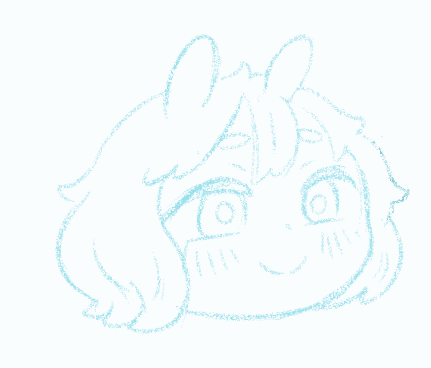
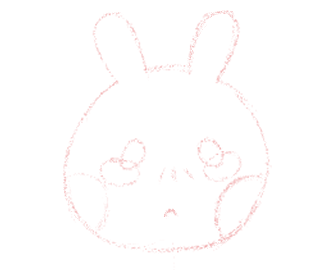
In cel 1 I will sketch the first drawing. For this sticker I will make a rabbit crying, the animation will be its tears falling.
To have the first drawing as a base and make the others from that, I give "Enable onion skin", so when you are in cel 2, cel 1 will be seen, but in a blue tone, so you can draw on it without discomfort making the changes you want.
You can change the onion skin settings if you want in [Animation> Show animation cels> Onion skin settings] you will get a window where you can change how the previous or the back color will look, among other settings.
I already made the sketch in each of the three frames, they were like this:
Now let's see how it looks in motion, in the "Timeline" we click "Play" and it looks like this:
Since we have the sketches we have to outline and paint each one, for this we need to create a folder for each cel, creating this layer makes everything inside be considered a cel.
We go to [Layer> Create folder and insert layer], we do this with each of the cels.
We change the name of the layers to have them in order. To the sketches I lowered the opacity to be able to do the delineation with comfort.
In this gif I just wanted there to be movement in the rabbit's expression and tears, so outlined the outline of his face I copied it for each folder and did the rest. I used Pen> Textured
This is what the outline of each cel in our gif looks like:
Now inside each folder I am going to paint the first cel. I used the Fill> Refer to other layers tool, this option allows you to paint fills on a different layer, this tool works quite well, but it could be that there are small spaces that have not been painted, you can use Fill> Close and fill for those parts or paint it with another tool like the nib.
Since I have the first cel ready, I will save the colors I used in the Color Set we created earlier. To save colors there I just have to have the "Drop Count" selected and click on the colors that I want saved in the "stickerconejo" Color Set.
This is how each cel looks once we finish painting it:
Now let's save it!
We will save this sticker in APNG format, which allows us to save it with a transparent background. Remember to turn off the visibility of the paper layer.
We go to [File> Export animation> Animated sticker (APNG)].
After deciding on the location of your file, you get this export settings window. For your gif to be a loop that repeats infinitely, you must have Loops> Unlimited selected, if you give the second option, which is Loops> Number of times, the gif will stop depending on the number of times you have placed it. going to repeat.
Finally you get a window that notifies you that the export was completed.
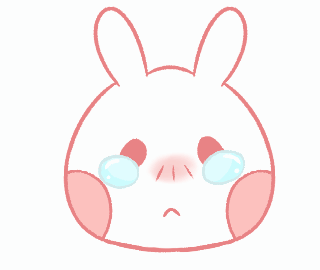
We already have it ready! The finished gif looks like this:
Note: The APNG format does not work on all websites, so you have to check the website specifications where you want to place it. For example, in this article they cannot be uploaded in this format, so I have to upload them in GIF format.
4b. Animated stickers from an illustration (with editable)
I do not know if the title is understood ha ha.
What if you have an illustration you made and want it to be an animated sticker? Or you may have made a sticker designed to be printed with a high quality and you also want it to have some movement for social networks.
If you have the editable file (that is, in clip studio paint format) you can do it this way.
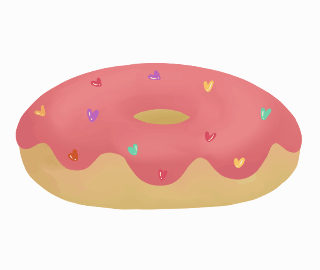
In this example I will use this illustration of a donut, select the folder that contains all the layers and give it Ctrl + C or go to [Edit> Copy].
We open a new file, we go to [File> New].
We select Type of work> Illustration. The size I will use the same as we used previously: 320 x 270 px in a resolution of 72. I select "Create illustration in motion", I want it to be something simple so my gif will have 3 cels, where the donut glaze will fall.
We select our first cel and go to [Layer> Create folder and insert layer], we do that with each cel.
In the folder of our first cel we are going to paste the folder that contains our illustration, it can be with Ctrl + V or [Edit> Paste].
Our artwork is larger than the canvas we are working on so we adjust the size with Ctrl + T or [Edit> Transform> Scale + / Scale - / Rotate].
Now I will copy the folder where the donut is and it will be pasted in cell 2, as I have the editable one of this file I went to the layer where I have the donut's glaze and with the brush I extended it.
Then I copied the folder I just worked on in cell three and did the same thing again, painted where the icing layer is to make it longer, like it's falling off.
When I finished we go to the "Play" button:
Our gif lasts 0.5 seconds.
If you think your gif is very fast, we will see how to slow it down.
(1) So is our current timeline.
(2) As I want to make it slower, I click on top of the blue pointer and drag to frame 6. When making the canvas we put in frame rate 6 frames per second, so extending our gif to frame 6 will last one second.
(3) Go down a little in the timeline, we also have to move the paper, in the same way we drag from the corner of the paper and take it to frame 6.
(4) We select any of the cells and we give "Delete specified cells", we do that with all of them.
(5) Now we click on the first cel and click "Specify cels".
We get this window to select the layers, we select layer 1 and we accept.
(6) We already have the first cel, we select frame number 3, so that the time that each cell appears in the gif is even and we give "specify cels", now selecting layer number 2. The same is done with the third cel.
(7) This is what our new timeline looks like.
The gif now lasts 1 sec and looks clearly slower than the previous one.
Now we are going to save it, I will export it in GIF format.
Let's go to [File> Export animation> Animated gif].
After choosing the location of the file we get the export settings tab, so that the gif repeats itself endlessly, remember to select in Loop> Unlimited.
Finished!
4c. Animated stickers from an illustration (image only)
I have this illustration in png to make it a gif, if it is not with a transparent background your image you can try to remove the background in the way you prefer if you want it to be without a background.
We start by opening the canvas, in [File> New] I will use the same size as before.
We are going to import the image in [File> Import> Image].
We will get the image in a size larger than the canvas so with [Operation> Object] we adjust to the desired size.
To rasterize the image, go to [Layer> Rasterize] or right click on the image layer and "Rasterize".
We go to [Window> Timeline].
In the timeline we click on "New timeline" and we get a window to configure it, in "Play time" we can put the number of frames, the seconds plus the frame or the temporal code, I left it in number of frames with 3. We give to accept.
Our timeline now looks like this:
We give "New animation folder".
We copy with Ctrl + C the rasterized folder of our image inside the animation folder according to the number of frames we are going to use, then we change the name of the cels to have order.
We select the first cel and we give "Specify layers".
In the window we select 1 and we accept.
We do the same with the other two cels.
Our timeline looks like this:
Now we create a layer folder for each cel in [Layer> Create folder and insert layer].
Our layers now look like this:
Inside the layer folder I made some glitters, in one layer I put the line and in another the color.
Remember to select "Enable onion skin".
I copied and pasted the glitter layers in the other folders of each cel, but I changed the color with Ctrl + U or [Edit> Tonal Correction> Hue / Saturation / Lightness].
To move the glitters from place first we are going to combine their layers, select the stroke layer and the color layer, right click and "Combine selected layers".
Now we can use the [Selection> Lasso] tool to select the glitters and move them around, the onion skin helps us see where the glitters from the previous layer were located.
And that's it!
Thank you very much for reading this, I hope it has served you. 💛
Users who liked this post


Comment