
"Simple Drawing of Rainbow Scenes: Rainbows, Halos and Sundogs"
The theme this time is Weather phenomena with the theme of "rainbow colors".
In this article, I have selected three weather phenomena related to rainbow colors, including rainbows, halos and sundogs, for drawing demonstrations. These elements are very suitable for use in fantasy and romantic style illustrations, welcome to take a look!
【Rainbow Scene】
start!
Since the demonstration in this article focuses on the sky and weather, I prepared a grassland as a background.
Drawing grass is very simple. Readers who are interested in drawing methods are welcome to refer to the appendix at the end of the article.
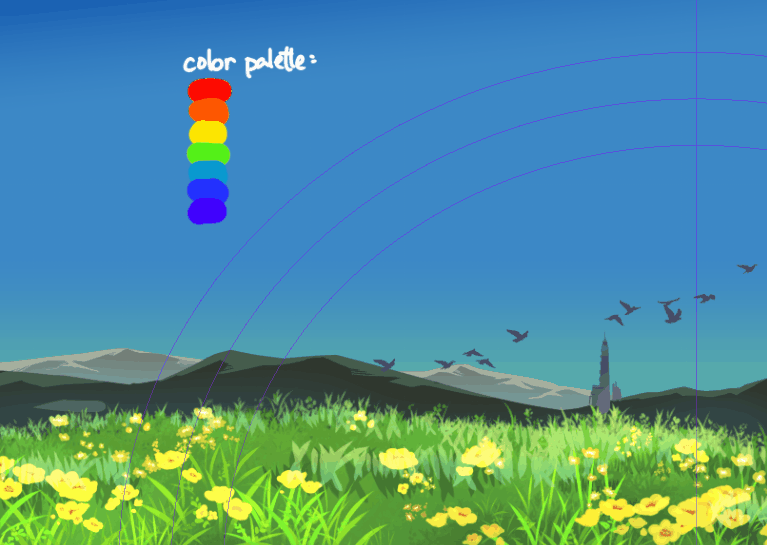
Then, please envision the rough composition first.
In the following draft, the positions including the "main rainbow", "secondary rainbow" and "cloud" are drawn:
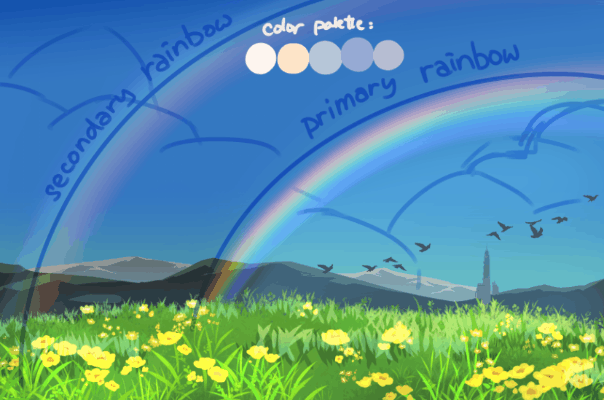
Main Rainbow: Illustrated theme. Depending on the composition, you can have a complete semicircle or only a partial arc.
Secondary Rainbow: A fainter rainbow located outside the main rainbow. Although it is often ignored in reality, adding it to illustrations can make the picture richer!
Clouds: Since rainbows are usually observed after rain, thicker clouds are designed here. But you can actually design some more varied clouds for your illustration, such as thinner clouds in the distance and thicker clouds near, etc.
✧ Sky
First, as always, we start with a simple color block as the base color! Then just add the upper and lower gradients and you’re done!
🔧 How to do
1. Use the fill tool to fill in blue.
2. Use the gradient tool → add color to the upper sky and lower sky respectively.
💡 TIPS——Color selection
The secret to making the sky look more interesting is the hue changes of the colors!
Upper Sky: A darker, more purple hue than the base color.
Lower Sky: A lighter, greener hue than the base color.
✧ Rainbow
When drawing a rainbow, please use the "Concentric Circle Ruler" of the "Special Ruler" to draw!
🔧 Using special rulers - How to do
1. Select the "Special Ruler" tool.
2. Select "Concentric Circles" in the tool properties window.
3. Draw out a circle according to the draft on the screen.
💡 TIPS
Please shrink the canvas in advance so that it is easier to draw the desired shape.
After creating a ruler, you can also use the "Object Selection" arrow to select the ruler and then adjust its shape.
4. Add a new layer and set the layer blending mode to "Screen". If you wish to use a layer folder, please set the folder to "Passthrough".
5. Use Airbrush (Soft) Tool. Please set it to "Alignable" in the tool properties.
6. Use bright colors (red, orange, yellow, green, blue, indigo, violet) to draw a rainbow. Red should be on the outermost side; purple should be on the innermost side.
💡 TIPS
When coloring, you can follow your personal preferences. For example, you can have more red to yellow parts and less blue to purple parts. Each color doesn't have to be evenly distributed.
Although the rainbow drawn here can be regarded as a passing rainbow, in order to reduce the stiff feeling, we can use the deformation function to make some changes to it. The following will introduce the "free deformation" and "mesh deformation" functions respectively:
🔧 Use the deformation function - how to do it
1. Please remove the ruler. Since the composition required a secondary rainbow, I decided to add another layer and move the ruler there directly for backup. Use the mouse to drag the ruler icon to the new layer.
2. Select the [Edit→Deformation→Mesh Deformation] function; or the [Edit→Deformation→Free Deformation] function.
3. Adjust the rainbow shape.
Rainbows closer to the sky are wider at the top, while rainbows closer to the ground are narrower at the bottom.
The picture below uses solid colored lines for a clearer explanation:
Method ①: Use "Mesh Deformation", the demonstration is as follows.
Method ②: Use "Free Transformation" (when freely moving the corners of the deformation frame, you need to hold down the [Ctrl] key + the left mouse button)
💡 TIPS
Regarding mesh deformation: Please place the mesh close to both sides of the rainbow. You can adjust the number of meshes in the tool properties window.
If necessary, it is also possible to use both methods at the same time:
These two deformation methods have their own advantages, please choose according to your own needs!
Mesh Deformation: Can make more detailed changes. However, it is difficult for beginners to master, especially when the number of grids is large, it will be easy to create distortions that violate perspective.
Free Transformation: It is very easy to create a sense of distance. But in fact, "perspective distance perception" and "shape change of the object itself" are visually different. If you pursue detail, you need to fine-tune it.
In addition to changes in shape, let’s also add changes in light!
🔧 Use layer mask - how to do it
1. Create a layer mask for the layer.
2. Select "Transparent" for the color and use the airbrush tool.
3. After clicking the layer mask icon, lightly paint on the head and tail of the rainbow.
This will make the rainbow more varied!
✧ Secondary Rainbow
Basically, the secondary rainbow is drawn in the same way as the main rainbow. Please repeat the above steps to draw!
📝 Notes
The concentric circles should be in the same position as the main rainbow.
The order of the colors of the secondary rainbow is opposite to that of the main rainbow, that is, red is on the inside and purple is on the outside.
The secondary rainbow will be darker than the main rainbow, so the opacity of the layer needs to be lowered. The example picture shows 20%, but you can actually change the value as needed.
✧ Adjust light and darkness
I don’t know if you have noticed, but the light inside the rainbow is usually stronger! So below I will use the layer's blending mode to make further adjustments.
🔧 How to do
a. Add a new layer with the blending mode of "Color Boost" and use an airbrush to paint lavender on the outside of the main rainbow.
b. Add a new layer with the blending mode "Screen" and use an airbrush to paint dark blue on the inside of the main rainbow.
✧ clouds
Although there are many brushes specifically designed for painting clouds in the Clip Studio Paint library, here we will use the preset brushes to demonstrate the basic tips for painting clouds.
In the demonstration image below, the "Thin Ink Smudge" brush is used.
"Thin Ink Smudge" is one of the default initial brushes of CSP. If you can't find it in your device, you can find it here【Dip pen・Brush_Ver. 1.10.9] Re-download (it is the sixth brush of the ink category in the official screenshot).
For how to install brushes, please refer to this official help.
✍ ️Drawing Method
1. First draw the background color in the shape of an upper chord semicircle; brush size: maximum.
2. Paint the shadow in the shape of an upper chord semicircle; brush size: large.
3. Paint the bright spot in a flat oval shape; brush size: medium.
4. Finally, draw the brightest part in a flat oval shape; brush size: small.
🎨 Color Choice
You can use dark or light colors for the background, depending on the thickness of the cloud edges and the position of the light source.
Choose a more purple or blue hue for the shadow color; and a yellower hue for the highlight color.
💡 TIPS
If you want to draw more layered clouds, you can repeat the steps, that is, shadow → light → shadow → light, etc., and add slight reflected light in the shadow.
Since the sun is usually behind the observer when observing a rainbow, please avoid drawing too obvious side lighting when painting clouds (and other scenery). Use front lighting to be more convincing. If you want the lighting to be more interesting, consider designing the light source to be in a higher or lower position.
✧ Color light and dark adjustment
Because we added a color-added layer above the outside of the rainbow, it affects the clouds on the left to become darker. At this point, you can create a layer mask on the color-added layer to lighten the color of the cloud highlights. In addition, I also used hue compensation functions (such as Ctrl+U) to make final adjustments.
Complete the rainbow scene!
[Halo and Sundog Scenes]
Although the solar halo and the rainbow are the same optical phenomena that show iridescent colors, their composition principles are actually different.
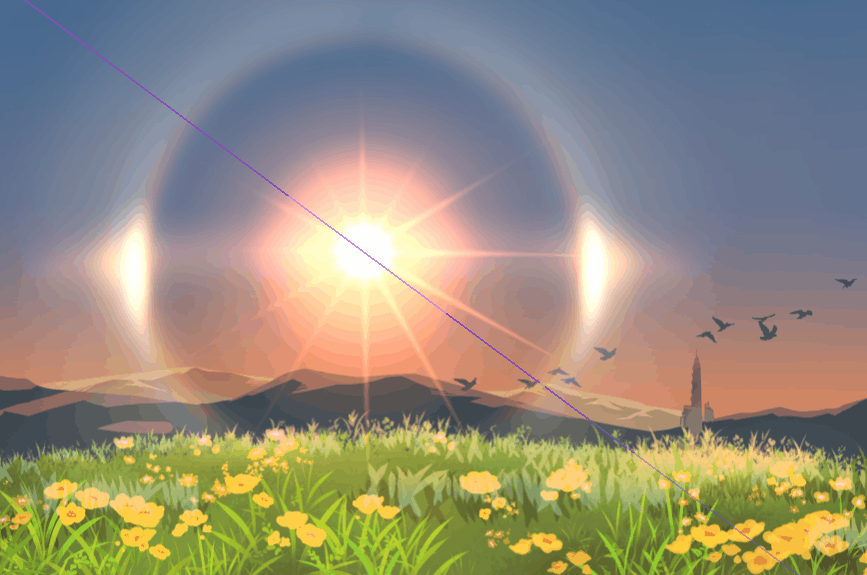
Unlike observing a rainbow with your back to the sun, the solar halo is observed with the sun as the center of the circle. In rare cases, there is a fainter second halo farther out.
Sundogs are two very bright points of light appearing on both sides of the sun, usually appearing together with a solar halo. The positions of the two sundogs form a horizontal straight line with the sun, but in painting they can be designed to be slightly arcuate due to lens distortion.
Sundogs usually occur during sunrise or sunset, while solar halos vary. The solar halo can be observed even at noon.
In fact, in most cases, solar halos are not accompanied by sundogs. But in order to show more painting methods in the demonstration picture, I decided to paint these two phenomena at the same time.
First, the first step is to decide the position of each object on the draft:
✧ Sky
Since the time is designed to be at sunset when the sun is closer to the horizon, the sky this time uses a combination of blue, purple, and orange.
Other scenery has also been adjusted accordingly to have an orange and darker color.
If you are more particular, you also need to adjust the object's shadow to the shape formed by backlight, which will also form the outline light of the object. However, since the focus of this article is to explain how to draw the sky and weather, I will omit it a little here and only reduce the brightness.
✧ sun
🔧 Steps
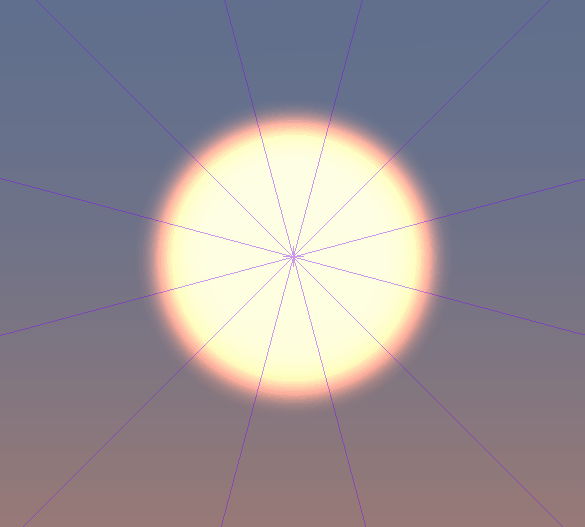
1&2. Create a new layer folder and set the folder's blending mode to "Penetrate".
3&4. Create a "Symmetry Ruler" in the folder and set the number of lines to 8 or above. The center of the ruler is the position of the sun.
5&6. Add a new layer in the folder and set the blending mode to "Add (Glow)".
7. Using an airbrush and bright orange, draw a circle in the center of the ruler.
💡 TIPS——Color selection
Since the demonstration picture depicts the sunset at dusk, orange is used. If you are painting when the sun is stronger, such as midday, you can also use lighter and bluer colors. If you can't decide, it's not a bad idea to adjust the color tone all at once at the end.
After completing the base color of the circle, you can paint as you wish
①Shorter radiation (steps 8a to 8c),
②Longer and narrower radiation (steps 8a to 8e),
Or make your selection by ③Longer and wider radiation (steps 9a to 9c).
①Draw shorter radial lines:
8a. Duplicate the sun’s layer.
8b. Select the Skew tool.
8c. Draw the shape of the radial lines on the newly copied layer: draw outwards in the middle of the two ruler lines, and draw inward above the ruler lines.
You can also add ② smaller radiation based on your preference:
8d. Use the airbrush (stronger) to draw radial lines.
8e. Use an airbrush (soft), cancel the "alignable" setting, and use a transparent color to erase some of the excessively long radiation lines to create a long-short-long-short interval rhythm. You can also increase the asymmetry of the radiation according to your preference.
③Drawing longer and wider radial lines:
9a. After adding a new layer, use the polyline selection tool and set it to "Alignable".
9b. Check out a quadrilateral between the two rulers and compasses.
【💡 POINT】When checking, please note: Ⅰ. The distance between the left and right sides and the ruler should be similar; Ⅱ. The lower part needs to cross the background of the sun.
9c. Use the airbrush to paint the center on a new Add (Glow) layer.
9d. Duplicate the radiation layer, use the Free Transform function, shrink and rotate it to fill the gaps that are not illuminated by the light.
9e. Merge the two radiation layers, use [Filter → Blur → Gaussian Blur], and adjust the intensity to the point where sharp edges cannot be seen.
9f. Use the airbrush to paint on the new Additive (Glow) layer in the shape of a triangle near the center.
9g. Use the airbrush to paint on the new "Add (Glow)" layer, with the shape of a circle in the center.
Then use the Skew Tool with a smaller brush size to gently draw outward on the radial lines. Depending on the need, it is also possible to draw inward.
9h. Select all the layers with radial lines drawn on them, use the mesh deformation function, and set the number of meshes to "3, 3" to make changes in the length of the radial lines.
【💡 POINT】Keep the middle line vertical and horizontal during deformation to ensure reasonable deformation results.
9i. After canceling the “alignable” setting of the spray gun, use a transparent color to erase some of the excessively long radiation lines to create a long-short-long-short interval rhythm. You can also increase the asymmetry of the radiation according to your preference.
Next, you can choose to continue the following steps with either [Step 8] or [Step 9].
10. Create a new layer, continue to add the blending mode (glow), and use an airbrush to paint the sun.
Repeat this step after enlarging the brush, for example, two new layers are added in the picture below.
11. Adjust the layer opacity.
You can also resize it as needed (for example, the first sun layer is reduced in the picture below).
When using free deformation scaling, hold down the [Shift] and [Alt] keys at the same time to maintain the proportion and center scaling.
12. Please place the sun layer group above all layers so that the light can cover the scene.
💡 TIPS
Stack multiple layers: The reason is that by controlling the opacity of each layer, the effect of making the glare slightly uneven can be achieved. In addition, it is also convenient to adjust the overall brightness and size of the sun to suit composition needs. After completing the sun part, right-click the layer folder and select "Combine Selected Layers" to merge them all at once.
Sunlight Rays: If all lengths are the same, it will look too stiff. You need to deliberately make them long and short so that you can have a rhythmic beauty.
Layer Blending Mode: In addition to "Add (Glow)", you can also try other modes, such as "Highlight Color", etc., which will also have good results.
✧ Sun halo
Basically, the way to draw a sun halo is the same as a rainbow. Please pay attention to the following and repeat the steps of painting the rainbow before making adjustments.
📝 Notes
The position of the center of the concentric circle is the position of the sun.
Press the [Shift key] while creating a concentric circle ruler to obtain a perfect circular ruler.
The order of the halo colors is red on the innermost side and purple on the outermost side.
Unlike the rainbow, the sunlight is directly in front of the observer. Due to the influence of strong light, the seven colors may not be completely observed**. Usually red is the most obvious, but you can also just paint red-yellow-blue. The purple on the outside can be omitted or even turned into white. And the color is not very bright, usually a bit lighter.
The reason is the same as above, the corona will not be very thick.
💡 TIPS
Colored circles that are too narrow may sometimes accidentally leave a gap in the middle when painting and have to be repainted.
At this time, you can first draw the circle with a brush size that you feel comfortable with, and then use the shrink function in the skew function to adjust it, but you need to pay attention to whether the image will break at the edge of the canvas.

Then, use the Free Transform feature to add variation to the halo.
【💡 POINT】When deforming, pay attention to the position of the cross in the middle and keep it close to the center point of the sun.
📝 Remarks
Please note that theoretically the corona is a perfect circle. The reason why it is distorted here is to imply the deformation caused by a strong sense of perspective, or the image is distorted by the lens, so the degree of distortion is generally not too great.
Following on from the above, if the scene you are painting requires a very accurate sense of perspective (such as a building), please remember to match the perspective of the two. Otherwise, it is okay to skip the halo deformation step.
Just like the rainbow part, please use Layer Mask to make changes in light. You can also adjust the overall opacity of the layer according to your preference to achieve the best effect.
Since the demonstration image contains phantom spots on both sides of the horizon, the light above and below the halo will be the weakest.
In addition, the light of the solar halo should not cover the nearby scenery (i.e. grassland); the distant mountains can be dyed with a little light, which can imply emphasis on the difference between distant and near scenery.
✧ Adjust light and darkness
There is also a difference in light and darkness inside and outside the solar halo. Contrary to rainbows, the outside of the solar halo is brighter.
Next, we will also use the layer's blending mode to make light and dark adjustments.
✧ Sun Dog
If your composition only includes the halo, you're done with the previous part.
In the next part, we will demonstrate how to draw "Sun Dog".
🔧 Steps
1. Create a new layer folder and set the folder's blending mode to "Through".
2. Create a "Symmetry Ruler" in the folder and set the number of lines to 2. The center of the ruler is the position of the sun.
3. As shown in the figure below, use multiple layers to stack the shape of the magic sun point. The principle is the same as that of the sun.
📝 Remarks
Here is a demonstration of the effect of stacking layers with different blending modes. In fact, you are very free to use which mixing mode, please feel free to try different combinations!
Although "helioids" are said to be points of light on both sides of the sun, in fact they are usually not round. When drawing, please follow the arc of the sun's halo and draw a point of light extending up and down.
The "heliodog ring" is drawn in the demonstration picture, which is a horizontal halo connected between the heliodog and the sun. Sundog rings are not necessarily observed and can be skipped. If painted, the heliotrope ring will usually be brighter near the sun and the location of the heliotrope.
✧ Lens reflected light (lens flare)
Since the sun is in front of the lens, try adding lens reflections to further enrich the image!
In the example image below, the "Moisture" brush is used.
"Moisture" is one of the default initial brushes of CSP. If you can't find it in your device, you can re-download it at the [Dip Pen·Brush_Ver.1.10.9] material location mentioned above (it is the eighth in the watercolor category in the official screenshots brush).
🔧 Steps
1. Create "Linear Ruler". The ruler must be positioned through the center of the sun.
2. Use the "Moisture" brush to draw the lens flare. For layers, set the blending mode to "Highlight Color (Glow)", it doesn't matter even if you only use one layer. But if you want to use multiple layers, the layer folder you create needs to be set to "Penetrate" just like the previous part.
📝 Remarks
Shapes that make up lens flares, including solid circles, hollow circles, and ovals. When drawing, the key point of strokes is to use "points" instead of drawing to the end in one stroke.
Light points can be overlapped when painting, and the positions do not have to be separated.
When painting, please deliberately adjust the brush size and stroke weight to create the effect of different light spot sizes.
In this composition, the brightest thing should be the sun, followed by the sun dog. So be careful not to overpower the first two with lens flare.
Although only one color is used in the demonstration image, it is actually possible to paint with multiple colors. Common colors include green, cyan, blue and magenta.
In addition, you can further add the Color Aberration Filter effect according to your personal preferences (※Function added after CLIP STUDIO PAINT Ver.3.0).
🔧 How to do
1. Click [Filter → Effect → Color Aberration (Color Plate Misalignment)] in the upper bar.
2. Select "Radial (use center point)".
3. Move the red "x" on the screen to the position of the sun, and the intensity can be set according to your preference. Finish!
💡 TIPS
If your CSP does not yet have this filter function, you can also consider searching in the material library. There are also many users sharing their automatic actions that have been set to achieve color difference effects!
This completes two illustrations with different backgrounds!
In addition, parts such as [Sun] and [Lens Flare] are also very suitable to be used separately to draw illustrations of other sunny weather!
Appendix: Grassland
Regarding the painting method of the background part other than the sky, it has been explained in another tip article "Simple Drawing Scenes". Welcome to the following location for reference!
The grass brush uses the following materials. Many thanks to the author of the brush!
Conclusion
Thank you for reading this far!
What do you think of this teaching?
Feel free to leave a message and let me know! Hope this tutorial is helpful to you.
Users who liked this post


Comment