
Introduction
Hi, I'm Sylsur, it's a pleasure to greet you.
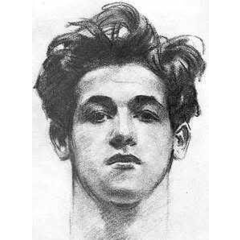
This time I will show you the process of how to make a portrait.
From three different ways of making the sketch to the way it can be painted.
You can also watch the video and remember to activate the subtitles with the ¨c¨ key.
I thank Victoria C. for allowing me to use her photography to do this tutorial:)
Let's get started!
Video
3 Ways to sketch.
No. 1
The first is to draw lines on top of a copy of the photograph.
First draw a circle and divide it vertically and horizontally.
Draw the jaw
Then draw the horizontal lines for the nose and mouth
Draw an oval for the torso
Circles for joints
And cylinders for the arms
I draw additional lines for the eyes, it is easier for me that way, but you are free to do them or not.
We repeat the procedure to copy the photograph or image.
This way can be applied in analog and digital to design original characters, but it can also be used for copying.
No. 2
The second way is to use a grid to copy the image.
Go to the -View- and -Rule- tab or Ctrl + r
We make a selection of the size of the photograph
We mark the boxes with the tool -Figure- and -Straight line-
Duplicate the selection and list a squad
Use an appropriate color so that it is visible without being offensive to the eye, so we will work in a more comfortable way.
We begin to copy the image
The numbers will help us guide us, so as not to make mistakes and thus draw in the correct box
You have to draw the line inside the box in the same position as the original
But also taking care that it looks like a single flowing line in the overall drawing.
You will wonder how to know the number of squares you must mark.
This will depend on how much skill you have when drawing since if you do not have as much experience in drawing you will have to make smaller pictures.
It is advisable to make a fairly accurate drawing is to mark the 1cm x 1cm squares in the image that you will copy
Then mark the grid in the area where you will copy the image, it does not matter if it is larger or smaller than the photo
You just need to measure your sheet, canvas, etc. and divide it by the number of frames you marked in the original, only on one side
Either from above / below or from either side.
This method can only be used in analog since in digital there are other easier ways to do it.
It is quite useful when you need to copy a design or image in a space with specific measurements and avoid unnecessary mistakes.
No. 3
The third way to do it is to copy the image directly, tracing the lines on the photograph.
Something very important that I have to mention is that you can use these last 2 methods, but remember that you should not get into the habit of doing it.
Since if you stop drawing in eye-hand coordination, it will be counterproductive to grow as an artist.
Order to paint the portrait.
Now that we have our sketch ready, we will begin to paint following this order.
He begins to paint what is in the background and thus continue painting backwards.
You can see which areas are listed, we start with the lowest number and end with the highest.
To paint!
I made the background with the gradient tool, then I blurred the colors with the -color blending tool- and adjusted the brightness and contrast of the layer in the tab
-Editing- / -Tonal correction-
Remember to rasterize the layer to be able to modify it.
Now click on the -File- / -Open- tab and we open the original photograph.
Drag the image tab to have it in a separate window.
Jacket
In a different layer we paint the clothes
We choose from the original photo the intermediate color of the clothes, the lightest and the darkest.
The sketch has to be on top of the other layers.
We apply a solid base of the intermediate color throughout the area that we are going to paint.
Mark the darkest areas with the tool -Brush- / -Transparent watercolor- guiding you with the sketch.
With the tool -Airbrush- / -Spray- we apply alternating between the lighter and the darkest color.
Trying to apply blurred color in the areas that are necessary
And more concentrated in the areas where it is darkest and where it has more light.
Something very important when doing any work in realism is to pay attention to details and recreate them as closely as possible.
Neck
For the neck, you apply the light color, then the darkest and the intermediate with the dense watercolor tool, transparent watercolor and the airbrush.
Shirt
We apply the same procedure that we use for the jacket, but this time since it is a garment with squares we apply the color in that way, applying the lighter color as a base and then the squares of the other color, using the tool for selection - Tie-.
The difference this time is that we apply the shadow at the end.
Hair
We continue with the hair, painting first what is in the background and then what is in front.
Painting the hair can be difficult, but if you see the hair in parts, that is, if you see the light and dark colors as silhouettes and then join them it will be a little easier. Apply alternating colors.
For the base use the brush tool / -dense watercolor- / -transparent watercolor-
With the -transparent watercolor- start applying the color in the part that is most highlighted or strongest and ends in the lightest. Like an airplane taking off.
So on until the desired area is filled
And finally, to make the hairs look more real, use the -dense watercolor- with a fairly small size.
Also apply alternating shades.
The minimum of colors or shades that you can use to paint a hair should not be less than five because otherwise it will look a bit flat.
We continue with the following parts of the clothing, using the same process.
To make the stitches you can use the tool -rule- / -pencil ruler- and -dense watercolor-
Eyes
In another layer we start by painting the sclera with the intermediate base color, so in this way we can add light and shadow.
Paint the glitter and blur it, after you have the base lock the transparent pixels in the layer options.
Remember that the colors are taken from the original photograph using the -Eyedropper- tool or you can press the -Alt- key
Do those little details as these are what ultimately make it look ¨real¨.
We paint the iris and the pupil, the edge should be a little blurred, for that use -Blur- very slightly on the edge of the iris.
Use the tool -Color Mix- for the inner part and finally we add the glitter.
Facial skin
We continue with the skin in another layer, for the base you can use -Dense Watercolor- or use the -Lace- tool and fill the selection.
Blocks transparent pixels
Apply the skin colors with the airbrush, according to the photograph.
To correct you can use the base color, and the tools -Color Mix- and -Blur-
Making a realistic portrait takes a lot of time and patience, so if you don't see immediate results don't worry!
As You paint it will take shape.
Also use the tool -Transparent Watercolor- for the face in the same way that we did with the hair.
Try to compare the tonality of the face with the original photo because if it is too light it will look flat.
And for the face to be seen with "depth" it is necessary to color the darker areas with the correct tonality.
The areas that are usually darker are the eye socket, one side of the nose as well as the mouth, and one side or edge of the face.
Depending on how intense the light is, so will the shadow.
Don't be afraid when you paint as any mistakes you make can be corrected.
Using the guide from our sketch we will make the eyelids and eyelashes with the same tools. Trying to make each tab individually.
Already having the eyelashes made will help us to see the balance of the entire face and for that reason we will also paint the mouth before finishing the facial skin.
Lips
In another layer we apply the base with the intermediate color and -Transparent watercolor- leaving the inner part of the lips darker.
To avoid overlapping the colors, use the Lasso tool to select the lower lip.
Then we paint the dark line between the lips and with the same tone apply the shadow to this line with a larger brush size, in a very soft and delicate way.
Also apply the shadow to the upper and lower lip with the same shade.
And finally, paint the small folds making a light line followed by a dark one.
Nose
We continue painting the skin and now we paint the nose with the help of the -lazo- tool to make the tip of the nose.
Eyebrows
Paint the eyebrows by applying a colored base in the darker areas and making the hairs individually.
Commonly the parts that receive the most light are the forehead, tip of the nose, cheekbones and chin.
And that's where we need to work to give it depth and also around the eyes.
We also apply a more pink color on the cheekbones and cheeks.
To give it that resemblance to real skin we use the tool -Airbrush- and -Spray-
Alternate between light and dark color.
We apply with a fairly low hardness and quantity of paint.
In this way, we will touch up again and again in the different parts of the face until we obtain the desired result.
The beret is painted the same way the blue jacket was made.
We add the corresponding shadow with the -Airbrush- tool
We adjust a few details, the contrast and voila.
We have finished the ¨Retrato Realista¨
I hope this tutorial is useful for you and thank you for your time.
Until next time.
Users who liked this post


Comment