Guide to animating in ClipStudio - from Zero

-
 MVP ◆This user has contributed greatly to the management of the community, by posting many great responses to the questions asked. Once every three months, MVPs are determined based on the points earned during that period and will be recognized accordingly.
 -
 New Valuable Player (NVP) ◆These are the next-best contributors to the community after MVPs. This is awarded to users who have not yet won an MVP award, based on the number of points they have earned.
 -
 Official Expert ◆Chosen out of all MVP awardees, who are already proof of excellence, this is a testimony of outstanding correspondence in the community. After careful screening, they are appointed by CELSYS and assume their position.Note: Formally called “Evangelists”
 -
 CELSYS official moderators ◆Moderators are official CELSYS staff members who are fluent in Japanese as well as various other languages. As moderators are not experts on software or creative work, they will not be able to directly answer your questions. However, moderators will provide communication and language support to ensure that everyone can smoothly communicate with each other.
 -
 CELSYS officialThis is the official administrator account.
Learn Animating from Zero - Terminology. Use of keyframes. Camerawork
Wanna know how to go from this:
...to this?
--->
(turn on the sound, but not too loud)
And that's just a picture! With no moving elements! But isn't the presentation much more powerful with the camerawork, then when the character is still, frozen in time?
And it's not complicated to do this. Not anymore - I read the tutorials and the manuals, and watched various guides so you won't have to.
Friends, today you are going to unlock the next level of using ClipStudio. It’s time to see how you can benefit from such fancy yet simple functions: keyframes and camerawork!
This guide is beginner-friendly. If you know nothing about animating, it’s okay because it also covers the basics of animation. Firstly, you’ll learn about keyframes - what, why, where and how. Then about camerawork and why it matters. Finally, how to combine them in your work.
Let’s go.
Correction: Let's ascend to the next level of artistry!
Understanding the terminology
------------
First, let's establish what's a frame.
A frame is one image (one drawing) out of the entirety of your animation. If your animation is a book, then a frame is one page.
But this tutorial is about keyframes, right? So, what’s a keyframe, and how are they different?
Well, a keyframe is a just frame that corresponds to a key.
Hoho, but what’s a key?
A key is a key moment of your animation. Example: you have an animation of a person smiling. The keys are - when the person doesn’t smile, and when a person finally smiles.
A key has something happening in it (an event) and it has the timing of when the event happens.
Thus, keyframes specify what happens and when it happens. The keyframes are the drawings that correspond to your keys, and they make the backbone of your animation.
So, in the previously mentioned case of person smiling, these are your keyframes:
Let's call this Keyframe A
And this one will be Keyframe B:
So you have the keyframes, but the change between them feels too sudden. There is a gap between the moment A and the moment B, when the person doesn't yet smile. There should be a transition.
We're going to fill this gap with another drawing:
Here, the person isn't smiling, but her mouth is opened. This is our transition.
We’re going to add this drawing in-between the Keyframe A and Keyframe B.
We just now made an "in-between." And what we did is called the "tweening" of the frames.
--
To sum it up:
An in-between is an intermediate, or a transitional, frame that’s in-between the keyframes. In-betweens fill the moment between the keyframes, and create a smooth transition from Keyframe A to Keyframe B.
An in-between is also called a "tween". Therefore, the process of adding in-betweens - the “in-betweening” is also called “tweening”.
--
And I hope it makes sense in other languages. And if doesn't, you have my sympathy.
-----
In traditional animation, everything was drawn by hand, on paper. This includes all the in-betweens. Usually the main animator would draw the keyframes. The task of tweening would go over to an apprentice, a helper, or another animator.
In digital animation, your helper is your software. The software aids the process of tweening by generating a smooth transition from Keyframe A to Keyframe B on its own. Therefore, drawing by hand all the in-betweens is not needed.
That’s also what we will look into today.
Now you know the vocabulary. Let's talk about how to do the necessary setup in ClipStudio Paint.
ABCs of animating in ClipStudio
We’ll start from the very basics. I’ve reset my workspace to Default, so you can see how to setup everything completely
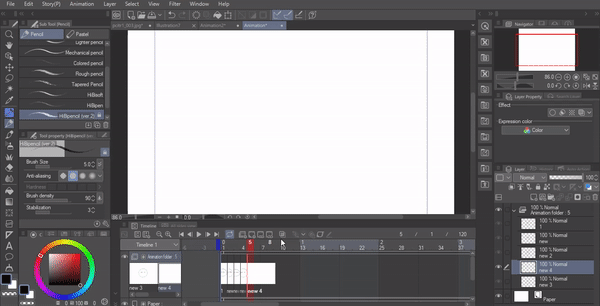
1. Creating a new file
In the upper left corner, go to [File] → [New File]
Select the video icon.
Specify the frame rate. ( you can change the settings later on as well)
Frame rate is how many frames per second will your animation show. How fast you flip thought the pages of the animation.
High frame rate --> smooth; Low frame rate --> choppy. The higher the frame rate, the better quality you get.
Standard: 24 fps (frames per second)
You'll see people using 8 fps up to 60 fps.
I usually do it on 12 fps. Here I set it on 12 fps as well.
Choose the size of the output frame. Everything that’s in the blue box will be exported. The margins beyond the blue box are meant for your notes.
Below is the screenshot of what it'll look like. The margins contain my ideas that I had whilst working. I wanted to review them later, so I noted them down in the margins.
Writing on margins is also useful when you are working in a team, and will hand over the work to other people. That's why when exporting the animation, you'll be able to choose to export them as well. But by default, only what’s inside the blue box will be seen on the final screen.
After you adjusted your preferences, click 'OK'.
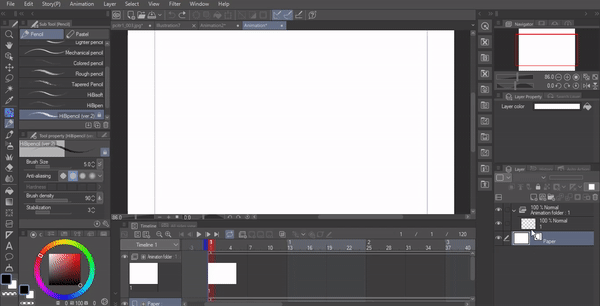
2. Setting up the workspace
Now you need to enable your [Timeline] Palette. By default, it is hidden. To bring it onto your workspace, go to
[Window] --> [Timeline]
Now you have your [Timeline] Palette displayed at the bottom of your screen.
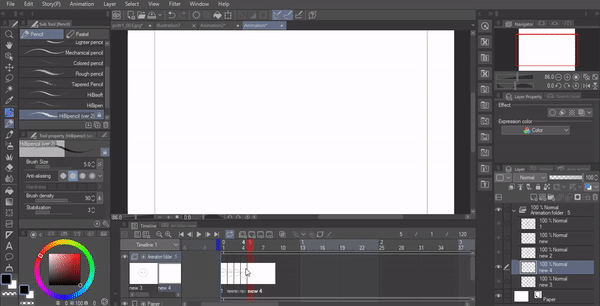
In the lower left corner of your screen, in your [Layer] Palette, you will have one animation folder with one layer in it:
Oh! - you’ll say. What’s an animation folder?
3. Difference between a normal folder and an animation folder:
Normal folder: all layers, even if unselected, are still going to be visible by default. To make them invisible you click on the eye icon.
I have created a Normal folder with three layers. On Layer 1, I drew a human. On Layer 2, there is a giraffe-fox hybrid. On Layer 3, there is a balloon.
And even though my selected layer is Layer 3 with the balloon, I can still see the giraffe and the human figure.
That's not the case with animation folders.
Once put inside an animation folder, the layer works similar to a sheet of paper used by traditional animators.
If you're looking at the page that has a giraffe, a giraffe is all you're going to see:
And as the name indicates, it's a folder for animation. So, to be able to use a layer in an animation, it needs to be inside your animation folder.
Now let's go back to our Timeline Palette.
4. Icon shortcuts on the Timeline Palette - the top 4 you need to know
1) Add a new animation folder
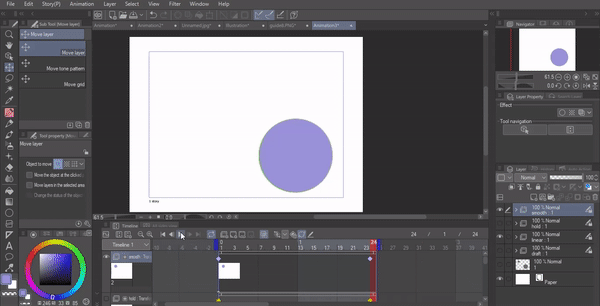
Click on it to add a new animation folder. The new folder will be created on the selected frame - on the frame that's highlighted with that big dark-red cursor ( it's frame 1 on the screenshot).
Why is it useful? For the organization of your layers. Example: you would have a separate animation folder for your character and a separate animation folder for your background.
2) Add a layer to a timeline
This button creates a new layer that will be automatically assigned to a frame that you have selected.
You can also create a layer using the Layer Palette, but in that case you will have to manually assign it to a frame.
So, as you now understood, it's not enough for a layer to be inside an animation folder. It also has to be assigned to a specific frame on your timeline.
How to assign a layer? Use the next icon:
3) Assign/link a layer to a frame
Select your frame. Click on this icon to open a window. Select a layer to assign.
(demonstration below)
4) Unlink your layer from a frame
Removes your layer from the frame it was previously assigned to. This action will not delete your layer from the Layer Palette. The unlinked layer is still kept inside your animation folder. You will be able to keep the removed layer, or reassign it.
5. Additional info
1) The order of the layers in your [Layer] Palette will not affect the order of the layers on your timeline. All that matters is the order of frames to which you have assigned the layers.
2) To move from frame to frame, move the red cursor. You can click on it, and drag it back and forth, previewing the animation:
3) You can make your layers see-through. This helps when you're drawing the in-betweens.
To do this, enable the setting: [Onion Skin]
You can do this by clicking on this button:
The previous layer will be shown as blue. And the next (the future layer) will be shown as green. You can change the settings of the Onion Skin by going to
[Animation]--> [Show animation cels] --> [Onion skin settings...]
There you can again enable/disable the Onion Skin, but I find the shortcut on the Timeline Palette very useful.
In the [Onion Skin Settings], you can change the number of skins (meaning how many layers you want to see), and the color of the frames. That's useful if you have a hard time distinguishing between blue and green, or if you prefer other colors.
Interesting fact:
Now you have seen a couple of times the word "cel". A "cel" refers to that transparent sheet on which traditional animators used to draw each frame. In digital animation, a "cel" is basically what you see on your keyframe.
If so far you followed the guide well, then you know the basics of animating and can now animate without an issue. (and if you didn't - that's alright. You can reread the guide and watch the clips. Take your time, and try to reproduce each step on your computer ^_^ )
It's time to dig into the fun stuff - how to animate better.
Keyframes
In digital software, the definition of a keyframe is a bit different from the traditional definition. The line between a "keyframe" and an "in-between" is not traced the same way as in traditional animation.
To put it simply, to ClipStudio, each of your drawings can be classified as a keyframe. The tweening is a task of the software, done automatically. It doesn't matter if you yourself classify the drawing on the Frame X as an "in-between". The software can go further than you, and basically "tween" your "in-betweens".
So, from here onwards, we're going to talk about things that are related to keyframes only.
As we established before, each keyframe records a value in time and space.
If you have an animation with a ball, then each keyframe will be recording the information about the ball’s shape, size, position, and other characteristics, according to time.
Let's see how it'd work with a real animation.
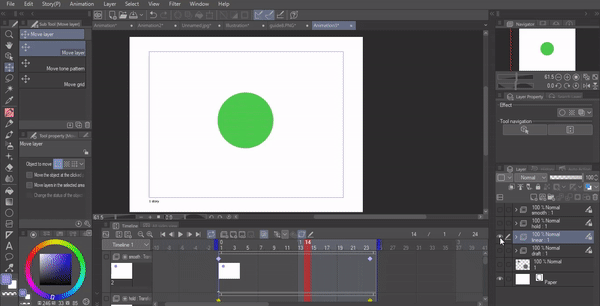
I'm going to select the first frame, and create a keyframe. Let's call it Keyframe A.
Keyframe A says that the ball is in the upper left corner. It also says that the ball is small.
Then, I'm going to create another keyframe on the frame 24. This one will be called Keyframe B. Here, I'll move the ball to the lower right corner, and I'll make it bigger.
Now this Keyframe B records a different value from Keyframe A - the keyframe states that the ball changed its size and moved its position.
So, we have two boxes of values - from Keyframe A and from Keyframe B. But, we don’t have any values between them. There is a gap.
We know that this gap must be filled by someone doing the task of in-betweening.
I can do it myself, manually. On each frame - from the 1st one to the last, I can displace the ball and change its size gradually. But that's a long process, even if I have only 24 frames.
So, I'll hand it over to the software. ClipStudio will do it for me.
But, here's another question:
There is also no data saying how exactly the ball moves or changes sizes - is it a gradual change? Does it slowly drift from one corner to another? Or is it an instant change, like a blinking light switch?
This missing data between the two boxes will also be calculated by the software. But the way it's calculated can be decided by you.
And that’s when we start talking about interpolation.
Interpolation
Interpolation - means the estimation of missing data between two values. Interpolation is the tweening done by your software.
To do the process of tweening, the software calculates what should happen between the Keyframe A and Keyframe B. But on top of that, it can also choose how it happens.
In ClipStudio, there are three types of interpolation or three types of transitioning from Keyframe A to Keyframe B;
1 - linear interpolation
2 - smooth interpolation
3 - hold interpolation
Linear interpolation --> speed is constant. Change is instantaneous and uniform.
Ex: clouds drifting through the sky - the speed is constant and doesn’t change.
Smooth interpolation --> generates a smooth transition between the keyframes. The change is gradual. Ex: you playing on a swing - starts slow, goes faster, then slows down again.
Hold interpolation - “holds” the keyframe in the state defined in the keyframe. So, sort of pauses the keyframe A until keyframe B is reached. No gradual transition.
"Well, I understand Hold interpolation, but I can't see the difference between Smooth and Linear." - says you.
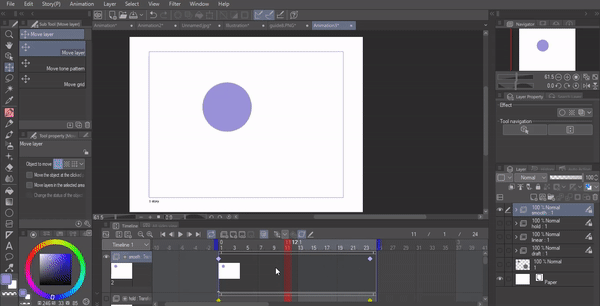
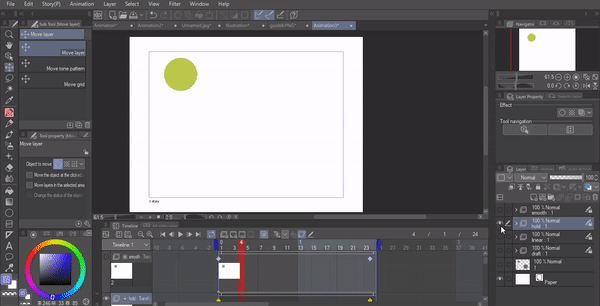
Here's an overlay of the two animations, done with different interpolations. The green one is Linear interpolation. And the pale-violet ball shows the Smooth interpolation.
As you see, at first the pale-violet ball was slower than the green ball. But then the pale-violent ball became quicker. That results in a smooth transition.
Linear interpolation is rarely employed by animators, because it results in a mechanic sort of animation. Unless you want movement with constant speed (like clouds drifting by, or the scenery changing behind the car window), then you would use Smooth interpolation.
And now we should see how to add keyframes (actually a very easy process)
How to enable keyframes in ClipStudio:
For effects like the object changing size, positions, and opacity, you need to create keyframes.
Here's how:
Once you have everything set up - your animation folder is ready, your layers are assigned to correct frames in the timeline - find this button and click on it:
You have now entered the "keyframe editing mode". You can't edit layers now, meaning you can't draw directly on them. To quit the keyframing mode, click again on the Keyframe button. Click on the Editing Pencil icon that's on its right, if you want to edit the layers whilst keeping the keyframes active.
After you created a keyframe, you need to select the [Object Selection] tool.
Go to the left of your screen and and choose the [Operation] Sub Tool. Then choose [Object].
Now you'll be able to select and move your layers. You can see the video above for details.
Once you have transformed your object (either changed its position, or size), a keyframe will be set on the timeline.
You will see a diamond icon appear above your frame.
The colour of the icon shows what type of interpolation has been applied.
Green means [Linear Interpolation]
Pale-violet means [Smooth Interpolation]
Yellow means [Hold Interpolation]
To delete, or to change interpolation of the keyframe, right-click it. Then you will see a list of options.
And that's pretty much all you need to know about keyframes.
REMARK:
For good animation, keframing is not enough. You also need to adjust the speed (the length of each keyframe), the acceleration, and the form of the object (ex: the ball deforms when it moves very very fast, the face squishes when you close the mouth, the legs blur when you run etc).
And to make really good animation, being a good artists isn't all either. You need to be a good cinematographer. And to begin the great journey towards the peak of cinematography, you first need to know how to exploit the 2D camera function.
Camerawork
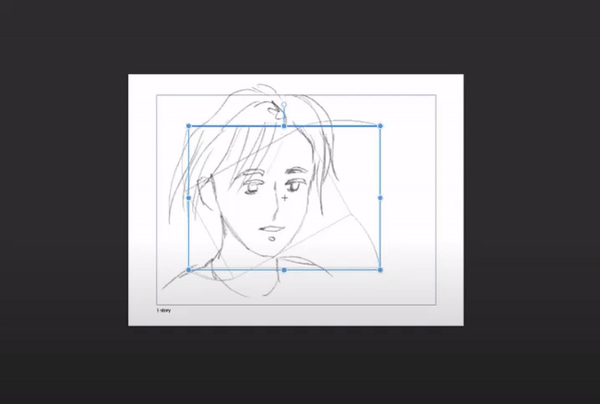
To work with a camera, we must have a 2D camera folder. This folder should contain all the elements that we want to be affected by our camera.
Camera folders allow you to move the camera view. This is how you can make the zoom in-zoom out effect, how you can make the camera shake like there is an explosion, or how to make it follow the characters head.
To create a camera folder go to the hamburger menu (the three horizontal lines) on the top left corner of your Timeline Palette. Select "New animation layer" . Choose "2D Camera Folder"
Alternatively you can also do this from the main screen. Go to [Animation] > [New animation layer] > [2D Camera Folder].
Either way, you have now created a folder for your camerawork.
Your animation layers must be inside the camera folder, if you want for any changes to be shown. Go to your Layer palette and drag your animation folder into your 2D camera folder.
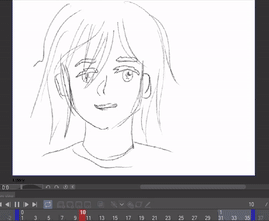
This is a very basic animation that I sketched out. This is the same person that you saw on the thumbnail - the main character from a novel that I'm publishing, and, eh, trying to illustrate....
Anyways, I'll refer to her by her name - Gen.
Use Select Object tool to work with the camera (like when we were working with keyframes).
Go to [Tool] palette, select [Operation Sub Tool], select [Object]
That's it, now you can play around with the camera.
Select a frame. It's important that you click on the camera track.
If you click on the animation folder track, you will end up selecting the layer that the camera contains, instead of the camera itself.
Deform the camera box. Scale it down.
You can also rotate the camera and move it.
Now play the animation
-> you will see that the cameraview zooms in, and rotates.
---------
Do various camera shots. Move the camera around, see what happens. Learn what works and what doesn't.

----------------Important:
Syncing audio with cameraview is powerful.
Adding an audio track is similar to adding a camera track. When you go to "New animation layer", choose "Audio".
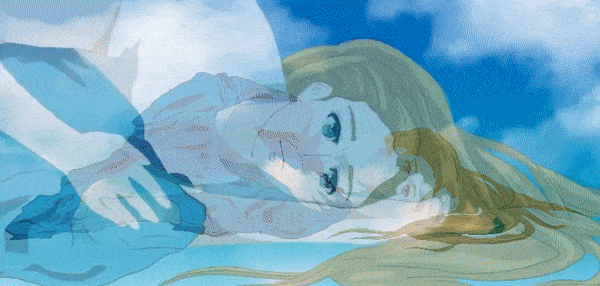
Like special camera shots, the audio can give a completely different feeling to the story, and you have seen that in the very beginning of the tutorial, when you saw this video:
The clip feels mysterious; it tells us that there is something going on. By combining the audio track with these "exploring" camera shots ( when the camera scrutinizes details from the face to the legs), you get a suspenseful storyline.
The camera movement says:
"Someone is watching~~"
And the audio track hints that it's not a very good thing.
Now, you've seen the video, but here you can see the path of the camera behind the video:
-----
Bonus tips
If you want to play around with the opacity of your character, you can do that when working with the Camera Folder, and, once your frame is selected, going to the Sub Tool [Operation].
There you can adjust the opacity of your layer.

You can also play around with blending modes.
For example, I want Gen to not simply disappear but to become darker and translucent, like this:
So, I set one camera folder where her opacity goes down. And then below it I put the second camera folder with [Overlay] settings.
When the opacity of the 1st folder went down, the folder beneath was visible:

A pretty nifty trick if you want to apply effects like a ghost emerging, or maybe sparkles.
You might ask why I used two separate camera folders.
Well, because I used two separate camera folders, I was also able to apply transformation to one of them, and make this cool effect:
-----And that’s all!
Here are the brushes that I use:
(in this tutorial -> the pencil, the inking pen, and the brush set for clouds). Everyone, the brushes are amazing.
Hope it helped with answering common questions about animation.
Drop your questions into the comments, I’ll update the tutorial
And here's the full tutorial on brushes:
Bonus-bonus
Just me sharing art. Cause it's interesting to see the linework, right? Again, the Inking Brush is very good to use.
That's all
o(〃^▽^〃)o
Users who liked this post


Comment