
Today's tutorial, I'll be sharing to you how to make fantasy weapons and magic with the help of 3D primitive materials in clip studio paint.
I am a 2D illustrator but I also have a little bit experience in 3D, so that made me wonder if we could use some 3D features here in clip studio paint to model a weapon.
Since clip studio paint isn't entirely a 3D application but we could do some tricks to form something with the use of basic primitive shapes, afterall learning drawing starts from a simple shapes, right?
If you prefer visual presentation, please see the video version link below.
Stage 01: Sketch
So the first thing I have to do is to create a sketch of the weapons. Plan ahead and figure out what could be the shape to use for it such is cube or sphere.
You can make the sketch simplier as long as you can read the detail of the drawing.
During the moment I've been sketching these, I am trying to make a shape that is a little complex so that I could show you how to solve some problem you may encounter.
Stage 02A: Newbie Segment - Object Navigation - Walkthrough
So now, I am done with my sketch, it's time for me to get the primitive 3D objects.
To find it, Drop down the Window on the Menu Bar > find the Material > and Select Material: Primitive
All of the shapes here can be useful depending on the design you have.
To start, simply drag any shape to the canvas.
On the top left corner of the object, you’ll be seeing these icon. These are the navigation tool of the object to control it’s placement and camera angle.
Once you click the object, it shows the manipulator where you can manipulate the object. This is called Gizmo.
Each of the drawing allows you to manipulate the object.
The arrows allows you to move the object.
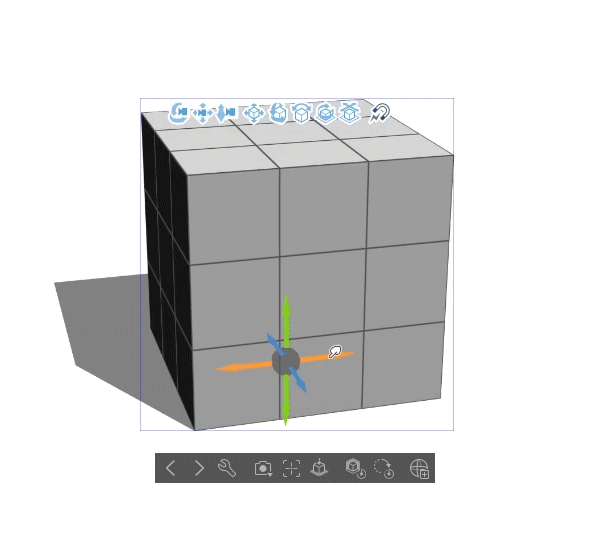
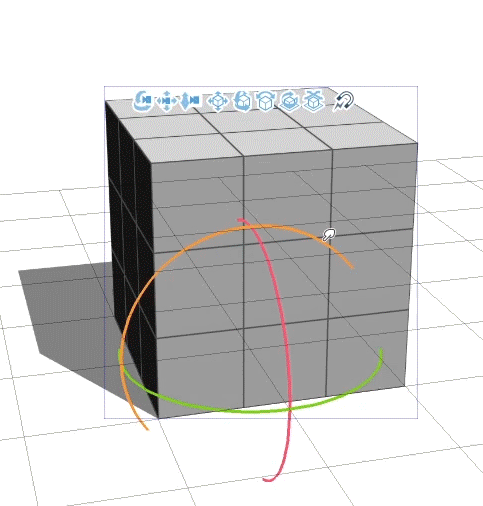
while the arc allows you to rotate the object.
The small boxes allows you to rescale unproportionally while the circle with point arrows allows you rescale in proportion.
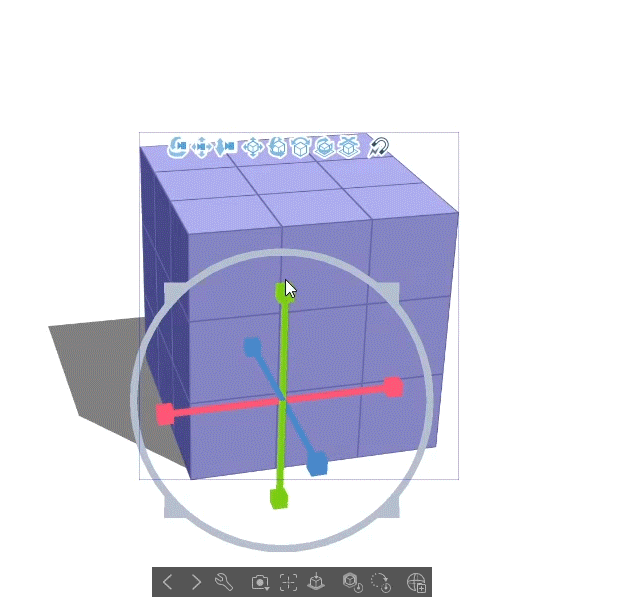
and each color identify as X, Y, and Z - Axis.
Red is the X - Axis,
Green is the Y - Axis
Blue is the Z - Axis
This helps you specify which direction you want to manipulate the object.
Stage 02B: Newbie Segment - Tool Property - Walkthrough
For additional property, we can go to Tool property of the object. However, I want you to open the Sub Tool Detail instead.
To find it, click the object first, then go to Window on the menu bar> Select Sub Tool Property
This will give you all the settings you need, but let me walk you thru it first and see what are the things to use.
If you wish to keep it on Tool Property for easy access in the future, you have the option to hide/unhide it. In that way, when needed, it’s easy to find.
So what are the things we need under the Operation Tab.
On-screen manipulator was the gizmo that we’ve been talking earlier. You can choose to hide and unhide it on screen.
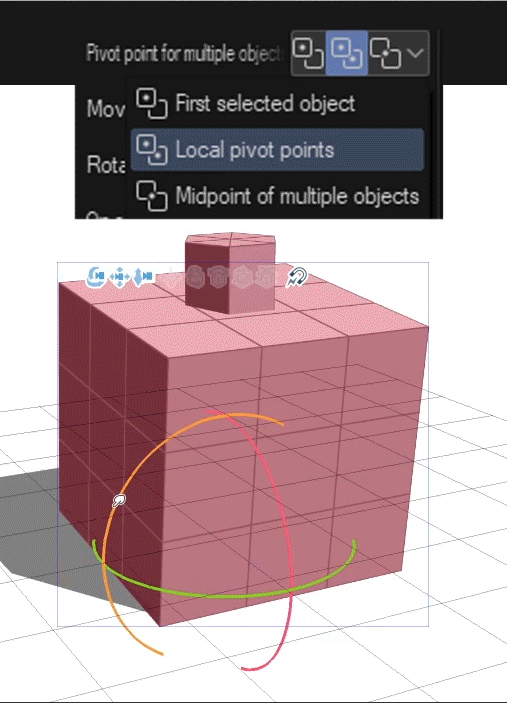
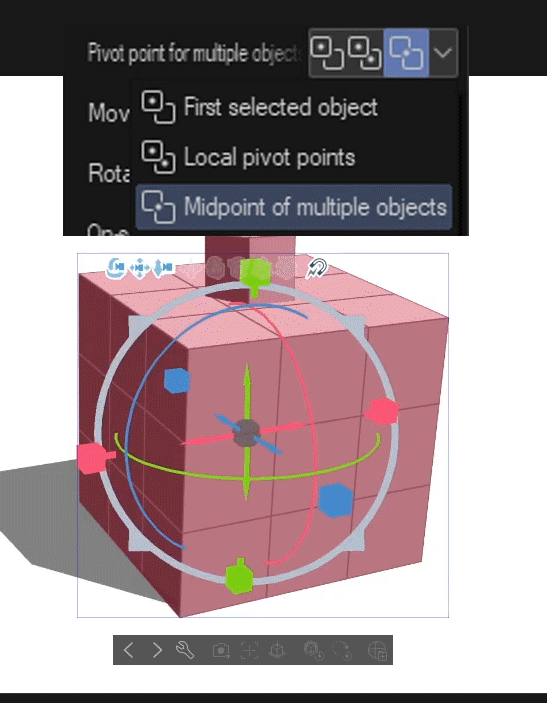
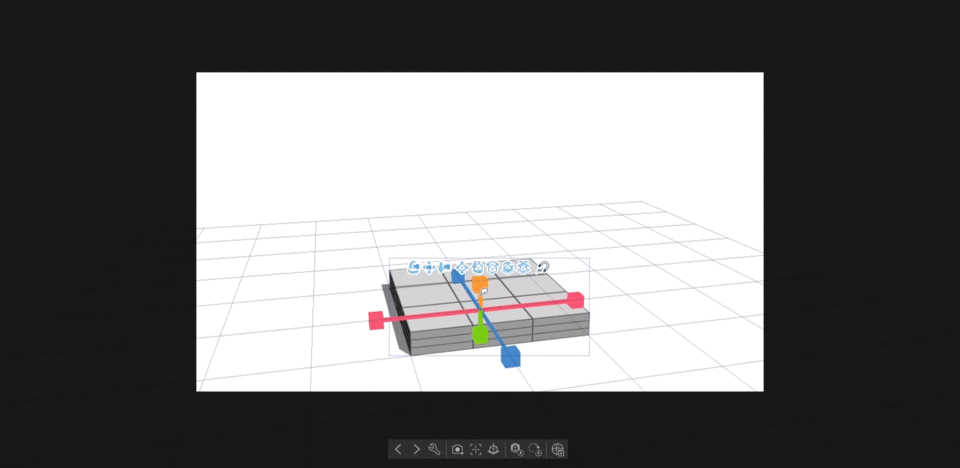
Pivot point was this gray sphere in the middle.
and each object you add has its own pivot points. When ever you select multiple object and rotate, it will refer depending of the option, so I normally choose Midpoint of Multiple Objects so that I can rotate them all at once together without them breaking apart.
I’ll show you 2 examples of Local Pivot points option and Midpoint of multiple objects.
So that all for the Operation Tab.
Now what’s in the Object List Tab.
What you see here are the layers of objects. Instead of using the normal layer for painting, we use this in the object list.
Every time you add some object, it will register here and you can select each object here as well.
You can also find this under Allocate Tab.
You can also move or scale the object here manually but I rarely do that in this windows since I prefer doing it directly to the canvas.
Under Camera Tab
I rarely use anything here except for the Perspective where I could just change the focal point of the camera.
If you know about cameras in real life, this is the lense size. The higher number of perspective, the wider it gets.
also commonly use on foreshortening.
Under Primitive Tab, you can set the number of division you want to your object.
and you can hide it by just unchecking the Show wireframe.
It doesn’t really matter if you increase the division for the cube since it still shows as a cube. I only use the divisions to act as accurate measurements.
Though if increasing the division on prism, it may turn into a cylinder.
Under 3D Primitive texture, you can add colors on the object or add an image to it.
keep this in mind because it’s gonna be useful later on.
You can also turn off the light source and the cast shadows under Primitive > Shadows.
This can be useful when you need to color pick the the colors of the other object.
And finally, the light source where you can control the direction of light for your 3D model. Keep this in mind because we’ll be also using this to our illustrations.
Now, we can proceed on modelling our weapons and magic.
Stage 03: Modeling the Object
To model the book, you can simply rescale each of the object until you’ll get the desire form of the item.
if you notice the magnet icon, it was the snapping tool and it will be your bestfriend
To show you more clearly, each color means separate object and put together to form the book.
and this is all the model I put together. With enough creativity using the primitives, it can form into something.
For the blade of the sickle or maybe sword, you can just use a plane to it.
It will make sense later after the texture.
Stage 04: Texturing and Rendering
First things first, we draw and paint the texture. Just keep it one side since we’ll not be showing all sides of the weapon.
In my case, I’ll only be painting the Front Book, the Blade, and a little extra to the handle.
Then save it as PNG with transparent background each.
Now, export the map of each object you want to apply the texture under 3D primitive texture > Export
Once you do it, you will be given this type of file with lines on it.
Those lines are the division or wireframe of the object. It serves you as a guide.
This is where you put your drawing as texture, but if you aren’t sure about the orientation, you can test it by numbering it 1 to 6.
This should find the solution of your problem
Then, you can add your drawing to the map. Stretch it if you need to, and this should make a perfect texture.
The reason why we need it to be PNG file or transparent background CSP file so that, when you add your blade to the plane, it will form to a shape of the blade, including it’s shadow.
So this is all of the item when i put them all together.
Adjusting each camera and perspective to make it look consistent to each other.
I set up the lighting to make it look perfect to my liking and added some extra stuff to the book to make it look more accurate to my sketch and made some decisions on reducing the detail of the staff.
So since I am ready to over paint this.
Now I simply put them together in a folder and convert them into Raster Layer.
Now all I have to do is to overpaint it normally do to get the exact material of the item and make it look as good as possible.
Since the timelapse video will be too large, just visit the video to see that and now, here is the final result of the illustration!
So what we've learned here?
We could use primitive 3D objects even with the non color one and serve the entire shape as our guide for drawing weapons.
But having it textured giving you less thing to draw to finish. That means, saves more time, and finish more projects.
That's all for this tutorial, hope this helps and thank you for reading!
Users who liked this post


Comment