
Introduction
Hello, hello, Kantella here!
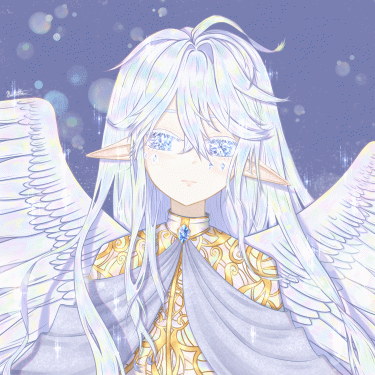
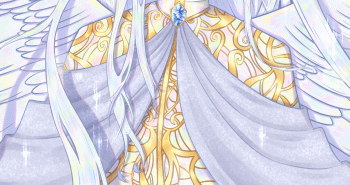
In this tutorial I will show you how I animated this sparkling portrait of my OC Celeste; the cute little angel who is actually a dragon as an example for this guide.
From setting up your timeline, preparing your layers, adding keyframes, and tweening!
(Click on the Index if you want to skip straight to the section you want to read.)
Let's get to learning and make your drawings come to life!
The Timeline
There are two ways to enable the timeline.
The first way is done when creating a new canvas:
File (on the top left of CSP) -> Select New
Chose the video thumbnail where the red arrow is pointing at in the "Use of work" section.
Adjust the settings to your liking. If you're making an animation for a video, you can pick the settings for HD to 4K video sizes.
The settings for my drawing in this guide are:
Size: 4000px x 4000px
Resolution: 350
Frame rate: 12 frames per second
These are my usual presets for doing simple animations for portraits.
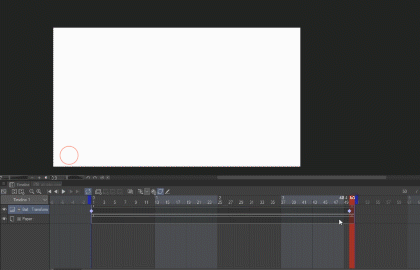
After clicking OK, your timeline will show up in the bottom of your workspace.
If you don't see it, it is fairly simple to open your timeline.
Just click the little arrow to expand it in the bottom left corner of the screen.
(If it's too hard to see, you can click on the image to expand it.)
After expanding your timeline, this is what should be on the bottom of your workspace. ↓
Now we have learned one way to open our timeline, the other way is for people who have already finished a drawing and have then decided they want to animate their drawings.
Maybe your workspace looks something similar to this after you've finished a drawing of your character and have layers with body parts separated.
There are other ways to open your timeline without using the arrows at the bottom to expand it.
Just go to "Window" on the top menu bar. -> Select "Timeline"
Or just hitting "X" is also the shortcut key to open your timeline (unless you changed your shortcut keys).
When the timeline is expanded, it may look a bit different than how I showed you before, but don't worry.
Just click on "New timeline" where the red arrow is pointing at.
This window will pop up after creating your new timeline.
Just chose your preferred settings, and click OK.
These are the settings I used for the portrait in this guide. ↓
And now your workspace might look similar to something like this ↓
With your drawing, layers, and an empty timeline all in view, you can hide the thumbnails in your timeline by right clicking on the layers on the left.
Now that we have our timeline set up, let's move on to our next step. ↓
Animating Blinking Eyes
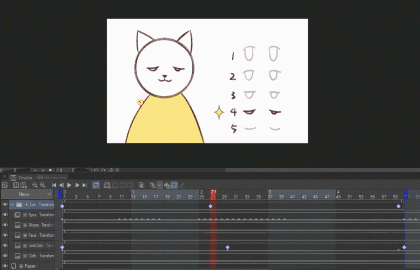
Before animating the eyes of your character, we need to prepare the frames for the motion of your character's eyes blinking and then you'll be able to animate something like this. ↓
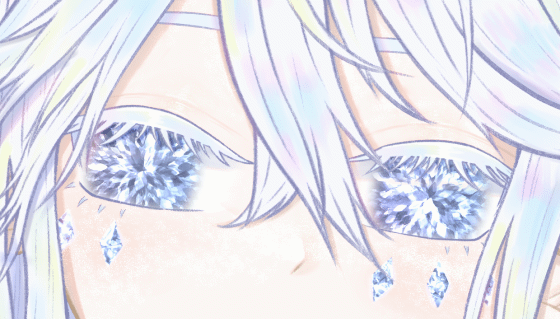
Here are the three frames (also three separate layers) I prepared for this animation, you can use more than three for a slower blinking motion.
Since all these eyes were drawn using multiple layers, I put them in three separate folders - first with the corresponding names: Closed, Half Open, and Open.
Next right click on the folder -> select "Merge selected layers"
Now that all three frames are turned into three layers, we will move on to the discussion of the timeline to add our animation.
First click on the icon with a plus at the top of your timeline to add a new animation folder.
Remember to rename the folder to make it easier to find later, I named mine "Eyes Motion".
Next, put the three frames (or more if you made more) of your eye animation inside this new animation folder. Since I wanted the hair of the character to be above the eyes, my animation folder for the eyes are placed underneath the hair layer.
The animation folder will also show you the number of frames that are inside after the name, here you can see mine has three.
Now, to add your frames into your timeline, select the animation folder, not the layers inside, but the actual folder itself.
Click on frame 1 to insert the version of the eyes you want for the beginning of your animation. Now right click with your mouse -> a window will pop up asking you to select a frame to insert, here I chose "Eyes open".
Then I set around 2 seconds in for the animation to make my character begin blinking its eyes. I right click and then select "Eyes Half Open". Then, go to the next frame and right click to select "Eyes Closed".
Now press play and see how your character looks with the blinking animation.
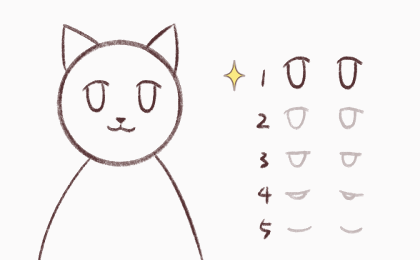
A blinking cycle will look something like this:
Eyes open -> Eyes half open -> Eyes closed -> Eyes half open -> Eyes open
When the eyes are closed, the eyelash curve usually will be in the opposite direction than when the eyes are open, unless your character is smiling while their eyes are closed.
Here I made a simplified version so you can see which frame is playing by following the little sparkle next to the version of the eyes.
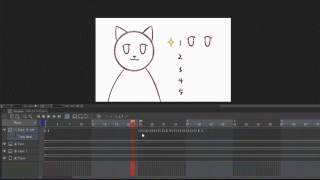
Sometimes, you can also make your character do double blinks so they look even more natural.
To work faster, you can hold left click and drag to select multiple frames -> let go -> hold down ALT key -> click and hold then drag to copy frames to a new location on the timeline
Now that you have learned how to add frames into your timeline, you can use what you just learned and apply it to many more different fun animations and do more than just eyes blinking!
For instance, you can approach things like the traditional flip book but do them digitally!
You can even sync mouth movements to an imported audio with this method. ( ´ ▽ ` )ノ
Using Keyframes and Tweening
Tweening is a word short for "Inbetweening". The process of what happens in between two keyframes which are the ones at the start and end of a smooth transition.
- Opacity -
We'll start with tweening something simple, changing the opacity of a layer in your animation.
My character is wearing a shawl in this drawing, and I animated it to change colors.
I named the layer for the shawl "Cloth" -> copied it, next have the different color (gold) version right above and clipped to the original one ↓
After you selected the layer of the new color version of your clothes, click on this button where the red arrow is pointing to enable keyframes. ↓
After enabling keyframes, select the frames you want to add keyframes to, and click on the diamond shaped icon where the red arrow is pointing to add them.
To make a simple transition - Add one on the 1st frame - middle of the timeline - last frame
Now that you have three keyframes on your timeline, click on the 1st one and changed the opacity of your layer to 0%.
Then change the opacity back to 100% for the middle one.
Next, change the opacity back to 0% for the last keyframe.
Now press play and check your animation. Always double check.
Your character should have a magic shawl/clothes that changes colors now.
This is also how I animated the sparkles in my drawing. I have different layers of sparkles that take turns shining in the animation.
This is what it looks like on my timeline ↓
This is also how I added the glowing effect behind my character, changing the darkness of the background and even the mouth animation. ↓

- Scale + Movement -
Now that you understand how to use keyframes, let's do more fun stuff with it!
There are a few things you can do when keyframes are enabled such as:
Changing opacity, adjusting scale, move positions, and rotate.
Here I show the process of how I animated a little ball moving further and getting bigger. ↓
(Hold CTRL for the transformation mode to show when keyframes are enabled.)
Tweening Folders with Animations Happening Inside
Maybe you want to make you character float, but somehow even after you selected the folder of your already animated character, when you try to move you character around, the program went and select one of the layers within your folder. Σ(゚д゚lll)
Here I have all my layers in a folder(regular not animation folder) named "Cat", but when I tried to move the folder around with keyframes enabled, it is very easy to accidently select a layer inside the folder.
How do we solve this?
We can avoid this accident by clicking on the "Graph Editor" after you selected the folder to safely add tweening animations to your character ↓
With the Graph Editor open, you'll have something like this. ↓
(The small diamonds are keyframes just in different colors.)
You can click on the arrows next to "View" and select the transitions you want to focus on tweening.
Here's an example of me using the Graph Editor to animate this cat to move around the canvas. ↓

Exporting
Now that you're done making your animation, the last step will be exporting it to your desired format.
Go to "Files" on the top left of CSP -> Export animation
There are different choices here, I often like to go with export as GIF or Movie.
Since most social media platforms will actually loop videos automatically, I like to upload my animated drawings as a video instead of a GIF to have higher resolution.
After selecting export as animated GIF, the program will ask the location to export your GIF. Then this window will show up. ↓
Tweek it to your desired settings and hit OK!
Your animated GIF is now completed.
When exporting as a movie file, the process is similar. The program will ask you where to save your movie file, and then this window will pop up. ↓
I hope this guide has been helpful to you, I also upload time-lapse videos of my drawing process to my Youtube channel, Facebook, and Instagram if you're interested in watching my process (link in profile).
Now go have fun animating your drawings! ☆:.。. o(≧▽≦)o .。.:☆
I wish you all a wonderful and super happy day every single day! ♡´・ᴗ・`♡

Users who liked this post


Comment