
The lazy artists way of creating 3D backgrounds in Clip studio
Sup!
Hello fellow artists,
Today you will be on your way to creating your very own 3d background. If you have any questions don't hesitate to ask me or engage with others in the comment section.
As a professional illustrator and graphic designer, over the years I've come up with several tips that makes drawing backgrounds in my comics relatively simple and quick to do. Here are some of my past works from my webcomic on webtoons.
Believe you can do it, Baby!
This is very important, drawing backgrounds is no easy feat so be patient with yourself, you can only get better from here.
Outline, Baby!
We need to plan what we want in our background based on what is happening to our subjects.
We want to make note of these four objects:
-Subject
-Foreground
-Background
-Camera Location
In film this collection of objects is called a Scene. I know this tutorial is for comics but picking cool angles and interesting compositions is the same for all visual art forms.
Composition is very important in ensuring your subject and your background coexist and work together.
• In this drawing I want two kids interacting over something they are reading while on a train.

• I want the subjects to be in sun light, this will highlight a light and fluffy feeling.

• I want the rest of the background to be warm and in shadow.
With our outline ready we can move on to the drawing bits.
Rough Sketch, Baby!
This step is self explanatory. I do a few quick and VERY ROUGH sketch to know what camera angle I want. Since we are working with 3D assets your sketches do not have to be clean but they do need to convey what direction the camera is facing.

I have decided on a straight angle, with a medium shot of the subjects. This way we can see the sun hit them just right and still see some of the cool background.
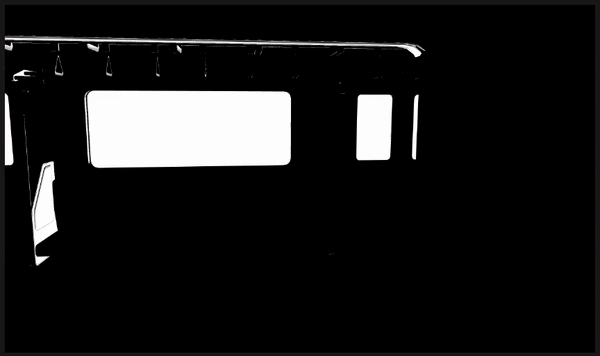
It's 3D Time, Baby!
Get your assets ready, if you love working with what you have then hop into your Clip studio Materials Pack and check out their 3D train interior asset, which is what I will be using.
For my over achievers you can always create your own 3D assets using SketchUp, Blender or Maya.
You can also get free 3d background from the Clip Studio assets store.
Now position your camera just right.
For those who are still struggling with anatomy, worry not. Clip studio has killer 3d models that you can tweak to fit your needs.
Line that Subject, Baby!
With our 3d set up done, we move on to lining our subjects don't worry about lining the background just yet. There is a special tool for that.

Line that background, Baby!
Clip studio has a really cool tool that converts bland 3d models into crazy cool line art.
Click this button
If you have the 3D object tool selected you won't be able to see the LT Layer conversion effect work. You could select a different tool (pen or pencil) or simply flip your canvas; this will show the LT Conversion in effect.
We need to tweak our shadows by controlling the light direction, if the sun is coming from the top, the shadow will be behind the subjects.

Change the light direction in the 3d model by dragging the sphere. Easy!!!
To add more shadow tweak this option
To show more or less detail tweak this option
To thicken the outline tweak this option
Click "Convert layer to lines and tones"
A more detailed control screen will pop up, don't worry the features are exactly the same. And you could even skip straight to pressing [OK] but there are a few things I want you to know.
Personally I always use vector lines, as I love being able to control the thickness of my lines. You can always try the process again for Raster, its exactly the same, instead select [Raster Layer] then press [OK] 👌
The [Tonework/Posterization] feature is really great for dotted shade work. If you are going for a traditional manga or comic style this could really be beneficial for you.
For this drawing I won't be using posterization, but be bold and try it out.
When you are done click [OK] and you should see a folder with new layers inside. Two outlines and a fill layer. I delete the fill later, as I prefer to add my own colors on a different layer.
Color, Baby!
Now it's time to color our subjects and whatever will be in the foreground. Take your time and have fun.
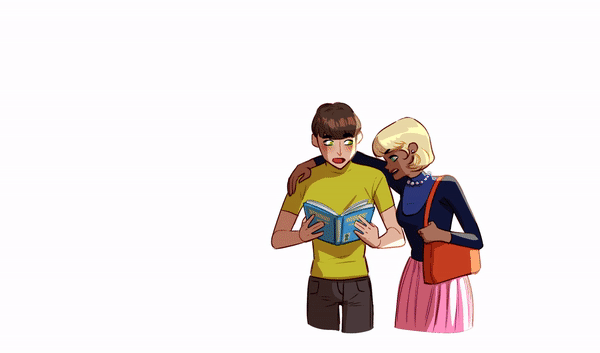
After coloring the characters we can move on to coloring the background. If your 3D model comes with color, the best thing would be to flatten it into a raster layer so you can easily manipulate it.
Final Design
Users who liked this post


Comment