Drawing all types of eyes
As an artist, no matter your skill level, you’ll probably be drawing eyes all the time, even more if you are pursuing a career as a character artist.
This is hopefully a guide that will help you understand a little bit more how to construct and render different eyes that can easily adapt to any project or maybe even help you develop your own style!
Realistic eyes and eye anatomy
The basic form of the eyes can always be simplified using two curved lines with a vague almond shape.
The position, form and curve of these two lines can easily modify the shape, direction and angle of the eye. This can also help to visually convey your character’s personality or to transmit emotions and feelings.
Have in mind that the eyeball is a sphere and the skin curves around it. For some people it's easier to draw the sphere first.
Once the basic shape is in place you can add details like eyelids or eyebrows. All of these are important pointers that will help you easily define the shape of your eye.
Here are the ones that I consider most relevant.
1-Iris and pupil
2-Eyelids (upper and lower)
3- Eyebrows
4-Lacrimal caruncle
5-Eye margin (The eye margin can be quite thick and in certain angles it will be very visible)
Honorific mentions:
Sclera, or the “white part” of the eye.
Eyelashes (I do recommend the eyelashes to be one of the last elements to be added)
Planes around the eyes
These planes make it easier to define the shapes around the eyes, they also can be quite useful to determine:
● The way light hits
For example, its common that Plane C has a deeper shadow because its placed on the eye cavity, Plane A rests on the bone, so it will probably reflect more light and create contrast with Plane C.
● How the eye connects to the rest of the face
For example, Plane E is the nose’s lateral side while Plane D joins the cheekbone.
Thinking of these planes as a 3D object, will help you understand better how to give them volume, that's the reason I tend to draw lines in the different planes.
The size and shape of these planes can vary a lot from one eye to another, for example, the Plane C is different in every eye displayed on the visual sample.
You can also use an Asaro Head 3D model to study how different lighting could affect these planes.
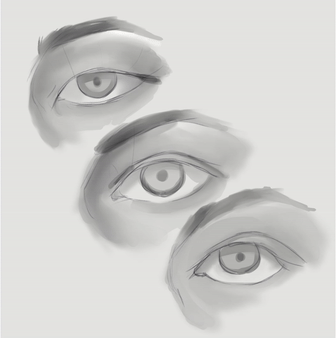
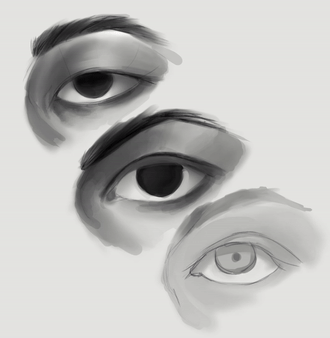
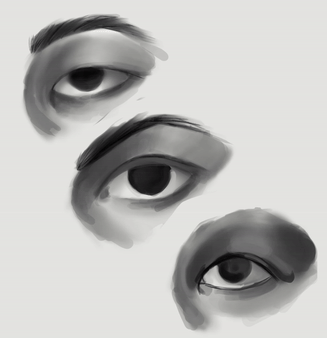
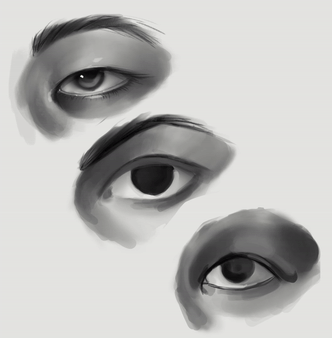
Rendering in grayscale
First, this is a quick painting process that might be helpful to someone, but I do encourage you to experiment and try different methods so you find what you are comfortable with.
There is also a soft front light in the references used for this demonstration, so the shading applies only to this specific lighting.

● I start by defining the shadows.
● Thanks to the spherical shape of the eyeball, it's very common to have prominent shadows at both corners of the eyes, while the middle section reflects more light.

● It depends a lot on lighting, but most of the shadows that you’ll find in the eye (and the face in general) are very soft. The crease created by the upper eyelid it's usually the hardest shadow that you'll find.

● Try and apply big chunks of color that you can mix or blend later.

● You can use a low opacity brush to start adding layers of color and have a better control on where the darkest shadows should be. (NOTE: I personally find it easier to go with darker shadows than necessary while painting in grayscale, just to have a better control of the contrast)

● After that I start to slowly add light and to tone down the shadows.
● Don't forget to add shadows to the sclera as well! Depending on the position of the eye and the thickness of the eyelids, shadows can be quite noticeable in the inner part of the eye.

● Be patient, remember that you can always correct during the process. It doesn't have to be perfect from the beginning. Slow down if you need to. You can actually see that I took extra time with the second eye adding layers of paint and blending them.

● Finally you can add some highlights and other small details, like eyelashes, wrinkles, creases, even pores. You can spend all the time you want detailing the eye!
● The eyeballs are really wet, so don’t be afraid of going crazy with those highlights. The lacrimal and eye margin are also quite reflective.
● The skin around the inner corner of the eye can be quite glossy as well and creates a nice contrast with all the shadows that surround the area.
● Eyelashes can easily catch light!
------● For this part of the process I used Pastel, Marker and Thick Paint Brushes, the Airbrush and Pencil for the highlights and small details.
-I am constantly changing the opacity of the brushes, but they are regularly between 30% and 70% opacity.
● For blending I tend to use almost all of the Blend Tool’s brushes.
-Smudge Blur, Blur, Blend are pretty good to give a soft polished look.
-Painterly Blender, Textured Blender can add nice textures.
-I like to use the Finger Tip brush as well to add lines, emphasize details or creases.
Color
Since we did a grayscale render of the samples, we’ll use a very quick and simple method to add colors!
● Use the Lasso tool to select the area you’d like to color.
● Go to Edit -> Tonal Correction -> Color balance

● Move the bars until you are satisfied with the colors, more than that, you can add some specific tones to the highlights and shadows by changing the button Gradient Balance under the color dials.

● You can also use the Hue/Saturation/Luminosity to modify and do small corrections to the tones you already have on the canvas, since the color produced by Color balance can be quite dull or way too saturated and sharp.
(CTRL+U/CMD+U) or Edit ->Tonal Correction -> Hue/Saturation/Luminosity

Using a mix of both tools will help you reach the color you are looking for.
● Finally you add a new layer with a Hue or Soft Light blending mode and with the airbrush slowly mix some new colors.

For example, here I’m adding a subtle violet tone under the eye and red/pink hues around the rest of the skin.
-Eyes will tend to have that reddish pigment since the skin around them is very thin and will let the blood vessels see through.
-Remember that the sclera is not really white! The color of it can change a lot depending on the environment.
-You can use colors to give more personality and emotion to your eye. If your character is crying or sick, the red color around the eye will intensify. If they don't sleep well, they’d probably get dark circles under their eyes.
Stylized Eyes
Using what we learned from the eye anatomy, we can use these principles to create different types of eyes and even break the rules to have more options at hand.
For example, all of the next sketches start by drawing the two lines that we mentioned earlier, and yet the results are very different from each other by altering these lines.
● You can also play with the planes: simplify them, make them bigger or smaller, increase the space between the eye and the eyebrow, change the eyebrow shape and thickness.
● Likewise, changing the shape of the pupil, the color of the sclera, the eyelashes length can give your eye a totally different vibe.
● Use the digital tools! I used the Blur tool on Sketch 2’s iris, while Sketch 6’s eyelashes have been dragged out with the Finger Tip Blender to create that effect. I have also used the airbrush on a Color Dodge blending mode so the iris seems to be glowing.
● Try to vary the thickness of the lines or give them more geometrical shapes! Find a style that works for your project! For example, using a highly rendered and realistic eye style wouldn't be practical if you are trying to make an animated 2D series.
I tried to use different coloring/rendering styles, just to show that this method can be easily adapted to every artist.
● Exaggerate certain features and simplify others, don't be afraid to omit elements!
This is actually a really fun exercise! Try and draw as many eyes as possible starting from two random lines.
Bonus!
Anatomically speaking there is usually one eye of distance between both eyes, knowing this, you can also modify the space between your character’s eyes to change the final look of your subject.
● Heterochromia is a variation in the iris coloration. it can apply as a different color for each eye, or two hues in one iris.
● The size of the eyes has a huge impact on your character's face and it's honestly one of the easiest ways to stylize eyes.
● Add accessories: glasses, eye patches, piercings.
● Makeup is also a nice way of giving an eye a different look, along with this, there are also tattoos or patterns on the skin and beauty marks!
Final tips
-Study realistic eyes. Remember that knowing the rules will help you break them.
-At the same time, study stylized eyes. Look into the work of other artists, have a broad visual library and options.
-Use references!! Especially if you are a beginner, I highly recommend always using references, even when you are trying to stylize eyes.
-Have fun!


Comment