Drawing legs and feet
Introduction
For this tutorial we are going to do a quick overview of the leg and feet anatomy and ways to simplify and stylize them.
I'm by no means an expert in anatomy but this is a compilation of all the information I've gathered during my studies and which hopefully can be useful to someone else.
Usually while drawing a leg (or any human figure) I follow the next process:
Gesture (movement and flow) ⮕ Simple shapes ⮕ Details (muscles and reference points) ⮕ Cleaning ⮕ Coloring
So we are going to try and go in that order, adding some more information about the anatomy and proportion along the way.
Our anatomy study is going to be very quick and focused on the most relevant elements for us as artists.
Don’t think that you need to know and name every muscle, bone or tendon (I literally always forget the muscles’ names an hour later after I read them) but remember how the most important ones look, since those are the ones that will affect the shape of our leg.
Proportion
✦ We are going to start by going through some of the standard proportions and sizes that can be useful for drawing legs. Since the body proportion is different for each person, take this as a general guide. ✦
▶ 1
The proportion of the legs (starting from the crotch to the heel) it's usually equal to the torso and head together.
▶ 2
The length for the thigh and calf section are also equal.
▶3
The space that occupies the knee can be similar to the one from the ankle to the heel.
▶4
It is said that the length for the human body is equal to 8 heads or 7 and a half. Legs are usually placed between the 4th and 5th units. The knees fall around the middle of the 6th head while the feet usually end with the last half a head.
That proportion is always the same no matter the direction the leg is moving, however as the leg goes up as if doing a side split, the point where the leg “starts” also goes a little bit higher towards the waist. While moving the leg up towards the front, will make the buttocks go slightly down.
This is because when moving or pushing the leg to a certain direction, the muscle fat and skin will move along and will give that impression.
✦Using a curve like in the samples, can help you keep your proportions while giving movement to the figure.
Also have in mind that these proportions can be affected by perspective and they are never 100% set in stone.
Simple bone structure
We are going to jump to overview the bone structure before going into gesture because I believe there is a certain similarity between these two and especially if you are a beginner, the simplified bone structure will translate way easier into gesture drawing.
So these are the important bones in the legs and feet.
【1- Pelvis 【2- Hip joints 【3-Femur 【4-Patella (Kneecap) 【5-Tibia 【6-Fíbula 【7-Tarsal 【8- Metatarsal 【9 -Phalanges 【10-Talus 【11-Calcaneus
We are going to start by simplifying them using two quick lines for each leg, which will make it basically a stick figure.
➊ From the pelvis (you can use a trapezoid shape like mine, or maybe an oval) , we can add some small circles that will function as our hip joints.
➋ Then we add the first line slightly inward and it will be the Femur. You can use the pelvis as a reference point for how far it goes.
➌ We'll add another circle now, this will be our kneecap.
➍ Our second line will do the same as the first one and go slightly toward the inside. This will play as our tibia. the femur should be connected here but as this is a simplification we won't be paying mind to it.
➎ It will be followed by another circle, for the ankle and finally a triangle for the feet.

Even though most of the time we won't be drawing a lot of bones as they really aren't visible (in many cases at least), it's good to know how they are placed and how the position affects the legs.
✦If you are a beginner, look for references and try to draw a bunch of these stick figures in different positions. Also pay attention to the proportion, even if you aren't doing an exact measurement of every line, try to keep them in any of the proportion rules.✦

On the other hand, I encourage you to practice the actual bones, particularly if you are interested in concept art or character art, there are tons of fun things you can do with them.
Gesture
If you ever find yourself with a stiff character, this will help you to ease the rigidity and give your subject a more natural flow, even if they are just standing in place.
For example, in here I'm using the red arrows to signal how the movement flows through this figure and at the same time bringing attention to relevant shapes.
There is also two guide lines that serve as the hips and shoulders that can be helpful in poses that require it, like this one.
The key here is to simply follow the movement and on this occasion don’t worry if it's not perfect or anatomically accurate.
You also want to be as fast as possible and use very loose movements and streaks.

For this, we’ll bring back our simplified bone structure, but we’ll add some curves and harsh straight lines as needed. Although if it's easier you can stick to drawing only straight lines at first.
Feet can be triangles in here as well, but you can also use a curved line that suggests the heel. Look out for the calves, they usually create a very distinctive and elegant curve.
Do your best to keep the exercises in a short time frame. From 30 seconds at most to 10 seconds.
Even the most complex figures can be reduced to a line, for example on a crouching figure, a harsh curve can be used to represent the leg.
★ Finally, when we are talking about gesture drawing, quantity it's more important than quality. ★
We are trying to build muscle memory and the more you practice this, you'll get better at doing proportions and following the movement of your character, so don't overthink it, do not worry if they are not perfect and just draw lots of them as fast as you can!
Simplification -> Cylinders and ovals
To simplify the leg we are going to use a couple of cylinders and, just like for the bones, we’ll use an oval or a circle as our knee.
If you have a gesture drawing or a bone structure first, you can use the lines as guides to place the cylinders. This will make the process easier, particularly if we are talking about a complex pose or something from your imagination.

✦This might not be as easy at first, but try to think of it as a 3D figure. This will also allow you to draw complicated positions effortlessly.✦
To make this easier you can practice and draw a bunch of cylinders in different perspectives and positions, you can also draw the leg structure: cylinder ➝ circle ➝ cylinder ➝ circle .

Once that's in place, we can move on to adjust the cylinder’s body by doing some thickness variations or adding some organic shapes as needed, for example:
● the thighs will be thick on top and go thinner as they go to the knee, so you can draw an elongated oval around the pelvis and the femur joint.
● notice how even though the body type it's different, the knee stays thinner than the thigh.
●the ankles can also be quite thin, so you can just try and sketch the lower cylinder as thick as you want your ankle to be and just build volume on top of that.
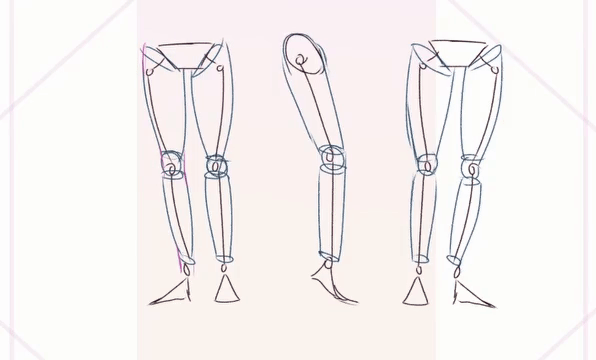
● below the knee, the front part of the leg can be quite straight and it creates a very nice contrast to the calf on the back from a side view.
Following a similar technique, muscles and fat can also be interpreted as irregular circles and ovals. We’ll go through the muscles first.
Important muscles
Since the muscles are usually more visible than the bones, we’ll try to point to the most relevant ones and because there are actually way too many muscles on the leg and some of them are clustered together, I decided to group a few of them in a single number.
I'll add a ✪ symbol to mark the ones that are most important or visible. And just to clarify, I’ll use the word "visible" here meaning the muscles whose defined contour can be seen easily through the skin.
【1】 Its actually a group of small muscles that connect to the torso. Since they are not that relevant or visible, I always think of these as a whole unit.
【2】Tensor fasciae -this muscle ends up joining the conjoint in number 11 down the thigh.
【3】✪ Vastus Lateralis - along with 4 and 5, this is one of the most visible muscles, especially if the character exercises a lot.
【4】✪ Rectus Femoris 【5】✪ Vastus Medialis
【6】Sartorius - I wouldn't call it that important, but once again, if the character has big enough muscles, it's going to be visible, mostly like a thin long shape.
【7】Tibialis anterior - it's an amalgamation of very small muscles that end up joining 8, but in general, they are noticeable.
【8】✪Gastrocnemius - or the calf muscle. Has a distinctive inverted heart shape.
【9】✪Tendons - have in mind the position of the tendons, because even when the character is a body builder, tendons do not grow and this creates interesting outlines, like the knee’s shape or the way the calf falls straight into the Achilles tendon.
【10】Soleus - this is another small muscle that basically is around the Achilles tendon. However it's not really visible.
【11】✪Gluteus + Iliotibial tract - it's an overkill to mention that this group its important, but I’ll add that the muscle that falls through the side of the leg towards the knee, can grow a lot, mostly in body builders.
【12】 ✪ Semitendinosus muscle - this set of muscles are also called hamstrings (12, 13, 14). Even though they can actually thicken to a considerable size and definitely be visible through the skin, it is less common and the very defined shape will likely only appear in highly shredded people.
【13】Biceps femoris 【14】Semimembranosus muscle
【15】Peroneus -This is another bundle of small muscles that can actually be simplified and joined to 10.
The foot on the other side, practically has no muscle and it is only composed of tendons.
So, now let's go back to the cylinders we already had.
To begin with, If this character is not that athletic, the most relevant muscles to add are the gluteus (11) and the gastrocnemius (8). We’ll just use a circle and an oval for this.
Then you just follow the out line and add some details. Likewise, you don't have to strictly draw over every circle for these are just guides and you might need to do some adjustments for it to look more natural.
Speaking of details, you’ll see that the knee is visible and will be present in form of a small oval or the shape of a shield. Depending on light and how bony your character is, the knee cap will be more or less visible but usually it creates two defined lines that can be used to simplify them.
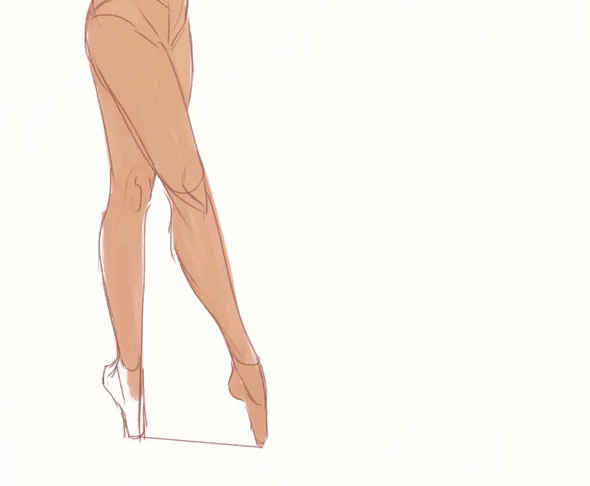
If we look at the side view, the foot resting on its tiptoe will make some muscles stand out more, the calf for instance will create a sharp line that joins to the ankle, even if your character isn't that muscular.
Now for the back of the leg, right at the knee height is possible to find a couple of strong lines produced by the hamstrings and the tendons. It gives the impression of the back of the knee being hollow. This will change a lot depending on the person and the amount of muscle they have built.
►Next let's add more muscle. Vastus lateralis and medialis (3 and 5) will form an inverted heart shape just above the knee. I tend to sketch them as long tear shapes stacked on top of each other.
The gluteus can be bigger as well, which will be more noticeable from a side view. The thigh will also be thicker so we’ll add another couple of circles, this time representing muscles 3 and 13.
From the back, the hamstrings will be more distinguishable, we’ll do some similar inverted heart shapes to simplify them.
The calves will increase their size and the heart shape will be more defined.
►Now lets move on to draw a big muscular character, for which we'll use a body builder as a reference. For this body type you'll appreciate that practically every muscle in the leg is highly recognizable.
It's worth mentioning that the thighs will change their shape and increase their size extremely, which means the character will have to stand with their legs wider apart from each other to make enough room for them.
On the contrary, the lower part of the leg, won't gain that much size compared with how big the thighs can get.
Veins will also be distinguishable at this stage and/or some stripes that run along the muscle fibers.
So, having in mind the place where the muscles are located, we’ll draw an oval over them. Try to imagine as if they are being inflated as balloons, so no matter if they are hitting one another, each of them occupies their own space and wins volume towards the outside.
✦It's easier if you think of every individual muscle as a 3D shape.✦
✦Additionally, consider that the way muscles grow and accommodate is different for each person. The pose also affects and shifts the muscles in multiple positions that might make them less or more visible, stretch or squash. ✦
Notice that even in the sketchy style I’m using for these demonstrations, the more defined and bigger the muscles are, the shadows will also become sharper, mainly in the points where the muscles intersect.
Adding fat
To add fat, we’ll use a similar technique adding ovals and circles. It's important to mention that the place where fat tends to accumulate varies from person to person. However, speaking of the legs, the buttocks and thighs will commonly hold most of the fat.
The calves, on the other side, won't usually store that much fat, they will tend to keep pretty much the same size, particularly if we are talking about smaller characters but if our character has enough body fat, the lower part of the leg can definitely be bigger.
The same rule applies with the feet. as they tend to be on the slimmer side of the spectrum and even though it is possible for feet to be thicker, it won’t be a significant change. The ankles, however, can store fat if the character is big enough.
So, we’ll go over the cylinders with thicker ovals. They'll intersect and overlap each other easily which will help to achieve that roundness and softness.
In places where we have circles intersecting or on the places where the leg is bending, we might have rolls. You can just add them to the outline by adding a small curve.
In the zones where the fat accumulates the most (like the thighs or buttocks) it's common for the character to have the “orange-peel” skin or cellulite.
✦Just like in the muscles, altering the size and shape of these circles can change a lot the shape of the leg. So experiment and practice with it.✦
Incorporating the feet
Until now we have been simplifying the feet using a circle for the ankle and a triangle for the foot. So next, we’ll break the feet into more shapes that can make it easier to draw them in different directions and poses.
First we'll try to emulate the sole, either drawing a couple of circles or drawing a long oval and subtracting a section. I usually call this shape the footprint.
As you can see in figure 1, the shape that results it's a little bit more subtle than 2.
Personally, I tend to use the more subtle bean shape whenever my character is wearing shoes, and go for figure 2 if they go barefoot.
Practice this shape in going in different directions and places, it doesn't have to be perfect and it's kinda like doing gesture drawing: the purpose it's to get familiarized with the footprint.
➜In case you find it hard to draw the oval or circles in perspective, you can add a box or square in the perspective you need or a sphere to represent the heel.
►1-2
For a side view, just drawing a straight line to represent the footprint it's alright, but then add a little half circle on top to substitute the arch of the foot.
►3
Then we are going to stack figures on top of our footprint. First for the heel we can think of it as either a sphere or a box, as mentioned before.
►4
For the fingers and metatarsals we’ll just add volume to the footprint. You can add a box first in the front part of the feet and then round a corner. The resulting shape is similar to a quarter circle.
►5
We’ll proceed to add the middle part of the feet. We’ll use an irregular pyramidal shape that will join the circle for the heel and the front part of the foot.
Notice how the shape doesn't have parallel lines, at least from a front view, quite the contrary. The upper line will represent the point where the ankle starts and it usually goes in the opposite way to the line formed by the metatarsals, which basically follows the toes line.
►6
For the toes, we can place the necessary circles on the front of the figure. You can add an additional guideline to limit how long the toes are.
When the perspective covers some toes, we just draw as many circles as they fit into the figure.
►7
Then we add some small cylinders for each of the circles. Consider that the index toe can be a bit larger than the big toe, hence it might surpass the guideline for just a fraction.
►8
Now to join the feet to the leg: we start by sketching a circle or a small cylinder that will serve as the ankle and proceed to draw a couple of circles to each side of the cylinder. It's possible that the perspective makes these shapes overlap.
►9
If you are having any trouble placing the toes, you can turn them into boxes instead of cylinders and just follow the perspective of the footprint shape.
Remember that the tip of each toe is rounder and thicker than the rest of the toe. Also there can be a considerable gap between the big and index toes.
The tendons might be visible through the skin, so we use some straight lines along the bridge of the foot to imitate them.
➜For the back of the leg we'll do the same process. We can start with a box to set the perspective and we can draw the inverted footprint here. The footprint actually wont make a big difference here, since the heel will be covering most of the foot, but it can help you guide the general position of the foot.
The heel will be a sphere too from the back.
➜The front of the feet will turn into a small triangle that barely peaks to the side of the foot. The ankles on the other hand, will follow the same procedure.
We can draw the Achilles tendon by emulating a shape similar to an hourglass in the heel, starting just at the ankle height.
Now we can draw the outline over our guidelines.
Stylizing
To stylize the leg and feet, you can experiment with the general proportion, change or exaggerate the shapes or certain body parts.
Simplify them to the extreme or make them geometrical or sharper.
✦Find the style that fits your work the most and look at other artists' work, or cartoon/comic characters. You can learn a lot simply by observing and analyzing the art of other people.✦
Finally, remember that all of the anatomical studies require a lot of practice, and even professional artists never stop studying. I know for a fact that I struggled a lot when I first started to study anatomy, so if you are a beginner, don't get discouraged if it doesn't come out great the first time!
Wish you all luck and hope this helps someone!




Comment