
Welcome ones again guys to another tutorial with me Daniel, I have drawing digital for a long time now and I have been chance to come across different method and styles to draw human figures and objects. And for today illustration we looking at the ways to draw a face from any angle.
I am so so happy and excited
To be illustrating todays tutorial because this aspect of art has been a bother to everyone [both old and new artist], even me at a some point in time. But as artist we do not fall down to stay down, we stand up even if is to crouch up stronger, so do not bit your self if you try and get some of what is to be learnt today. And I will like this course today is one of the interesting and sweet concept of art although it is also complicating when understand throw your arts from interesting art piece to fascinating art piece.
This art concepts often throw artist out of balance Because of some of its few ideas or precept behind it that with out the full knowledge on them can not add that flair or spontaneousness to our art piece. And those precept guiding it for one to be knowledgeable on (1.) How to draw effectively the necessary figure [all facial features using shapes],
(2.) Knowing how the different positioning and the poses that better experience the figure emotions,
(3.) Knowing the usefulness of perspectives and it implement.
If as an artist one is able be acquire those above precept, it will help build up our art skills or style and also those who already know how to draw to improve more in their styles, it also given artist the idea to create their own kind of face style to have either Big eyes, pointed chin or realistic look like manga, cartoon and comedy face.
[if can look closely to those characters draw of each style you notice that of the cartoon's have a pointy chin with big eyes, for anima's it has a small stature and go the comedy it has small eyes and body structures are more realistic]
Before we start, I want you to know that I will be break todays tutorial into steps in order a simple and effective explanation and understand and also I will be able give out idea brief with a shorter time.
STEP (1.) What does the human face look like?
Some beginners (like those new to art), may think that the drawing of face is just to draw a circle,
a v-shape underneath It,
add the the facial features and hairs and we done.
No smile dear character!! because If we are to look more closely, we will notice that the both ears are not properly balance to facing each,
Same goes for the both eyes their too are not balance facing each or even balance with the ears.
So "No dear" doing what was done above is wrong, art has principle or precept to follow like for example, trying to show your viewers what is in your head by drawing them, you need to applying the principle mentioned above like the proportionality of the image,
the position of the object,
And the it's nature of culture like one's art style, idea suitable environment for the object/character and so much more.
So what do we see in our heads when the word Face is mentioned, do you see only for number 1.) the ears, nose, mouth and eyes or 2.) Do you see shapes, dimensional and position?! Yes, all that was mentioned above are effective in there own way. But all I am trying to say is that "if we can just only see that of (1) and being ignorant of that of (2), it will show in our art piece and some time take that spark out as show below.
This character only obey the first precept,
While as you can see in this other character which obey all the precepts
◾Draw a Face (facial proportionality using shapes)
Drawing of face have some few method out there which artist use to be able frame correctly the facial features of the face, permit me to say that if you have been going through some of my previous tutorial you may have notice me making reference to using our Regular shape, yeah!!! our square and circle to draw as a basic construct.
This shapes are artist basic foundation. They are every artist primary starting point and for we to grow we should always base our figures on them.
So drawing a character face whether it be a female/male character this methods which we will be learning can be use for both. And they methods are the square foundation framing and the circle foundation framing.
[Note that you just need to learn any one but if you about to learn the two it is fine]
1. We will be start from Simple framing of character face structures,
2. Build ourselves to Complex framing of character face structures.
I advise, if you are a beginner you should focus and practice more on the simple basic of framing character face before moving to the complex ones.
So with no further ado
◾ The Simple ways of framing of character face structures
This aspect of the tutorial is to help build up beginners with the simple basic way of character face construction.
◾Using Square method,
So we are to draw a face of our character using Square method as one of the method method above, we draw the box facing the position we will like our character to face [3/4 view]
While also taking note of the framing guidelines for the facial features.
Draw in some face features like the eyes, nose, mouth and ears in any fun way that is easy and accommodating to us but them still hold on to their basic form placing them on the box.
[Notice that our character is now having form but no structures, let see how we can add them]
We can now draw in the outer structures of the character face like the round skull, cheeks and chin with that we are done with the simple use of square to frame the face of our character.
With we are done. We can see that the character is slightly facing the camera which is number 2, and is face direction number 1.
Now look back to our guidelines do we can now see it usefulness.

◾Using of Circle method,
Now using Circle method to frame the character face, we will be drawing our character face [ Front view]. So we draw a circle
With one horizontal line dividing it into two and two vertical line crossing it slitly below the circle.
And each of this lines indicating the different facial features.
After that, we draw the neck of the character.
The are some different types of ears with one can draw but you can try out any of the three which is the human ears, troll ears or elf ears. But for this tutorial, we will be using the human ears.
Now, we can draw the shape of the skull. The reason why I didn't say round skull if you may be wondering is because the skull is not perfectly round.
They are some few ways which the forehead can be draw which is the hard Edge forehead, curve edge forehead and the round forehead.
And with that, we are done here is the finish Work.
Using of colours to indicate the simple facial features

With that done, we can now moving to the next aspect of this concept.
◾ The Complex ways of framing of character face structures
Using Square method,
Let's start with using the [Square method] to draw our character and the character but we will be use a [Male character] because square shape expresses strength, confident and stamina.
[So to draw our character we will start by drawing three different square box shape each facing different positions Front view, 3/4 side view and profile view].
Draw a small on top and a big box under indicating the body of the character.
Draw one straight horizontal line with two vertical line at the middle each from the end. Now the horizontal line is indicating the left and right side of the face while the top vertical line is indicating where the eye and brows will be and the vertical bottom line is indicating the position of the tip of the nose.
We add the two shapes in form ears at the both sides of the square,
For the neck, when drawing imagine a rubber band been twist,
At this point, we can now on a new layer draw the clear lineart.
Here is the finish work piece.
Using colours to indicate the complex facial features for male character.
Using Circle method,
Now drawing the face of our character with the complex/full features using [Circle method] and for this aspect we will be using a female character because Circle shape expresses the feeling of cuteness, loving and friendliness. [The view point of the character will be the Front view, 3/4 side view and profile view].
So we start with drawing a circle.
We move on to draw the guidelines on the face and Add the ears.
Now we can draw in the eyes of our character in the right spot using the guidelines. Following that, we add the eyebrows above the eyes.
Then we draw the neck in the form two rubber overlapping each other.
Then we can now finish it up by drawing the chin and our character is finish.
Using colours to indicate the complex facial features for female character.
Now to the next concept of illustration which is...
STEP 2: The Face positions of the Character
Draw of face as we know is one but one need to know how the face can be position differently, and for that they are the primary positionings which gives raise to the secondary positionings.
◾For Primary Face positions of the Character
There are nine position which one can position his/her character face and they are
1. 3/4 view
2. Oblique front+ upward view
3. Oblique front+ slight left
4. Oblique from behind
5. Front view
6. Profile view
7. Oblique front+ slight right
8. From above
9. Behind view.
So for we to draw three rows of them each dividing into three different column.
For draw them [ using the circle method], so we start by draw a circle,
And indicating the face features using line [as shown above in the other concept] with the lines showing the position which we want the various characters to face. Then, we can now add the various features to our various characters.
[notice when drawing head one should avoid drawing the shapes round because the skull is not round]
The red circle is circling the point or place we people normal get it wrong, so try to know more on the shape of a head.
Finish work piece,
◾For Secondary positionings of the Character
They are branches of the basic or main nine the also have the same position of the nose, eyes, eyes as the main one leading to them.
Draw a circle, indicating the face features using guideline [as shown above in the other concept] with the lines showing the position which we want the various characters to face.
Now we can add the various features to our various characters.
which ranging from the middle to the left or right, up and down face position which means all are link to the correspondence neighbor in a symmetrical way as shown with the blue lines.
STEP 3: The various Character perspective
This aspect of the art concepts is the most complicated and tricky and most beginners often find this part difficult to learn, but let me today that the are just some few ideas behind drawing a character in different perspective view point. Those view point can be either from above view [also known as the bird eyes view], camera straight on view [also the fish eye view] or below view [ ant eyes view].
◾Above view [also known as the bird eyes view]
The principle/idea we may say which guide this concept is that, when we are draw an object or character we use a above or bird method of view things like if an object is far in a space with a hole risen, it is straight when seen from a far.
But as it gets very close to the viewer, it middle and bottom tends to be small from the middle down, While the head which is the top of the object tends to get bigger than the other part depending on the precepts that anything closer to Lens is more bigger, so the respective part which is bigger is more close to the Lens or viewer point of viewer.

[Note that depend on where our figures is position in space at a particular time with the hole risen position ahead, changes the form or appearance of our object or character].
So if we implement that when drawing our character, our character will appear like what is below.
◾Camera straight on view [also the fish eye view]
The principle/idea we may say which guide this concept is that, when we are draw an object or character we use a above or bird method of view things like if an object is far in a space, it is straight
But as it gets very close it top/head and bottom tends to be small both the head/top and down, While the middle of the object tends to get bigger than the other part depending on the precepts that anything closer to Lens is more bigger, so the respective part which is bigger is more close to the Lens or viewer point of viewer.
So let's implement that to our character,
◾Below view [ ant eyes view]
The principle/idea we may say which guide this concept is that, when we are draw an object or character we use a above or bird method of view things like if an object is far in a space, it is straight with no change in form.
But as it gets very close it middle and top/head tends to be small from the middle up, While the bottom of the object tends to get bigger than the other part depending on the precepts that anything closer to Lens is more bigger, so the respective part which is bigger is more close to the Lens or viewer point of viewer.
Applying the properties of the above to our character.
Now one part is conquer moving on. The next idea is that if we are drawing our character or object depending on where/how the object/character was view either from the above down or from the bottom up changes way the character or object looks, so we should all observe them when drawing.
◾ Bonus round
Now we have the knowledge on the various ideas behind the positioning and perspective of the face.
But I will like to throw each features proportionality in to this tutorial as a bonus round because if we do not properly know how the look and changes with the various positions and perspectives, it may affect.
[Note I will only be draw for each features the three aspect that normal is complicating]
For the drawing of eyes we first of all draw the outer shape of the ears in [red] but bearing in mind that the ears changes in appearance for each of the different positions, the we draw the inside of the ears as indicated with the [blue] first follow up by the [green].
Finish work piece.
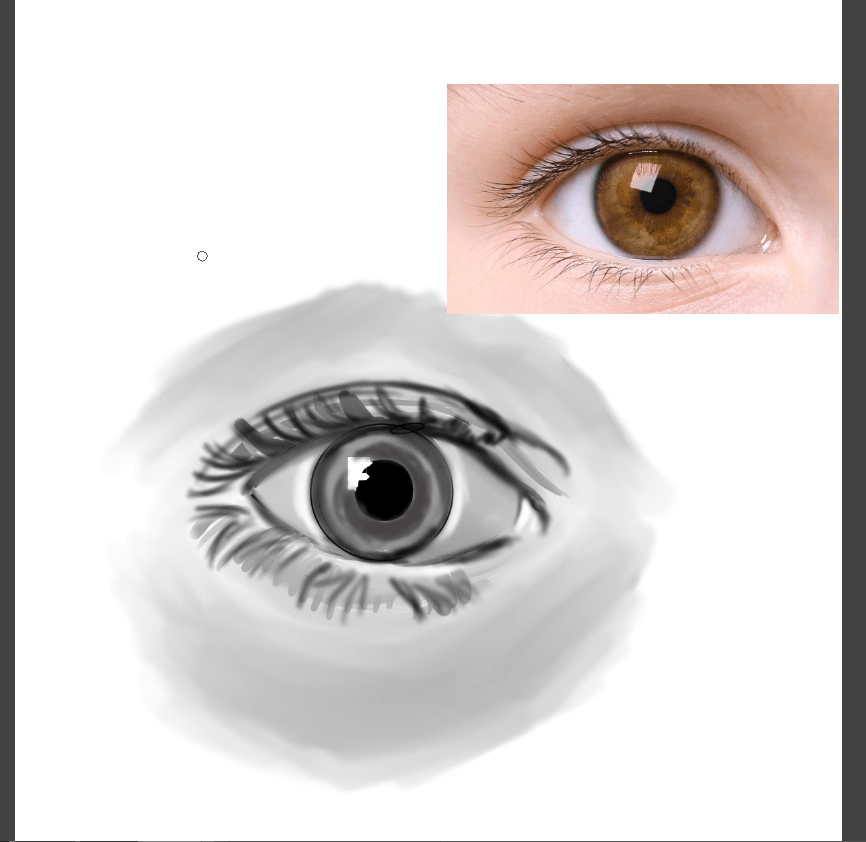
For the eyes,
We start by drawing a round shape and a rectangle with one bend end above the circle in [red], follow by that of the [blue] which indicates the eyelids both the up and down eyelids then the [green] which is the pupil.
Finish work piece.
Note: when you draw a head give it shape relatively to our regular shapes and also avoid with out good proportionality as shown below.
For mouth,
We will first divide the position horizontally and vertically with a straight line which is the [red], follow up by drawing two small circle on top and two big ones below as [blue] and lastly, draw the upper lips and the down lips as [green].
Finish work piece.
For the nose,
We start by drawing a polygon as [red], follow by drawing two lines attach to the both ends of the polygon as the nose pipe in [blue] and lastly draw the nostrils as [green].
Finish work piece.
◾Proportionality of the face and Body
What I want the part of the tutorial to make clear to everyone is that the body of our character can change position that is opposite to the position of the characters face.

Now our both characters are form all facial features already added, so we will be colour them base on black,grey,red, blue and milky colour.
After everything here is how the final piece appear with all precept applied for the kind of positioning.

◾3D Avatar flow in creating face
Also if you want to improve quickly and you are fined it difficult to draw any of the various framing method of face, not to worry [CSP] has made different Avatar characters for even male and female gender,
They can make one's work more easy than ever. In the aspect of poses, expression and even in they can also be use to draw the different ways to draw face. To do it we just need to first import our character.
And to do so we [Click]>[Material icon]>[select pose] that will take us to the figure materials.
[Note: I will be using a female character for the explanation but you can do same for any gender which you can get in settings].
To get for them you need to go [Click]>[Setting bar]>[Preference],
Now, on the new dashboard click on the bar beside for default 3D figure,
After doing that another dashboard will be displayed [Click]>[selection bar]>[3D],
Then a drop box with four selection will be display. For the first two which is 3D drawing Figure is for both male and female.
While for the second two is 3D drawing Figure version 2 also for male and female.
So you can choose which so ever that suits you.
Now after importing, we can use either hand or position setting to adjustment and position our character to the various positions but if we are using hand we can adjust the character head down with the green circle shape which appear when you click any of the portion of the character.
Or position it to the left using the red circle shape,
And the blue circle shape is use to bend the head left and right.
While if we don't want to stress our self or just want to do a fast drawing and do not want to waste time setting the head CSP has made they various face position settings available and at our dispose.
Like if you want our character to face the view with his/her back.
Or oblique front+above view,
Or right side view,
Or oblique left + slightly down view.

At this point, all we just need to do after positioning it, we reduce it's opacity from 100% to 50%.
Then we create a new layer above the figure layer, then draw a rough sketch of the our character using the 3D figure as the guidelines [because CSP has perfectly design the figure to suit such aspect].
Next, set the rough sketch layer to blue colour,
Then use the rough sketch to draw the character lineart,
Now we can add the kind of finish touches we want to the character and we are done.

BONUS 2+
This we will be see how to use square method of framing face to draw the downward view, upward view and oblique back+left side view.
We draw the box, next draw in lines as the guidelines, draw the facial features, then the draw the rough sketch of the head and lastly the clean lineart.
For the part of the face, the head is position facing up where the blue arrow is pointing and the viewers can only see the character bottom side with the red arrow showing that part.
For the upward view, we draw the box with all the guidelines, draw the facial features, then the draw the rough sketch of the head and lastly the clean lineart.
For the part of the face, the head is position facing down where the blue arrow is pointing and the viewers can only see the character top side with the red arrow showing that part.
We draw the box, next draw in lines as the guidelines, draw the facial features, then the draw the rough sketch of the head and lastly the clean lineart.

For the part of the face, the head is position facing left where the blue arrow is pointing and the viewers can only see the character right side with the red arrow showing that part.
EXIT
Thanks one guys, I hope this tutorial was helpful and I hope to see you next time for now I will be signing off, bye.
Users who liked this post


Comment