
Hi, it's Nadia!
In this tutorial I'll write how to create dynamic poses in diferent way.
If you struggle or you're new with perspective, please give a quick read to this tutorial, I've written basics of perspective ^^
Inroduction
Dynamic poses often show a subject in motion or engaging a physical activity.
But first, to explain how to do them, I wanted to talk a little about how to represent a 3D image in a 2D space (that it may be a paper o graphic table).
There are different drawing styles, but most of them are using like a 3D style.
As you can see, the fairy I've drawn with the 2D style, looks flat. It's like everything is flat even if I've added a lot of details
Meanwhile, the same fairy drew in perspective (so it looks like 3D) has got volume and even if I've drawn the same static pose, she seems more realistic ^^
The same thing is applied to dynamic poses. When you draw a pose, try to imaging it in a 3D box, move legs and arms back and forth, not just left and right!
For example:
(I use a static pose to make it more visible)
The pose is the same, but
1- has feet on the same line and arm following the body line
2- has feet one foward and one back, arm back, and chest up
At first it can be a little difficult, but try to first imagine the person inside of a box, it will be easier ^^
You need to exaggerate a pose, if you don't like it, you can always come back, but try to push it more then you usually do. You'll be surprised on what you can create!
Gestures and line of action
Another point that help with poses, is the "line of action"
It's an imaginary line that pass through the entire pose and it helps to give emotion
For practice, just doodle a lot of thumbnail gestures, and then redrarw the pose using a line of action to create the pose.
Gestures are not anotomically correct. They just show the pose to see how it could be, and they are so helpful!
When I've first found about gestures, I did a lot of them, because they help you with your visual library, and since you don't have to care about anatomy, they appear so easily to do ^^
Yes, all the first ones where difficult, but when you get used, the more you do, the easiest they are!
For starting, you can look at references and then try to copy the pose, but when you do a lot of them, you'll be able to image the pose naturally and see it in 3D in your mind!
As you can see, they just follow the perpsective for themself, all of them have different camera angles and point of view! They are so tiny, so I didn't lose time with details, I just sketched them, 10 to 30 seconds each. And not all in one day. You can do 5 one day, 8 the other day and then trying to increase day by day ^^
Clip Studio 3D models
When I draw a difficult pose or if I'm in an art block, I use 3D model of Clip studio to help me in the process ^^
You can find it on Window > Material > Material: Body type
And when you click, it will appear a window were you can find the old and new versions of male and female body type
Click on the right button and it will appear the window where you can change the body type, if more muscle or less etc...
By clicking on the 3D model, with the object tool, You can move all the parts of the body
And look! I've created the same pose I've drawn in a little thumbnail ^^
The best part with 3D model? Well, it's 3D! You can totally move the camera wherever you want, so you can choose the perfect angle, without redrawing it ten times!! (By the way, if you want, you could actually do it for practice, it's always helpful! But I mean, if you are doing a long artwork and you need pose reference, you can create it with the 3D model ^^)
Clip Studio has this function, called "Manga perspective" that will enhance the closest part of the body to the "camera" (so the closest to you).
Has you can see, in the first image it's not selected, so it looks like a normal photo.
In the second one, the hand is a little bit bigger:
By modifying the slider, you can deform the image as you like:
Here I've moved the camera.
The closest part of the body now is the foot. So the function enhance this part:
Speed Lines
Another really helpful way to draw dynamic poses, is also to apply the so called "speed lines"
Those are lines, usually used on manga style, but also in other drawing styles, that help you to imagine better the action.
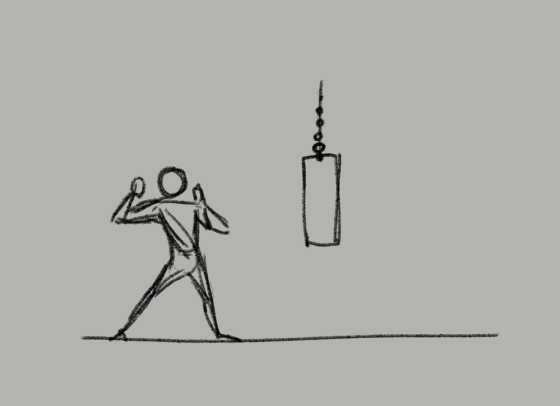
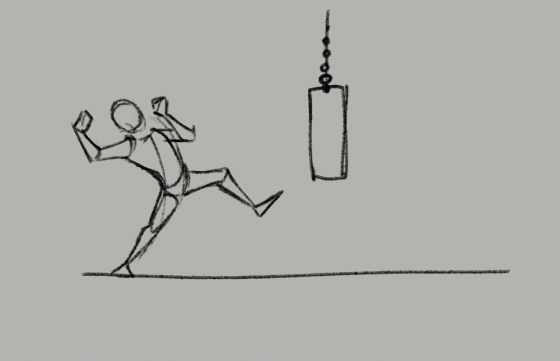
For example, this person is running:
This person is running fast:
So these are just sketched, but as you can see, speed lines help to see the direction and create the optical illusion that something is moving ^^
Think about animation
In animation there are different stages, and the first one is "keyframe"
Keyframe, are basically the poses that represent the movement.
So, if you want to draw a dynamic pose, think of it as if it's an animation keyframe. So it would be:
1. when they are going to punch
2. when they touch the punching bag
3. when the action is finished and the bag is dragged by the force
And look, just by this 3 images, it looks an animation!
However, you can exaggerate the pose to make it feel more powerful, so look what I've changed:
I've raised the leg, to make it feel they are like charging a lot that punch
I've lowered the head, so it looks they're giving all their energy to that punch
And lastly, I gave a more curved shape to the body, so it follows the action
But for an illustration, it's not really appealing drawing like that flat. So now, using 3D models, I choose a better camera view to draw that punch:
I first recreate the pose. It has not to be tottally equal, just change it as you like
The one you draw as thumbnail are just references ^^
I've moved the camera to chose the angle I prefer:
Notes
Thank you for have read until here! I hope this was helpful ^^
Users who liked this post


Comment