
Introduction:
Drawing a side profile can be a rewarding and challenging exercise for artists. It requires an understanding of proportions, perspective, and capturing subtle details. In this tutorial, I will guide you through the process of efficiently and creatively using a 3D model provided by Clip Studio (and other softwares) to draw a face from side view. Let's get started!
Step 1: Choosing a 3D head model
Start by finding a model from Clip Studio Paint’s Library, or the Asset Store . It's crucial to have a clear visual representation of the face shape and artstyle you want to draw. Pay attention to the angles, shapes, and proportions of the face to fit your vision.
Recomendation: Clip Studio Originals
Clip Studio head model template is, technically, all you need. It has all the basics, plus many sliders that you can personally edit, to fit your characters and some facial expressions.
Recomendation: Marredae
Marredae has these 4 realistic bust models that are of very good quality. I would definitely recommend you to use these 3D models.
Gender and Styles
There is a clear difference between male and female faces, especially in adults. What's interesting is that the Chibi style doesn't actually differ from one character to the next, or even by gender. This is due to the fact that it is a simple face shape that is frequently used to make the characters appear much younger. Now, in the standard anime style, and especially in western comics, the characters clearly differentiate between genders, and occasionally even within the same gender. However, after a semi-realistic style is achieved, the gender becomes less visible until it is totally realistic.
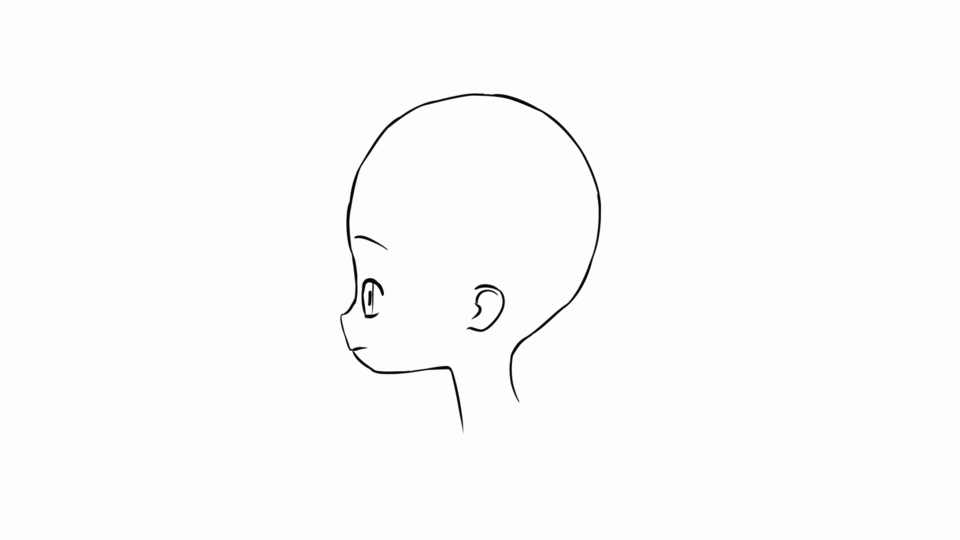
Step 2: Upgrading your profiles
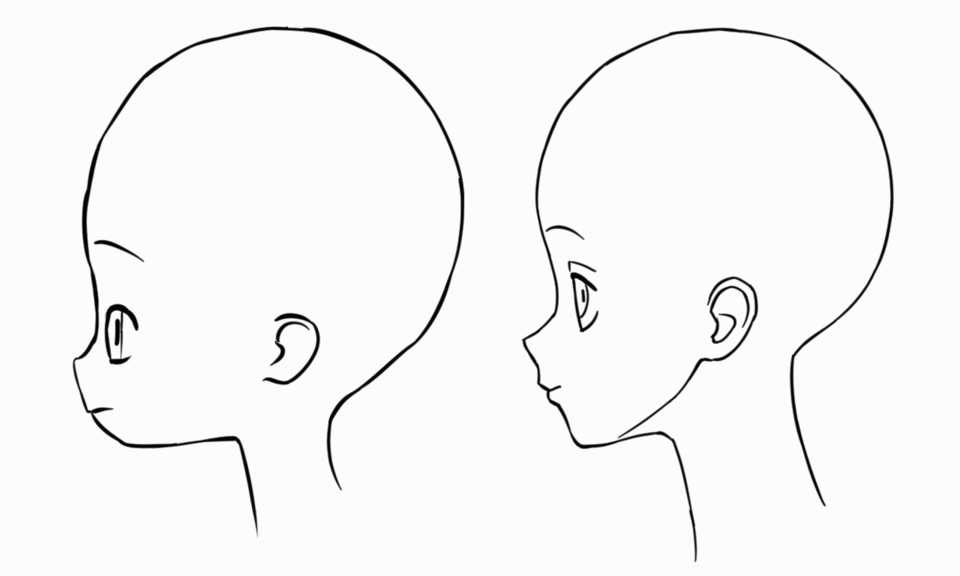
The most important step is to outline your head model after importing it to the canvas and setting it to side-view (profile). But, especially when it comes to Japanese styles, that isn't always enough to look authentic to the style. Because the models are 3D, their face features are more solid and less stylized. You can improve your drawing by moving the eyes and brows back into the head, making the ears simpler and more readable, and disconnecting the lips from the outline.
After that, there's another trick you may use to liven things up. Simply imagine the face is slightly turned to us, and then add the eyelashes from the hidden eye, as seen in the image below. Depending on the style, you can change the curve of the mouth and add a little of the brow.
Step 3: Facial Expression
Facial expressions play a vital role in conveying emotions and bringing life to your drawings. Before diving into drawing specific expressions, it's crucial to grasp the underlying structures of the face and how it moves. Familiarize yourself with the different parts, such as the eyes, eyebrows, nose, mouth, and cheeks, using your own face or any references you prefer.
The eyes and eyebrows play a significant role in conveying emotions. Experiment with different shapes, sizes, and positions to depict various expressions.
Drawing an open mouth can bring life to your character illustrations, whether you're drawing a smile, a shout, or any other expression.
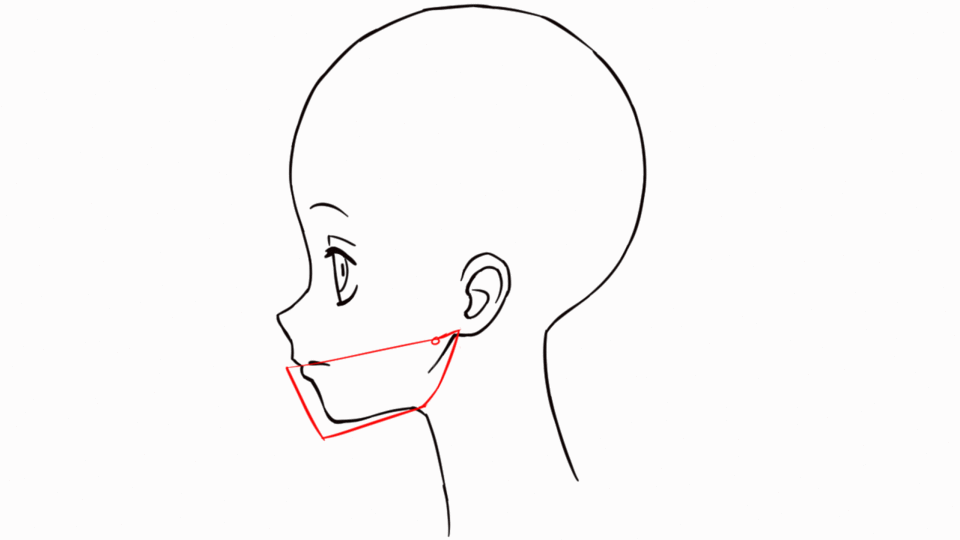
Select the entire jaw of your lineart and rotate it at the ear. Using the horizontal line as a guide, draw the upper lip by lightly sketching a slightly curved line. The curvature will depend on the expression you're aiming for. For example, a smile would have a more pronounced curve, while a shout might have a wider, flatter shape. To draw the lower lip, just softly meet the corner of the mouth and the tip of the lower lip.
If you want to include visible teeth in your open mouth drawing, lightly sketch the basic shapes. Start with the front teeth, using straight or slightly curved lines, depending on the angle and expression. Add details like gaps or irregularities to make the teeth more realistic.
Inside the open mouth, sketch the tongue and the roof of the mouth. Use curved lines to depict the general shape and form. Remember that the size and positioning of the tongue may vary based on the expression and perspective.
Don’t forget that this step also depends of the style you’re looking for, but below there is a middle ground example.
Step 5: Adding Details
Before starting to draw hair, take some time to observe and study various hair types. Look at different textures, lengths, and styles. Pay attention to the way hair flows, falls, and interacts with light. This observation will help you understand the fundamentals of hair drawing.
Start by outlining the general shape, considering the hairline, and any partings or bangs. Focus on capturing the overall silhouette of the hairstyle without worrying about how good or detailed it looks just yet. Observe how the hair falls and flows, creating natural waves, curls, or straight strands. Think about the direction of the hair's movement and consider areas where it might overlap or tuck behind the ears.
Make any necessary refinements to improve the accuracy and overall appearance of the hair. Pay attention to smaller details such as flyaway strands, wisps, or any specific characteristics of the hairstyle you're drawing.
Head accessories can add flair, character, and cultural significance to your drawings. Whether it's a hat, headband, crown, or any other embellishment, mastering the art of drawing head accessories will enhance your character designs. Observe the reference image closely to capture the subtle shapes of the face. Pay attention to the curves and angles of the head.
Select the head accessory you want to draw. It could be a hat, headband, tiara, or any other decorative element. Visualize how it will sit on the head and consider the angle and positioning. Focus on capturing the overall shape, curves, and angles. Pay attention to any specific features such as brims, feathers, or embellishments that give the accessory its unique character.
Evaluate the proportions of the head accessory in relation to the head itself. Ensure that it is neither too small nor too large for the head. Make any necessary adjustments to achieve a harmonious balance between the accessory and the head.
Step 6: Shading, Texturing and Detailing
To bring your drawing to life, start shading the different areas of the face. Observe the light source in your reference and shade accordingly. Pay attention to the values and tones, making darker areas appear darker and lighter areas appear lighter. Here, its more about the style you want to follow and less about the angle. You can shade the same way you would on any other drawing, as long as you keep in mind how the head is shaped. All the 3D models in Clip Studio Paint have in-built shading tools so, you can make use of them!
Conclusion:
Drawing a side profile can be a challenging but rewarding exercise in capturing the unique features and proportions of your character’s face. By following the step-by-step instructions outlined in this tutorial and practicing regularly, you can improve your skills and create impressive side profile drawings. Remember to be patient, observe carefully, and have fun with the process. Have fun!
Users who liked this post


Comment