
Introduction
The Text tool is great for adding text to your comics, illustrations, and graphic designs, but that’s not all. Clip Studio Paint’s Text tool has several options that will increase your efficiency when inserting text or editing, and it has gotten even better with version 2 of the software.
In this tutorial, I will share seven essential tips as well as a few creative typography methods so you can also use the Text tool to its full potential.
How to Access the Text Tool
To use the Text tool, go to the [Tool] palette (Window > Tool), and select the icon [A]. Alternatively, you can also use the keyboard shortcut T.
Tool Property palette
To use the Text tool settings, open the tool property palette (Window > Tool property). This palette contains the essential settings.
Sub Tool Detail window
To access the advanced settings in the [Sub Tool Detail] window, we click the wrench icon on the bottom right of the tool property palette.
If you want any of the advanced settings in the pop-up menu to show up in our Tool property palette, you can click the box on the left of that setting so an eye icon shows up in the box.
Clicking again will remove the eye icon and the setting will no longer show up in your Tool property palette.

In this way, you can customize your Text tool property palette to have your most needed settings readily available.
Tip 1: Set Your Separate Text Color
By default, the main color is used as your text color. But this can be inconvenient when you need to switch between adding text and working on your illustration or poster and the main color keeps changing.
To set the text color to a specific color, go to the Tool property palette, and in [Text color] select the third box, which is for user color. Now, all your future text inputs will be in this color regardless of the main and secondary colors.
To change your user color, select the desired color and bring the cursor to the user color icon. The cursor will change to the Fill icon and when you click, your user color will change to the selected color.

Alternatively, you can click the drop-down menu icon in the [Text color] setting, go to [Select user color] and choose your color from the [Color settings] pop-up window.
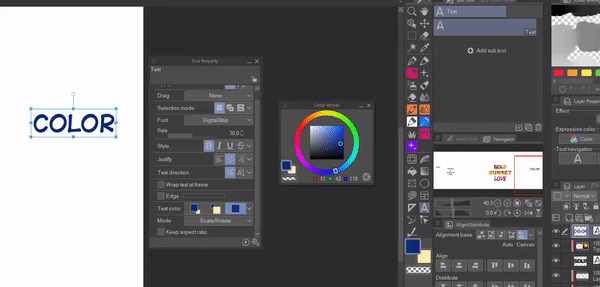
Using this user color setting, you can have more control over what your text color will be and when it changes.
Tip 2: Create Custom Font Lists
Clip Studio Paint has a nice, long list of fonts to choose from. But did you know that you can also make your own custom font lists to meet your needs?
You could create different font lists for different projects or organize your favorite fonts so you don't have to scroll through the entire list each time.
To create a new font list, go to the Text tool property palette and click on the [Font] drop-down menu. Select the gear icon on the bottom right and in the pop-up window click the first icon on the bottom left to create a new font list.
Name your list and select the fonts you want. By default, only the font names are displayed, but by clicking the second icon right underneath the font list, the font names will be displayed in their specific font, making it easier to choose.
When you have made your lists, press OK.

You can access your font list from the [Font] menu, by clicking the [All fonts] dropdown button.

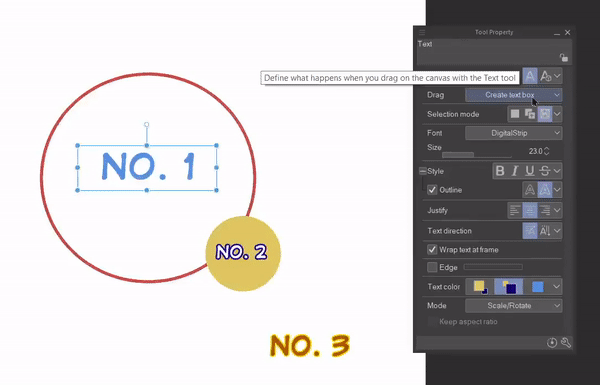
Tip 3: Creating a Text box, Adjusting Wrapping, and Selecting Multiple Texts
Usually, when we type with the text tool by clicking anywhere on the screen, we need the press enter to go to the next line.
Also, in this mode, resizing your text box changes text dimensions instead of text wrapping ( [Keep aspect ratio] can be turned on to maintain text ratio while changing its size).
As such, if you want text wrapping to change by adjusting the text frame, make sure the [Wrap text at frame] setting is active (and use version 2 for enhanced wrapping capability).
Now a text box will show up when you click on the screen to type and you can adjust that text box and its wrapping at any time while typing.

Alternatively, you can set the [Drag] drop-down to [Create text box] in the tool property palette. Now by clicking and dragging, you can define your text box and your text will wrap within it. You can also adjust the text box later and the text wrapping will change accordingly.

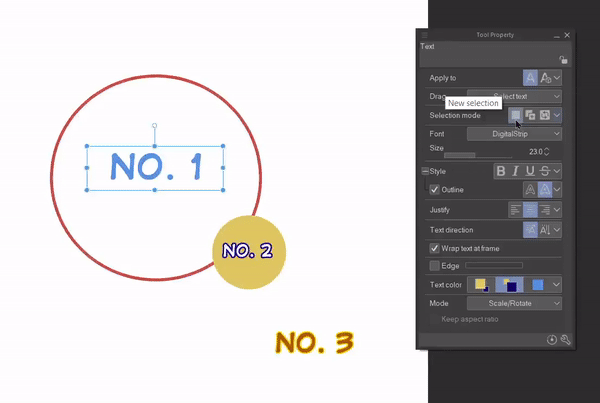
Select multiple texts:
If you want to make changes to multiple text boxes at once, you can switch the [Drag] setting to [Select text].
You can also make multiple text selections by setting the [Selection mode] option in the tool property palette to [Add to selection] or [Toggle selection].
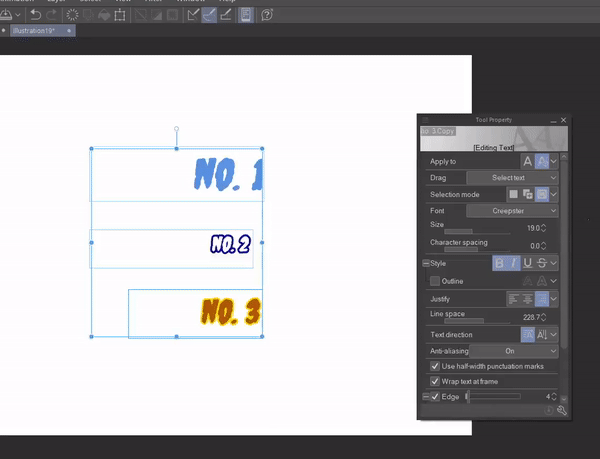
Tip 4: Edit Multiple Text Boxes at Once
Once multiple texts have been selected with [Drag] or [Selection mode], we can apply changes to all these texts at once.
But sometimes changes do not apply. Why? We need to first change the [Apply to] setting in the tool property palette from the default [New only] to [Selected text], which is the second icon.
Now all your changes, such as for font, color, size, direction, moving, transforming, and all others will apply to every selected text box.

Tip 5: Use Align/Distribute Tool for Aligning Texts
The version 2 Align/Distribute tool is great for aligning objects as well as text.
It makes it very easy to quickly test out different alignment and distribution possibilities, especially great for poster, webtoon, and thumbnail layouts.
Simply select your text boxes or layers, choose the alignment base, and try out the options yourself.

Note: Make sure the [Align text pixels] option is checkmarked in the Align/Distribute palette to ensure accurate alignment.
Tip 6: Add New Fonts
There are many free font resources online. Once you have downloaded and extracted the desired font files, go to the [Font] drop-down menu and click [Add font from files]. Select the file or files (.ttf, .otf, .ttc, .otc formats) and click [Open].
It is that easy and these new fonts will now be available for you to use inside the software.
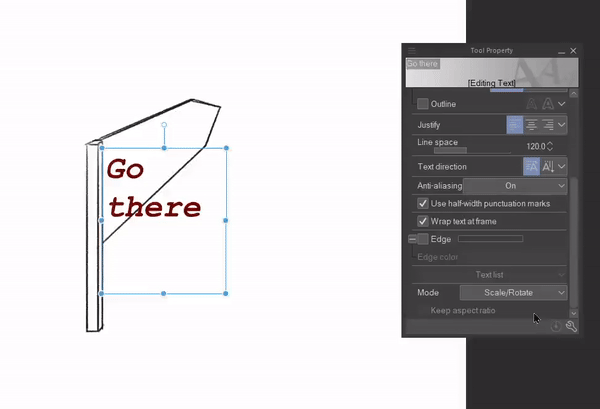
Tip 7: Change Your Text’s Plane
If you want your text to appear along a certain plane for background banners and signs etc., it is very easy to do with the Text tool.
Go to the tool property palette and in the [Mode] drop-down menu, choose [Skew] or [Scale/Rotate/Skew]. Now you can manipulate the corner points of your textbox to skew it to match the plane you want.
Creative Typography: Using Edge, Clipping Masks, and Blending Modes
There are many ways in which we can creatively edit text to make it more interesting and appealing. Here I will share a few techniques to customize available fonts when working on posters and title designs etc.
1. Edge:
Edge outlines the text and the outline’s color and thickness can be adjusted. By default, the [Edge] option is not visible in the [Tool property] palette but is available in the [Text] category of the [Sub Tool Detail] window.

Stacking duplicates with an edge can give even more interesting results.

2. Clipping Masks:
Clipping masks are a great way of adding a flare of interest to your text, especially when you do not want your text to be a solid color, or do not want to rasterize your text layer.
You could clip a texture, image, or gradient, etc., to create fascinating results. To do this, bring the layer containing your texture or gradient, etc over your text layer so it covers the text to the extent you want. Then click the [Clip to Layer Below] icon (the first icon in the second row of the [Layer] palette).
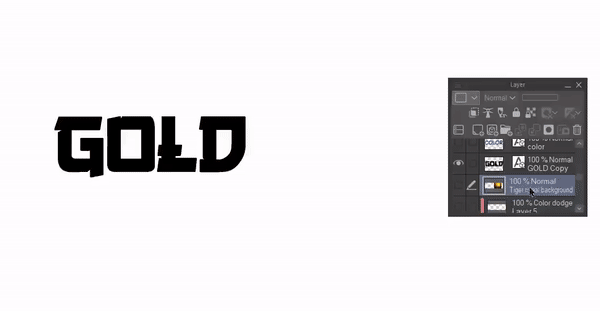
3. Blending Modes:
With blending modes, you can add interesting lighting effects to your text. In this example, I have added hearts to the text ‘Love’ with [Color Dodge] mode.

All Text Stays Editable
The best aspect of the creative typography tips I’ve mentioned above is that you do not need to rasterize your text to apply these effects. If you want the same effect for another text or need to make changes later on, you can simply edit your text layers instead of having to start all over.

Final Thoughts
I hope this article helps you make the most out of the Text tool and I also hope it gives you ideas on how to creatively play around with your text. Thank you for reading till the end!
Users who liked this post


Comment