
Introduction
In this tutorial, I will demonstrate how to paint natural green sceneries in easy-to-follow steps. I will be using the Simple Mode on my chromebook for this tutorial, so we will achieve our goal while only using the most essential tools.
1. Painting trees and bushes
For tree and bush foliage, I find the default [Leaves] brush to work great. Using the [Leaves] brush, draw the tree’s foliage base with various sizes of leaf clumps using dark green color.
Now create a layer under the foliage layer for the tree trunk. Next, using the [Brush pen] brush, draw the trunk and branches that connect to the foliage using dark brown color.
For the branches, go mostly from thick to narrow as they branch away, with thickness at some bends. In case it is hard to draw crisp branches, the transparent color is great for refining them as desired.
Next, determine the direction of light and identify clumps of leaves where light will mostly fall.
Select [Lock transparent pixels] on both layers and with the [Brush pen] go over the highlighted areas using light green and light brown for the foliage and trunk respectively.
Now use a very light green and a very light brown to go over the highlights area again to add some stronger highlights.
Tip: When changing colors from dark to light for lightning, shift the hue wheel steadily towards yellow too, as that is the color of the sunlight we are portraying. This approach will help keep your overall colors from looking dull.
These same steps can also be applied when painting shrubs and other vegetation.
2. The change of seasons
When painting natural sceneries, we don’t always have to stick to greens for our foliage. Depicting different seasons is a great way of exploring variety in natural landscapes.
3. Painting a grassland
To paint a grassland, we will start by blocking in the colors. I’ll be using the [Brush pen] to do so. We will paint from the background towards the foreground, with the color contrast and shape sizes increasing as we move towards the foreground.
I’m only using three colors at this stage to keep things as simple as possible.
Since I’m painting a sunny day, I’ll use a bright yellowish green to highlight the land getting direct sunlight. The background will look the brightest as bumps and crevices seem flatter in the distance, letting the sunlight stay dominant.
Now with dark green, I'll paint the lower parts of the medium green blocks. These will be the elevations in the field.
Don’t fret if your grassland is looking too rough at this stage and just focus on defining the basic shapes. It will all start coming together at the detailing stage.
Now I'll take the [Pointillism] brush and soften most of the edges in the painting. I'm also adding some color variations and defining some planes of the elevations.
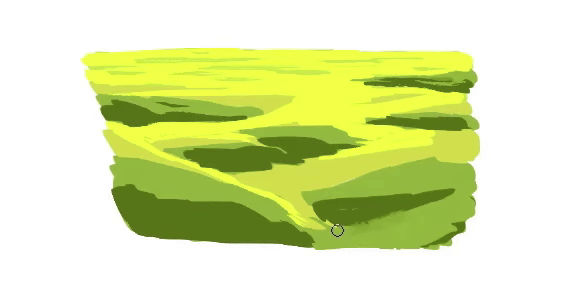
Now I'll take the [Brush pen] again and restore some sharp details, especially in the foreground. By switching between two shades of green, we can create the impression of blades of grass in the foreground.
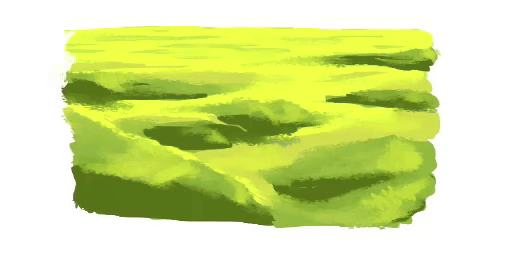
Now I'll select the [Grassland] brush from the [Decoration] brushes and add grass blades to the foreground in different shades of green.
Switching to the [Trees] brush in the [Decoration] brushes, we can add a few trees to the middle-ground and background to create a sense of depth. The tree in the middle-ground will be larger and darker as compared to the ones in the background due to atmospheric perspective.
To add further definition to the painting, I’ll take the [Textured pen] from the [Pen] brushes and add patches of sharp and medium highlights to the foreground and middle-ground in the direction of the sun.
I’ll add some more details such as coloring the tree trunk in the middle ground and adding the sky.
If we want the grassland to look more colorful, we can go for spring vibes by painting scattered flowers throughout the field using the [Texture pen].
4. Painting a focal point
I can turn this grassland into a better scenery by adding a focal point in the foreground. To achieve this, I am going to add a tree to the foreground with the steps discussed in the first section. I will also consider the rule of thirds while doing so.
Tip: Adding the tree to a darker patch of grass makes it easier to blend in the trunk with the grass.
To add an element of interest, I’m going to paint in a tire swing as well. Here is the final result:
Final Thoughts
Natural sceneries are fun to paint and can be achieved with a simple approach and the most accessible tools. I hope you found this tutorial helpful. Thank you for reading!
Users who liked this post


Comment