
Hellooo! Today I come to share the way in which I draw faces in profile.
I will explain from the structure of the face to the perspective of the face.
Structure
To begin with we need to understand the structure of the face.
This is how it looks from the front.
In order to draw we need to learn the profile structure, only half of the face would be visible.
This is what the face would look like in profile.
This is how the reference lines would look on the drawing.
Some of the things we may notice are:
A kind of triangle is formed from the forehead and chin.
You also have to know that if we want to draw a woman's face, the features of the eyes and the face in general, such as the jaw, do not look as marked as that of men, but that will depend on what you want to draw.
We also notice that the forehead and chin have a similar distance and the only thing that sticks out is the nose.
The shape of the mouth seems to have two triangles together.
The distance between the limit of the circle, with the beginning of the ear and the chin are similar.
In the middle of the circle are the eyebrows.
The back of the head protrudes from the circle.
The ears meet in a quarter of the circle.
The nose is similar in height to the ear.
The eyes are not at the same distance from the eyebrows, they are further back.
Eyes
To draw the eyes we need to understand how they move and the way they look from the side.
The circle that is inside the big one is to limit the eyes since the small circle represents what cannot be seen in a face from the front.
(Example)
The eye is a type of sphere like the example above and what covers the eye are the eyelashes and other parts of the face.
Like the head, it is divided into 4 parts to be able to draw in perspective.
The eye from the side is shaped like a triangle, although it will also depend on the type of eye we want to draw.
The iris and pupil will have an oval shape.
(you can look for more references on the internet about the eyes if it is difficult to draw it)
Example
Here the triangular shape is appreciated more.
movements
If we want to draw a character with an open mouth, there are some things that have to be known.
Example of what it looks like.
The movement of the jaw is downward.
The red point works to know that the jaw cannot be moved too much from a fixed point.
Also note that the upper part of the face does not move much.
To be more specific, here is the structure of the bones of the face so that you can see how it moves.
You can see a little movement in the bone near the ear.
Example:
Parts of the face
mouth and nose
The mouth is shaped like a hexagon, from the side it would look different depending on how we want it to look.
You have to take into account the movement of the jaw to be able to draw the mouth.
Nose
There are different types of noses, so it will depend on what we want to draw in order to make them.
(You can look for more references of the type of noses that exist)
forehead and chin
There are many face types so try to put some features that stand out.
The forehead can be round like number 1 or straight like number 2.
Also the look looks different depending on the distance you leave between the eyes and the forehead like 3 and 5.
The types of chin can vary a lot just like the lips, the chin can be straight or round.
The lips can be prominent or small.
Perspective
If we want to draw from a different angle we have to know several things.
An example
To practice they can look for different references on the internet.
They can be guided by the structure that we saw at the beginning.
Depending on the angle from which the face is viewed, the sphere will also look different.
You can also use 3D models to better understand the shape of the face.
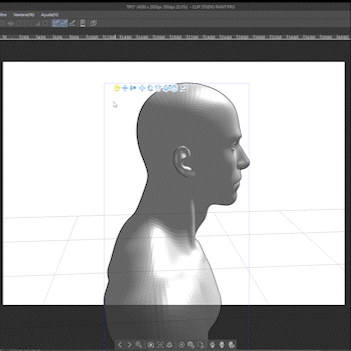
Example using 3D:
(I rasterized the layer where the 3D model was in order to lower the opacity)
Final result
Hair
When making the hair it will depend a lot on the style and shape of the hair on which you want to base it, that's why I recommend seeing references when drawing.
(The yellow color represents the limit where the hair can be.)
The red dot is an example of where the center of the hair can be.
You have to remember to leave a space between the head and the hair so that it does not have an odd shape.
Example
Final
If you want to see more thoroughly the structure of the face I recommend this tutorial.
Well, to finish I would like to thank those who read until the end and I hope it will help you when drawing faces in profile since it was difficult for me when I started drawing and with this tutorial I hope to be of help.
Thank you very much to see!
Users who liked this post


Comment