
Lets get started!
Gathering references
The first step is to decide what flowers you'd like to illustrate which requires research! This is the most important process since it will provide a strong foundation and also help in studying how to approach the illustration
If you'd like to start off with a flower that's more beginner-friendly, I'd recommend something like a daisy or a sunflower due to its easier shapes. Since those flowers have relatively flat petals and a single layer of petals, they’re easier to practice drawing as simple shapes and therefore easier to practice drawing from many angles. For flowers that are more dense and that can be a fun challenge, I'd recommend flowers with a lot of curved overlapping petals like chrysanthemums or roses.
Be sure to also pick reference images with clear lighting and that has enough information for you to understand how it works.
Flower Meanings (The Language of Flowers)
There is a long history of prescribing meaning to different types of flowers. When deciding which flowers to draw, you can also select those that have special meaning either in general or to you. Flower meanings can also help drive the overall tone and mood of your illustrations adding that extra dimensionality and symbolism to your work!
For example, roses are one of the most commonly known flowers and are usually symbolized with love. However, the color of roses represents different meanings! Yellow roses mean platonic love with friendships and purple roses can mean 'love at first sight.' There are many different yet subtle meanings behind each flower and their pairings together so always research before diving in!
For this demo, I will be using daisies and chrysanthemums- flowers of joy and cheerfulness! I've also decided for this illustration I want to reflect a happy and bright tone so when the audience sees this illustration, my goal is for them to feel joy!
Flower anatomy
It’s important to carefully study the anatomy of flowers. Gather many references and if possible observe the plant in person.
Quick Tip! For creating fantastical flowers, I would suggest first studying many real ones and then learning which parts can be swapped out to make something unique. Studying from real life will give an air of believability to fantasy designs. (If this tutorial goes well, I'd be happy to do a separate tutorial on Flower Concept Design!)
1. Rough sketch in primitive shapes
To start, let's break the flower into approachable shapes - think in circles and spheres!
Below I’ve roughed out the general shape I’ll be using for all of the chrysanthemums (left) and the daisies (right).
Since daisies are relatively flat flowers, I can use just a single oval to plan the arrangement of petals. The chrysanthemums are a bit more complex. Since the petals are in rows AND curve upwards, I’ll need to create several offset ovals to plan how the petals will layer and curve.
Once you have the hang of it, drawing flat flowers from new angles is as simple as drawing ovals from different angles.
Quick tip: You can use the 3D primitives tool to help block out the shape of the more complex ‘rounded’ flowers. The shape of the chrysanthemums is more or less several halves of spheres.
2. From ovals to flowers! How do we get there?
I’ll create an example of a pot of flowers to show how I would use this method to draw a bundle of flowers.
I roughly sketch the angle of the flowers. I’m going to be drawing a bunch grouped together, so from the start, I will plan to angle the flowers in many directions to give the scene a natural variety.
At this stage, I’m just using very simple circles to decide the angle and to indicate roughly where each band of petals will go.
From observing the chrysanthemum flowers, I can see they’re made of many expanding rows of petals- so I indicate concentric circles I will be able to use as a base for the next step.
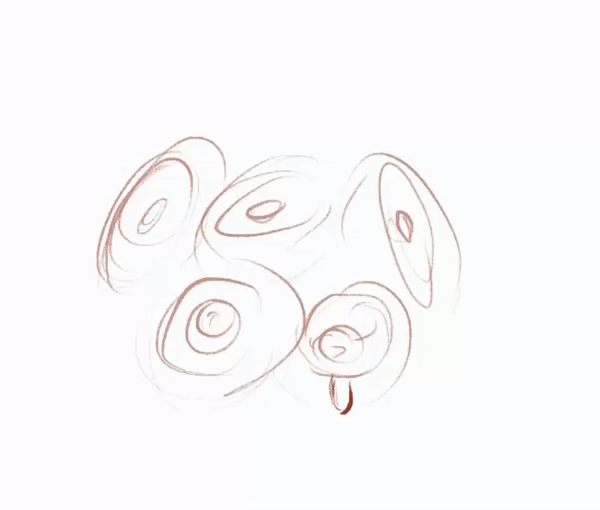
I start to rough in the shapes of the petals, keeping to the circular guide
During this process, it's okay if it looks rough since we will focus on clean up later. From our studies, we want to make it more natural by being a little random and creative with petal variation. Sometimes I might erase and resketch areas that look too uniform. The name of the game is variety to keep it looking natural but also making sure to keep that overall shape. Be sure to check your references for more details or even ideas on variety and shapes!
Once we're happy with the overall shape and petals, we take a thinner brush and clean up the sketch!
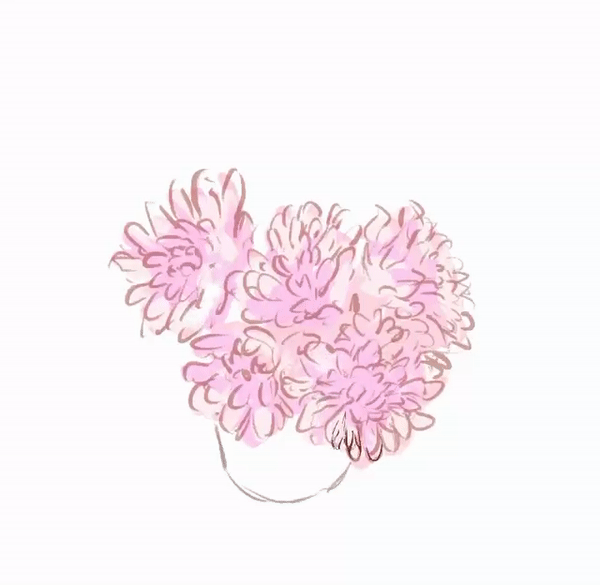
Ta-da, a lovely pot of flowers!
Now let’s return to our larger illustration, using the same methods…
3. Coloring!
Once you’re happy with the sketch, then the flowers are now ready to be painted!
Here are the flowers I’ll be using for the illustration with my OC :
I first create a layer with the base colors around the flowers.
Next, I create a new layer and clip it on the base layer. This will make sure whatever I color stays within this layer.
With the clipped layer this is where we will use the color jitter. Start painting over the whole thing to give it some variety.
Quick tip: For the underpainting, it’s useful to use a brush with a small amount of color jitter to create a nice subtle variety seen in a lot of flowers. The color jitter settings can be found in the sub-tool settings for the brush. Mess with the settings until you have an effect you like.
Next, I will make a third layer and loosely paint in the tints and shadows. I like to work loosely and push and pull the paint as I go. However, there are many different techniques for how to approach the coloring stage.
The final layer set up for the coloring:
4. Final steps!
Place the flowers with your illustration (or have it the main focus if you'd like!) And keep building and rendering until it's to the level you like! In this instance, I'm adding flower pedals, and hearts and making everything super cute using CSP's default decoration brushes. This is to your own discretion!
And we're all done! Thank you so much for reading and have fun painting flowers!
If you have additional questions, let me know and I will be happy to try to help clarify!
Users who liked this post


Comment