
Hi dear, Daniel [Dannyyoung22] is here again with another useful tutorial. I am so happy to be showing everyone the ways I do use CSP assets to my advantage and showing to new beginners the various ways one can use this tools to make our work easy and also I will be showing the ways I draw and paint flowers to give it that realistic look and vibe. So stick with me as I take us down memory lane; Oh sorry, I mean let's take down so Memos on easy ways to paint flowers with the various season moods in mind.
***
For we to be able to make use of the CSP assets (sub tools) properly or effectively, the firstly most important thing we must do is TURNING ON our (Research Mode) and do so research on flowers, so as not to dive into an uncharted territory.
Step 1: Research mode Turned on!!!
To best better ones self in anything the person must be willing to learn and that willingness to learn will be the one to help build our foundation to stand strong.
***
Now back to the tutorial at hand with our research mode now turned on, we can just set our mind on reaching drawing of flowers easy and not leaving out it realistic expression ask our self in what ways can I draw flowers, if I am to draw a particular flower in the various seasons how can I do so, in what way are flower useful when added to characters and scenery and lastly if I am using CSP [clip studio paint] app on either my smartphone, tablet or system, how can CSP help make drawing of flowers easy for me; and with that, we will then see that for those questions to be answer we have to research it and thanks to today's tutorial those above question will be answer in what we will be looking through.
***
For starter, let's see how can CSP help makes drawing of flowers easy which then takes us to the,
• Clip studio paint assets (sub tool),
This are sets of sub tools or brush materials which can be access by any CSP linked user by either freely downloading it or purchasing it with either clip or gold coins as displayed below.
***
The various material online CSP assets site are either made by the CSP officials or users alike. And the first thing we need to know if we want to use the assets sub tools is
a) How to get to CSP assets site and download the various materials.
We can get to clip studio assets page through different ways but the first and the easiest is as follows;
After turning on your data network, open the clip studio paint app> on the CSP first page we will see some links> we need to select the one with the assets on top of it which is the third one with green colour. click it and it will then take us to the Clip studio paint assets site> in the assets site we can then click on the search engine bar above and type in (flower), then when we are on the page with different flowers> select the kind flowers be it free or buy> in the selected material, we can the click on (download) which will then take us back to the CSP app and the material will now start to download.
***

After it has finish downloading, we can then move on to know,
b) How to import the materials to the designated sub tools.
In clip studio paint, assets downloaded from the site get stored in the material folder designated as (Downloaded file). And there are two different ways which one can make use of the material downloaded into the (downloaded file) such as;
(i) Import from material folder,
When in the canvas, below on the palette bar is the material icon which looks like a folder with 9 varying colour dots [indicated 1],
***
Clicking on it will open the [Material folder] mini dashboard where the downloaded material is store.
Drag the downloaded material onto the canvas will import the downloaded material onto the canvas,
***
With that done, we have imported the DOWNLOADED MATERIAL.
***
Now that above is one way of using the downloaded flower material, the second way which we can use the downloaded flower is by importing it as a BRUSH SUB TOOL.
(ii) Import as brush sub tool,
When in canvas>[click on any of the sub tool brush],
***
In [Sub tools dashboard], we can either create a space where we can add the material to better to make getting to it easy, select the import icon at the bottom of the dashboard which looks like a box with an arrow pointing in from the top,
***
Now in the material folder, select the needed material,
***
it will then be imported into the designated Sub tools dashboard.
***
With the downloaded material added as a sub tool, we can now use it to draw a stroke as indicated with the red arrow.
***
c) How to properly use this materials.
Now when I say "use the material" some may think using the material is just by importing the material and placing it on your scenes or Characters any how, yes I do agree that we need to import it but without the proper understanding of how the material works will not just waste your time it will also make your work to look unique less.
So to available should then bring us to trying to understand the way assets material work. So for the purpose of today's tutorial I downloaded some nice looking flower material following the above mentioned process to the CSP ASSET site and downloaded the following below.
***
And how are the the Link to get them for yourself if you like the material and please donont forgot to hit the (Like Button) to help promote the awesome creator of the piece.
***
Ok, If we take a look at the first flower material, we will notice that this particular material among so many of it type only present their material facing one position.
***
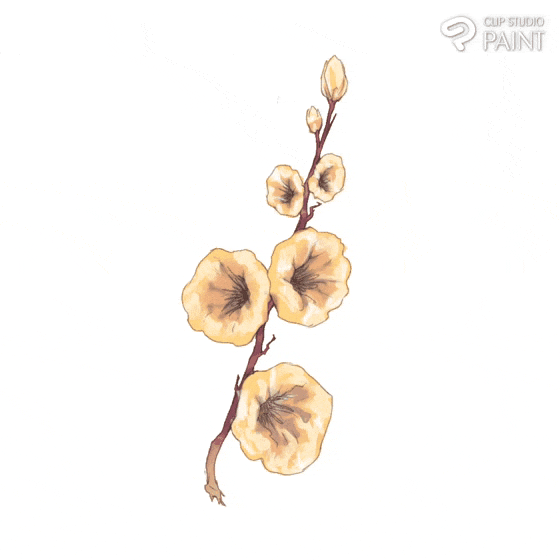
(ii) Yellow flower,
This type of flower material appear with each one facing different position, even when it is just a tap [indicated 1], a straight line [indicated 2] or curvey stroke [indicated 3] it still comes with each of the flowers facing it own direction.
***
(iii) Daisy petal,
Petal as we all know are not fully flower but they are part of what can up a flower and the add their own set of composition to a scene or character when use.
And the reason why I joined this set on the tutorial is because the set of daisy petal has another useful set the asset material possess, and that effect is the MAIN COLOR and SUB COLOUR effect.
This type of colour effect that most of the asset materials possess can be control with the [Pop-up] on the EDIT BAR which when click displays three sets of colour (the main+sub and transparent color),
***
Hence, the (MAIN) when giving any colour is apply affect the line art (outer part) of the material while for the (SUB) affect the base colour (inner part) of the material and that of the (TRANSPARENT) does nothing to the flower.
I next added two set of different colours red indicated (1) and green indicated (2),
***
(iii) Sakura flower,
This type of asset flower materials is similar to the YELLOW FLOWERS above which their flowers face different direction and can also be position at the angles such as when towards the left [indicated 1], upward [indicated 2] or even curvey [indicated 3] and still maintain thickness and appearance.
***
(iv) Red and blue roses,
This type of asset flower materials has colouring process is also similar to the way one applying colour to that of DAISY PETAL FLOWER where by one use of the [Pop-up] on the EDIT BAR allows us to give the material a light green colour for it base colour and a dark green colour for it line art,
***
Which we can further render by doing for the first flower which is the BLUE ROSE FLOWER that is drawn on one layer with one set of new layer above it, clip to it which one use to add detailed render.
***
And the RED ROSE FLOWER having one set of the flower on different layer which can help as one renders and for easy movement.
***
Whereas for the set of RED ROSE FLOWER that are (indicated 2) having above them one set of new layer each, which are Clip to them as shown below.
***
And that below is how the (the blue and red rose) flowers will turn out after the last rendering is done.
***
Now with we now having the proper understanding on how we can make use of some of the Clip studio paint assets material, let's move on to learning…
Step 2: How to draw a realistic looking flowers.
Digital painting of a realistic-looking flowers tends to be very similar to traditional drawing approach, but with the added advantage of digital tools such as (assets material and sub tools) which every Digital studio like clip studio paint all have made available for users to ease their work.
But as an artist it is always advisable we do know how to properly draw the various kinds of flower so as to develop our art style and give our artwork it's own unique looks, which if we are to do so we must first seek out the following to better help us create a good looking realistic flower:
A.) Realistic-looking Flowers.
1. Use Reference Image:
Find a high-quality reference image of the kind of flower you want to paint. It's essential to have a clear and detailed reference to guide your digital painting.
***
Note: I will like to point out that I will not be draw the exact reference flower but instead I want us to think of the reference as a horizons point which we are to try reaching.
Now base on what I will like to explain later on which is how seasons affect flowers mood, I am just going to be drawing five set of flower to make my work easy and quick.
2. Rough Sketching:
Create a new canvas setting the HEIGHT and WIDTH to the size your want, which for me I leave it on the default settings.
***
Use a light sketching brush or pencil sub tool to sketch the basic outlines and shapes of the flower using Lines and regular shapes.
***
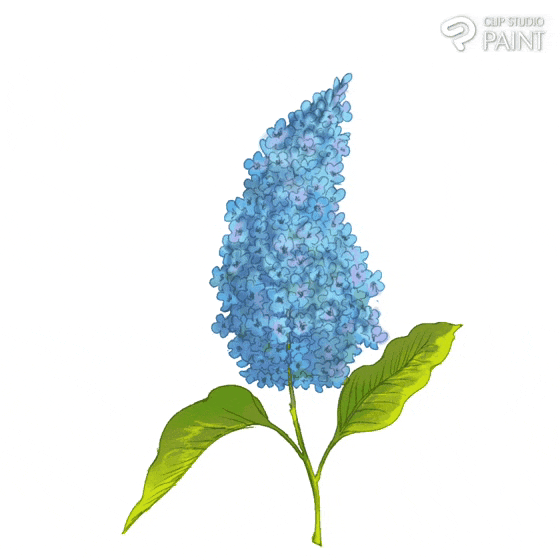
The above flower are named as follows:
1. Lilac flowers.
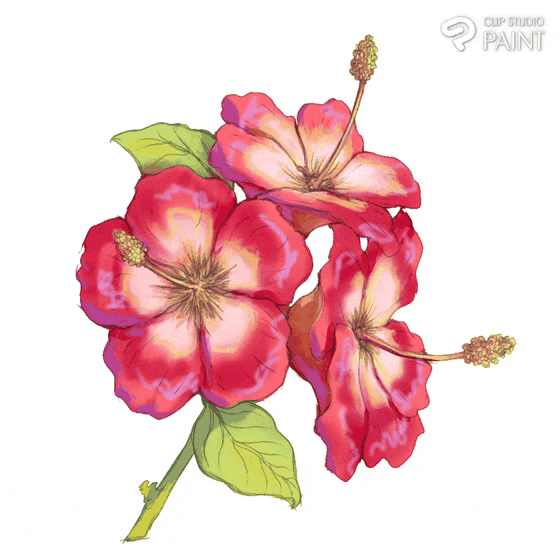
2. Hibiscus flowers.
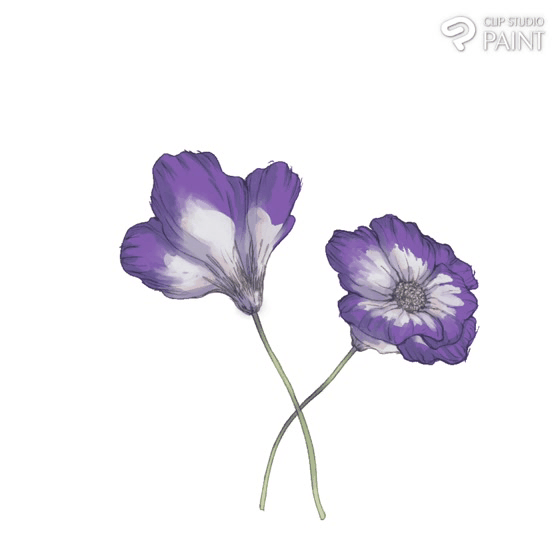
3. Poppies flowers.
4. Gladiolus (also know as sword lily) flowers.
Notice above how regular shape and line gave the flower each the unique appearance, that is because they are the basic structure unit of the flowers and any other objects.
Pay attention to proportions, angles, and overall composition, we can now add.
3. Drawing of Line Art:
Using the rough sketch as guidelines, create a new layer above that of the rough sketch and further refine the line work by redrawing the art work but this time making some side either thicker or thinner.
***
And sometimes when I am draw flower such as (Poppies flowers), I tend to draw them on separate layer to make it easy for me whenever I feel like to move it from it position to another or if I want to duplicate any other separate,
***
◾ Pointer on the things to take Note of when we add the line arts.
A quick highlights on how to create and render the following flowers;
1. Lilac flowers.
• For the above number 1:
I started by drawing the outer frame of the flower in a pyramid form (A), then in each flowers I added a CURVEYDOTS (B) and lastly I added some cone shape (C) to the various side of the pyramid flower.
• For the above number 2:
I draw the left leaves inform of a raising and falling hill which is that of the GREEN CIRCLE to avoid the from being uninteresting like that of the RED X.
• For the above number 3:
I draw the right side leave to look like three round shape sticking together with the stripes not being boring.
2. Hibiscus flowers.
• For the above number 1:
I put down the shapes of the cone on top of the stem (A), added some branches at the bottom (B) and also add strain of lines on it (C).
• For the above number 2:
I draw the Stem tilted to the right with some branches of it point at opposite sides.
• For the above number 3:
I started with the outer frame (A), added some darker dot with strains coming out face one end and I render it some by add some lines close to the edges.
3. Poppies flowers.
• For the above number 1:
I add some thicker lines at each end and touching pose of a flowers (A) and I also added some strains of lines at the top of the flowers Petal (B).
• For the above number 2:
I draw the frame of the flowers (A), also with it stem (B) and I tend Add details to the center of the flowers (C) as shown in (Number 4).
• For the above number 3:
At the bottom of the flower by the left hand side (A) with the stem (B), I added a Ziggy up and down lines between the flower (C).
• For the above number 4:
Layering outer the frame (A), I draw several coil shape line in center sections of the flower (B) and I further add some more coil details (C).
4. Gladiolus (also know as sword lily) flowers.
• For the above number 1:
I draw the leaves of the flowers to have a rough and rigid edges with the lines inside it to be curve like letter S (indicated with the green colour), and I try avoiding drawing the lines inside the leaves straight but instead curvey.
• For the above number 2:
I first draw the outer frame (A), then I draw some coil shape line into three sections (B) and I further add some more coil details (C).
4. Adding of Base Colors:
Start by blocking in the base colors of the flower using a large brush or the fill tool, Make sure to match the colors as closely as possible to the reference image or it relating colours. Use separate layers for different elements like petals, stem, leaves, etc., to allow for easier editing later.
***
5. Layering and Blending:
Add additional layers to build up the details and colors of the flower, Use smaller brushes or selection tools to refine the shapes and textures of the petals, stem, and leaves. Use blending brushes or blending modes to smoothly blend colors together and create realistic transitions.
***
Note: not to add much saturation to the work because later on in the season section we will add them.
6. Light and Shadow:
Pay attention to the texture and details of the flower. Use various brushes or textured brushes to create the texture of petals, veins, or any unique patterns. Zoom in and work on small details, gradually refining your painting.
***
7. Texture and Detail:
Observe the lighting conditions in the reference image and apply light and shadow to your digital painting accordingly. Create new layers for highlights and shadows, and adjust their opacity and blending modes to achieve a realistic effect. Use soft brushes and gradual transitions for smooth shading.
***
8. Refining and Adding finishing touches:
Continuously compare your digital painting with the reference image and make necessary adjustments. Refine the edges, colors, and details to bring your flower to life. Experiment with different brushes, opacity levels, and layer adjustments to enhance the realism.
Then once you are satisfied with your digital painting, add any final touches or accents. This could include adding a background, adjusting overall color balance, or adding additional details like dewdrops or small insects if desired.
***
B.) They way I simplify the drawing and painting of flowers.
As beginners, drawing of flowers usually tend to seem hard but as usually use to say to myself “KISS” (Keep it simple and sharp).
(i) Simplify method of drawing flower,
When drawing u need to start with common basic shapes like oval, Circle, cone and more as shown below.
***
While also keep in mind that flowers are different into several sections called the symmetry but for the above flower are just divided into four for easy understanding.
***
Next, I will also advise one learn how to draw flowers petals looks like from different sides (such as front, side, down and up).
***
(ii) Simplify method of painting flowers,
Further more, the second method I use to simplify the drawing of my flowers is to not draw at all but just paint in tones or grading.
And to do so we first needed to layer out the structure or base colour of the flowers in little bits.
***
Then add some little yellow dots and quick shadows to it.
***
And then copy and paste it multiple times on the landscape scene or image.
***
Step 3: Ways which seasons add commendable expression and moods to flowers.
As the seasons shift, temperature and sunlight drive the chemical production inside the plant leaves.
Hence, Plants tends to respond to the change of season by losing their leaves, flowering, or breaking dormancy, and the sometimes flowers tends to change a little bit from the original colour to the closest colour on the colour wheel.
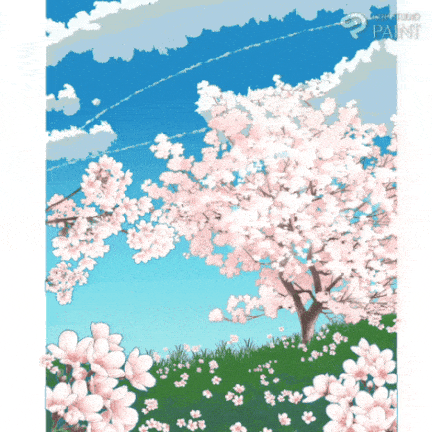
(A) Spring season,
This season usually make things look not too cool not too warm either but it just leave things at their normal appearance.
***
Which then mean for the designated flower I do not need to add any adjustments.
(B) autumn season,
On the other hand tend to make things dry and looking drained out, so to best implemented this;
I start by getting to the [menu page]>[edit page]>[Tonal correction]>[hue/saturation/luminosity]> a dashboard will appear, set hue to (-7), saturation (-52) and luminosity (2).
***
After ways, I moved to the COLOUR BALANCE SETTING which is also in the [Tonal correction], set [Highlights] to 1, -5 and -19.
***
For the [Half-tone], I set to 92, 35 and 10.
***
And lastly for the [Shadow], I set to -20, -16 and 15.
And I am done.
Here is the finish work below.
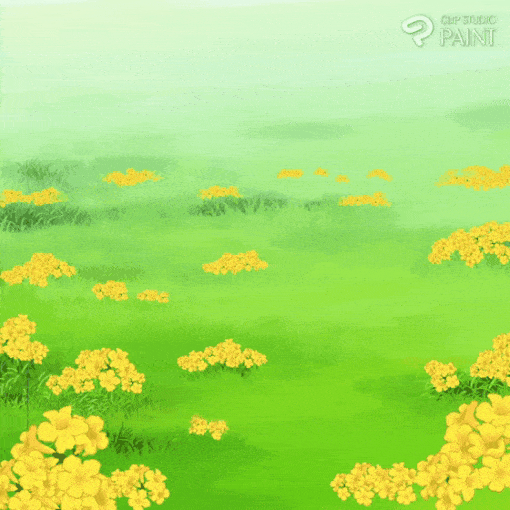
(C) Summer season,
As we do know during summer, we tend to have allot of sun shine but not as drastic as autumn; So in order to show this emotion or mood on the flower we need to give the flower allot of saturation to show that the sun ray is heavy upon the flower.
To be able to achieve this, we need to be in the [colour balance], set the [Highlights] to 4,10 and 11.
***
Then for [Half-tone], I set as 10, -18 and -100.
***
Lastly for [Shadow], I set as 52, -6 and -57.
***
And that is it for this piece.
Below, is the end result.
***
(D) Winter season,
Now for winter season, during this time the weather temperature tends to drop and sun shine are rare which then makes living things to look bluish of some suit, so to be able express the flower to look bluish l, we need to be in the [hue/saturation/luminosity], then setting hue to (-7), saturation (-52) and last luminosity set to (2).
***
After that, I tend move to the COLOUR BALANCE and set the [Highlight] to 24, 1 and 24.
***
For the [Half-tone], I set as 8,8 and -6.
***
The lastly for [Shadow], I set as -74, 0 and 0.
***
then it ends there and here below is the finish work.
***
And with those are how I add emotions to my work with the help of the four seasons.
***
Step 4: Usefulness and effectiveness of flowers to add meaningful details to characters or scenery.
Flowers are beautiful and delicate things the add beautiful to what so ever the come in contact with like take a painted scene for example:
(1) Scene: grass and blue sky landscape
When the landscape is without flower it just seem flat,
***
But add of flower now added depths and more beautiful to the scene.
***
Take another scene with blue sky, yeah it is beautiful but lacking spontaneousness ,
***
But let's add some trees and some flowers as well,
We can now see the difference right,
Bonus course!!!
For beginners and old users who maybe be wondering how did he make the choice of brush size? or how did the brush he use so flexible?
For the first question, I did make the brush size choice, instead I just entered the brush settings on the palette bar>[click on the detailed edit sub tool (the icon that looks like a spanner 🔧) ].
***
A new dashboard will display on it I will then ENABLE specify by size on screen.
***
And that will help me choose the size of my brush when I zoom in (reduce size) or zoom out (Increase size).
***
While for the second question, Go into the DETAILED EDIT SUB TOOL>[click on the bar on top with brush size on it]> a list of setting will then appear but I just want to set just the STROKE 1 and BRUSH TIP 1,
• Stroke 1,
In stroke 1 setting, I only want to enable in Gap (), correction velocity input and
Then I will move on to the next,
• Brush tip 1,
In brush tip for the yellow assets flower, we tend to see that it has three sets of MATERIAL which are the reasons why it is so flexible,
And also some of the assets material tend to have just one IMAGE MATERIAL or some more like take the lotus assets flower for example;
***
It has four sets of IMAGE MATERIAL that is why it is easy to use when adding it to the scene (giving it a Foreground, midground and background).
***
Note: the first layer above with the arrow is the foreground, the second midground and the last below is the background.
Here are the link for the background scenes.
***
(2) Adding of flowers to a characters.
Once you are satisfied with your characters created, add any final touches or accents. This could include adding a background, adjusting overall color balance, or adding additional details like dewdrops or small insects if desired on different layer.
***
Progressing from the background up to the foreground image with the bulk layer set place in FOLDER in the LAYER PROPERTY as shown in the below image.
***
Place some flowers around the neck and head of the characters (1) and (2), then I add some flowers to the background scene indicated (3).
***
NOTICE the two Layers above other Layer selected by the square which are for the neck and head flowers, and the square selection below is for the flower behind the characters.
Then I use the eraser Sub tools to erase the part of the flowers covering the hairs around the female characters face.
***
Next, I added some more flowers to the foreground of the image which are make with the square selection,
***
And also on a new layer , I then set the LAYER PROPERTY to dots by clicking on the and selecting the. Which I use to add some effect on the female bottom white wears.
***
With all the above mentioned done, I have finish the piece as shown below.
***
Remember to save your work regularly and experiment with different techniques and brushes to develop your own style, cause clip studio paint allows for easy experimentation and correction, so don't be afraid to explore and have fun with the process. Happy painting!
THANKS
I am so glad to have been able to do something like this that can either help one or more persons, and I will like to point out that drawing or homing one skill is not all as it may seem, watched or hear it takes effort to get to any point, I know it may not be easy as the title may claim but with your frequent practice and deligent you will see that it will become easy at the end and lastly artist are not born they are carved so keep pushing. Byeee


Comment