
In this article, learn surprising features Clip Studio Paint has to offer that can speed up your illustration process!
Intro
Hello, hello! My name is Dreamer! Welcome!
In this month’s article, I will be showing you all some pretty cool and surprising tools that CSP has to offer! Had I known that these tools existed when I first started using the program, my process when making illustrations would have been so much faster!
Here’s to hoping that the things you discover in this article will speed up your progress, too! ^^
So, then! Without further ado, let’s get started! >:D
Video
If you want to watch the video, here it is! Otherwise, feel free to keep reading! :D
The Magic/Auto Select Tool!
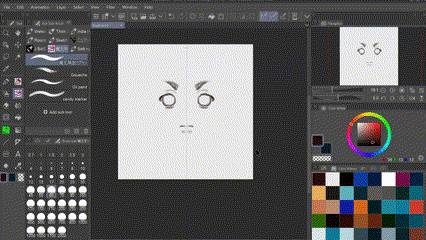
I find this tool to be VERY useful when it comes to selecting broad areas of canvas that I want to fill in with a base color! It is located right next to the lasso tool, so it’s pretty easy to find! :D
The neat thing about the magic tool is that, so long as there are no gaps in what you are selecting, it will pick the entire image!
How do I use it, then? Get ready to be amazed! >:)
Firstly, I make sure that the lines that make up my sketches have no gaps. This is very important, because if there are gaps in the lines, the magic tool will select the space within and without the drawing! And for the particular way I use it, you don’t want that! >_<
It may be a lengthy process to check for gaps if you’ve got a detailed drawing, but it’s worth it in the long run! Oh! This gap instruction only applies to the lines outside of the drawing! Like, the silhouette of the character or object! The inside lines, like the details of the drawing, don’t count! :)
Then, I make sure that I am on the same layer as the sketch (so the magic tool refers to its lines as a border to not cross), and I select the outside of the sketch! Trust me on this! If there are no gaps in the sketch, all but the area inside of the drawing should be selected. If there are gaps, everything will be selected, so you’ll need to check and see where you left an opening!
Next, I select the “invert selection” option on the tool bar that pops up after selecting the outside of the drawing!
And, lastly, I add a new layer underneath the sketch, and select the “fill selection” option on the same tool bar to fill the sketch with color!
Ta-daaah! A quick way to select all your line art and fill it in with a base color! Cool, huh? :D
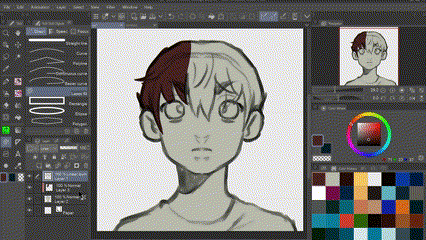
The Symmetry Tool!
This ruler is AMAZING to use when it comes to making quick and easy illustrations that are perfectly alike on both sides! You can use it for objects, buildings, or even faces (although you may need to doctor it up and have a little bit of facial anatomy experience)! To find it, simply go to the ruler palette on the sidebar of the canvas!
It will be towards the bottom of the options of rulers you can choose! :D
Once you have the symmetrical ruler selected, simply place the ruler wherever on the screen you want it to be, switch to your brush, and start creating! ^^
Keep in mind that the ruler only works on the layer you placed it in! If you’re wanting to carry it over to another layer, click and drag the ruler icon that pops up on the right side of the layer you’ve got it on to the desired layer!
Tip! Press + Hold Shift!
When placing your ruler, press and hold the shift key to create a straight line! :D
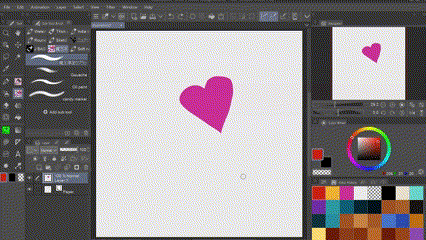
The Lasso Fill Tool!
I LOVE using this tool when it comes to applying base colors to my illustrations! Typically, I pair up my usage of it with the magic tool! This is because the magic tool first selects what I want to draw and can make it easier to apply the base color, and then the lasso fill tool proceeds to quickly fill in spots of color on top of what was already applied (that’s a long sentence; sorry >_<)!
The lasso fill tool is a bit trickier to find; it’s located in the figure palette on the sidebar of the canvas! :D
The lasso fill works the same way the lasso tool does! The only difference is that once you’re done drawing the shape you want with the lasso fill tool, it automatically fills in the shape with whatever color you have selected at the time! Isn’t that cool? :D
It’s a bit harder to control than the lasso tool, but it does make filling in base colors more efficient! Plus, there’s something satisfying about using it -w-
I highly recommend trying it out! :D
Tip! Clip Your Layers!
I recommend clipping layers to the base color for this part! It keeps the colors you’re applying within the shape of the original color, and it also allows you to cleanly add the colors without the fear of having to redo certain parts! You can just erase the part of the layer you’re on that overlaps with the other layer’s color!
Once you’re satisfied with it, then you can merge it all down onto the base color! :D
This is the merge button, by the way! :D
The Border Tool!
Admittedly, I underestimated how efficient and helpful this tool can be! If you want a quick border/lineart for something, rather than having to line it yourself (which may take a while), you can turn on the border effect and get a quick edge! I usually use it for things with straight edges, like doors, walls, frames, etc.
You can even use it to line your character illustration while drawing them, if that’s how you work! Crazy cool! >:D
The border effect is located under the layer property palette! :D
If you don’t have the layer property palette selected, simply go to the window tab at the top of the screen and go down until you see the button that will put it on your canvas! You may have to situate it the way you want on your canvas, but after that, it makes finding and using the border tool so much easier! :D
How does it work, you ask? Simply go to the layer you want a border to be activated on, go to the layer property palette (if you aren’t already on it at this point), and press the border effect! When you press that, a default border will be applied to the layer, and it’s up to YOU whether or not you want to keep the border as it is, or customize the thickness, color, and whether or not it’s a regular or watercolor edge!
What’s the difference between the regular and watercolor edge? Well, the regular edge is a lot more noticeable, for one, and creates a definite edge between the colors you have on the layer and the color of the border. With the watercolor edge, it’s a lot more natural looking; you can also adjust the blurring width of the watercolor edge, how dark it is and the area (how thick it is)! So, you have a bit more customization with the watercolor version, but it’s not as distinguishable as the regular border edge.
I tend to use the watercolor edge for things in my illustration that need a more natural-looking edge, like wood. You could also use it for line art, if you wanted to!
I use the regular border edge for things like stickers! :D
The Navigator Window!
The navigator window is a handy thing to have equipped on your canvas! With it selected, you can see the whole of your drawing, even if you’re zoomed in on the actual illustration! I find this very handy, because I often find myself zooming in a LOT when adding details. So, this helps me make sure that I’m not going overboard, and it saves me from having to fix too much later on! -w-
If you don’t have the navigator window equipped, just go up to the window tab at the top of the screen, and it will be one of the things you can select to add onto your canvas! :D
Textures and Materials!
If you’re struggling to draw a background or achieve the texture you want in an illustration, let me help you! :D
For textures and items, Clip Studio has a default texture tab that you can go to in order to achieve the texture or pattern you were looking for!
BUT WAIT!! That’s not all! >:D
Clip Studio also has an amazing asset store where you can download brushes, backgrounds, and materials made by other artists, and by Clip Studio Paint themselves!
There are a TON of free brushes and materials available for you to download, but there are also some for you to buy as well! The two currencies on the Asset store are GOLD and Clippy. As far as I’ve seen, GOLD is usually for materials, and Clippy is usually for brushes and models. But that doesn’t mean each payment method sells only that! Depending on what you search, you may discover brushes on the GOLD, and materials on the Clippy! Some artists sell items for both currencies! :D
They also have a GOLD membership for you to exchange your GOLD for Clippy every month! So, you can do that, too!
But, if you haven’t looked at the Asset store yet, I highly recommend doing so! Just, be careful! You may go overboard and download a lot of handy items! :D
Pressure Sensitivity!
If you’re wanting to achieve a painterly feel when coloring your illustrations, to the point where you can control how lightly and how darkly the colors transfer from your stylus to the canvas, the pen pressure setting is your friend! :D
How to customize your pen pressure, you ask? Simply go up to the file tab and select the Pen Pressure Settings palette!
After that, a prompter will come up asking you to draw as lightly and as darkly as you desire on the canvas! Once you’re satisfied with the range of pressure sensitivity, you can go ahead and register the sensitivity settings you just made, and there you have it! You’ve got the pressure sensitivity you want! :D
Color History!
I find the color history palette very useful! Sometimes, I want the original color I applied on the canvas, not the color that was created after mixing some hues and values to it! But before I knew the color history palette existed, the best I could do was eyeball the color wheel and try my best to recreate the original color! It was very tiring to do T-T
But then! I discovered the jewel that is the color history palette! >:D
And now, I can select my original color with ease! TwT
The color history palette is just as its name implies! It allows you to see and select colors that you’ve used before! It goes a pretty long way down, so you’d have to do a LOT of mixing to lose your original color for good! ^^
I find this a handy tool, because if I’ve overworked a base color with too many elements, I can use this palette to select the original color and reapply it to the illustration! :D
If you’re not sure that you have the color history palette selected for you to see and access it, just go up to the window tab at the top of the screen and select it! Then you just situate it wherever you want it to be on the canvas! :D
Alpha Locking!
Alpha locking is very useful if you’re wanting to change the color of the object in the layer, or if you’re wanting to start shading within the layer’s colors! It’s basically the same thing as a clipped layer, but it’s within the lines of the layer, as well as on the SAME layer! I like to alpha lock my sketch layers to change their colors, and the base color layer to shade the skin of my characters! I also do the same thing for clothing! :D
You’ll have to clip layers for blending modes (multiply, add(glow), linear burn, etc.), but if you’re just wanting to use the colors you’ve already got, or if you’re wanting to shade and add highlights without blending modes, alpha lock will do just as well! :D
This is the alpha lock button, by the way! :D
It’s right next to the lock button! ^^
Although, if you’d rather have the assurance of being able to affect the shading and highlights without affecting the actual base color section, I completely understand! You don’t have to alpha lock your layers if you don’t want to! Do whatever is comfortable to you! ^^
Transparent Color!
If you’re wanting to have the control of an eraser, yet still maintain the textures of your brushes, I recommend using the transparent color! :D
I like to use it when I’ve applied a multiply layer over my base colors! I can erase the shape and form of the figure into the multiply layer’s color without losing the feel of my brush! It’s really cool to use! :D
Shading Assist!
I don’t really use this anymore, but when I did, it was a very efficient way to figure out where shadows and lights go within an illustration! :D
Once you’ve gotten your base colors figured out, you have to merge your layers together! The Shading Assist tool won’t work properly unless this is done!
Tip! Make a Duplicate File!
If you’re worried about not liking how it looks and wanting to start over, I recommend saving a duplicate file of the drawing before you merge your layers together. That way you can merge, edit, and customize the layers of one file as much as you want with the assurance of having a spare one to use for later! ^^
Once you want to activate Shading Assist, simply go up to the edit tab and select Shading Assist! It’s right underneath Colorize! ^^
Once you select Shading Assist, a menu will pop up that will allow you to select either preset lighting scenarios (like evening, morning, etc.) or select what kind of color scheme you would like the lighting scenario to be! You can also move around the direction of the light source by clicking/pressing and dragging the light source that pops up with the menu to the spot on the canvas that you desire it to be! :D
It will take a few seconds for the color scenario to change to what you want it to be, so please be patient! >_<
It will be worth it in the long run! :D
After that, if you like how it looks, you can press OK, and the shading will be applied to your drawing! Otherwise, feel free to change it around until you’re satisfied! :D
I only used the Shading Assist tool around one time for an actual illustration. Other times, I would use the copied file that I applied the shading assist tool on as a reference for my original file. It would help me figure out where my shadows and lights should go, but also gave me a bit more control! :D
Quick Copy + Paste Layers!
If you’re wanting to duplicate a layer, simply press ctrl and c to copy it, and then ctrl and v to paste it, and there you go! It has been copied! This is great for duplicating sketch layers! :D
It also works across different illustration files! If you want a sketch or part of your illustration to be transferred from one tab/file to another, simply press ctrl and c on the parent file to copy it, then ctrl and v on the new file to paste the layer or selection into your new drawing or canvas!
If you want only a certain part of the layer transferred, you can use the lasso tool to select the specific part, then just do the abovementioned steps! :D
Outro
And just like that, you’ve learned some nifty things that have sped up my illustration process in Clip Studio Paint! Very good job! ^^
I hope these tools and techniques make your creation process a LOT quicker. And if you wouldn’t use them the way I do, that’s okay, too! Experiment and try different ways to make the tools fit your creative process! It’s your art, after all! :)
Just remember to give credit to anyone whose techniques may have fit your savvy! Shout out to all the artists who introduced these tools and techniques to me when I was first starting out!
Until next time, I wish you all the best, and happy creating! :D
Users who liked this post


Comment