
Getting smooth, clean lines is something a lot of digital artists struggle with, whether they’re just starting or making the jump from traditional to digital. In this article I’m gonna share my tips and tricks on how to achieve better lineart in digital art.
As a reminder, this is just my way of doing things. What I share here might work for you, or it might not, but I hope this can help you in some way in your art journey!
If you watch the video you may notice I do my lineart in red instead of black, this is just a personal preference of mine I picked up from an artist I’ve been following for ages.
1. Draw towards yourself
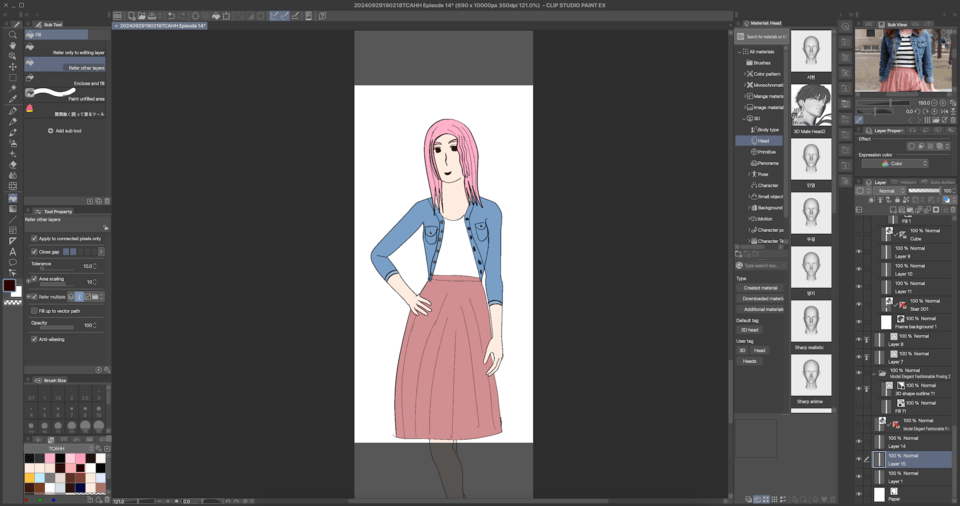
The first tip I have is something I heard ages ago and it stuck with me: try to always draw lines towards yourself. That’ll create more stable lines than when drawing away from yourself. When you’re working with a particularly tricky line, you can rotate your canvas so you’ll be drawing at a more comfortable angle. In most digital drawing programs you can achieve this by holding R on your keyboard and rotating the canvas with your stylus, but I personally prefer to do it using the slider on the navigator window in Clip Studio Paint. If you don’t see the navigator in your workspace, you can get it by going to windows on the top of the screen and clicking on navigator, then you can dock the window wherever you want, I keep mine on the upper right.
2. Zoom in and out
Second tip: zooming in and out! The zoom tool is your friend. In Clip Studio, you can do that either in the slider on the navigator or by pressing ctrl plus and ctrl minus on your keyboard. Pressing ctrl 0 will reset the zoom. When you’re drawing a long, continuous line, try zooming out so that you don’t have to make such a big movement to draw it. I usually work with the canvas fairly zoomed in, but if I stayed zoomed in for bigger lines I’d have to draw them bit by bit, which normally looks choppy and not good.
3. Draw your lines beyond where they intersect
The third tip, and my favorite one by far, is drawing your lines to beyond the point where you want them to begin and end. I use this a lot especially when I’m drawing hair, because I have a lot of lines intersecting each other, and for hair especially I like my lines to be very fluid. So when I’m doing the hair I’ll draw my lines way longer than they need to be, then I’ll draw another line that intersects with the first one and erase the leftovers. Now, this can be a little annoying because you might accidentally erase parts of the line you wanted to keep, right? Well, there are two ways to get around that. The first one is to make each line in its individual layer, then, after you’ve erased what you want gone, you can merge the layers.
4. Use vector layers
However, in Clip Studio Paint, there’s an even easier way to do this, called a vector layer. Vector layers in CSP allow you to manipulate your lines in many ways you can’t with normal layers. One of these ways is the vector eraser, which you can select from the list of eraser brushes. When you use a vector eraser alongside a vector layer - the eraser won’t work as intended in a normal layer - you can draw intersecting lines and by simply going over the part of the line you want erased, the program will automatically detect the intersecting point and erase everything beyond it.
Vector layers in general can be used to make your life way easier when it comes to lineart. Like I said, they allow for a lot of freedom in how you can manipulate lines. You can manually adjust the lines by dragging the points that form it, you can adjust the thickness of your lines, and you can even connect lines. I use vector layers a lot for drawing circles, which are notoriously tricky to draw.
5. Use border effects for things such as shoelaces
The next tip is for when you’re trying to draw details like shoelaces or stitches. In Clip Studio, you can create a new layer and then go over to layer properties, if you can’t see it, you can once again go to window up on the top of the screen and click on layer properties. Now click on border effect. You’ll want to select “edge”, adjust the thickness of the edge to your liking, I usually have it set to 2, and then, this is important, on edge color, select black. Using a white brush, draw your shoelaces as just one line. You’ll see that the layer effect is creating the outline for us. After you’re done, rasterize your layer, click edit on the top left of the screen, then, convert brightness to opacity. This is why we used a white brush with a black edge. The program will delete the white and leave just the white, leaving you with perfect lineart for your shoelaces!
6. Pen pressure and stabilization
The last tips I’ll give have to do with your Clip Studio Paint settings. First, play around with pen pressure! If you go to “file” on the top left of the screen, you can go down and click “Pen pressure settings”. It’ll open this window called “adjust pen pressure”. Here, you can follow the instructions on screen, to draw freely on the canvas varying how much pressure you put in your pen as you would normally when drawing, and Clip Studio will automatically adjust this graph here for you. It’s really important to do this when you first start using Clip Studio Paint! You can also manually adjust the graph to your liking but I find the automatic adjustments to be very good.
Second, remember you can adjust the stabilization on each brush! You can do this by selecting a brush and going to tool properties, you’ll see a slider called stabilization. You can also find this slider by clicking the wrench icon on the tool properties and going to “correction”. Then, adjust to your liking! Stabilization helps make your lines smoother and well, more stable. It can be very helpful if, like me, you have shaky hands. Personally I keep the stabilization on my sketching brush lower than on my lineart brush, but you can do whatever you want. Mess around with it, see what you like!
Well, these were my tips for getting smoother lines in digital art. Hopefully you learned something and have fun drawing!
Users who liked this post


Comment