
Have you ever felt confused or frustrated when drawing perspective buildings in Clip Studio Paint? In this tutorial, I will share with you my technique of using the tools and the approach to complete a castle drawing in Clip Studio Paint.
This tutorial focuses mainly on how to use the tools to draw a 3 point perspective castle, so a bit of prior knowledge on perspective and the basic function of Clip Studio Paint will come in handy.
Before we dive in, I'd like to clarify the distinction between layers and tools. Typically, when drawing, we work with regular rasterized layers. However, in this tutorial, I'll be using vector layers exclusively. Vector layers create dots or control points for every line we draw, making it easier for us to manipulate every single line.
Setting shortcut keys
I strongly recommend setting these tools as shortcut keys first because we'll be using them throughout the entire drawing process.
You should only have one "Adjust Line Width", I will explain why I created a copy of this sub tool later on.
Three advantages of using the tools mentioned in Vector layer
Now, let's compare drawing with a normal pen versus using the straight and curve tools under a Vector layer.
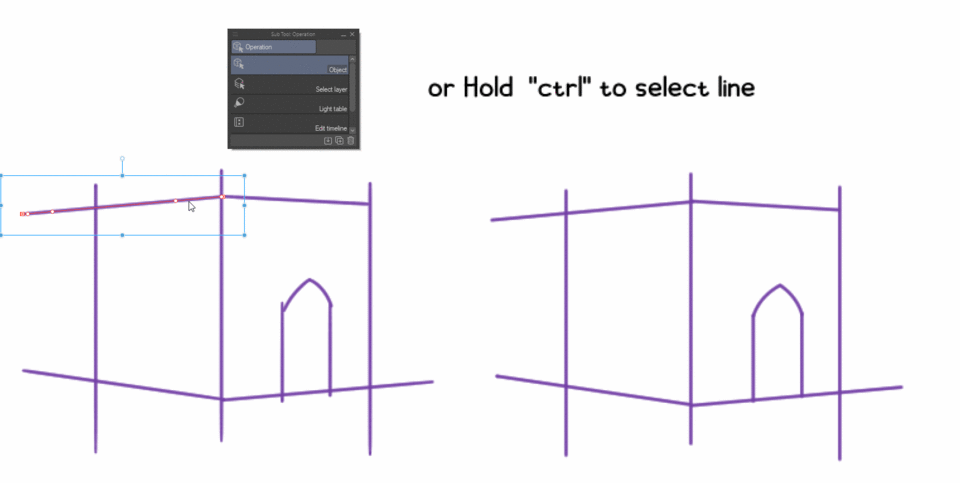
The lines on the left side, drawn with the default G Pen , exhibit multiple dots or control points. Conversely, the lines on the right side, drawn with the straight line and curve tool, only have two control points.
If we utilize the object tool or hold the control key to select the vector lines drawn by the G pen or any pen tool, it becomes challenging to alter the lines due to the presence of multiple control points. However, when we select lines drawn with the "straight line" or "curve" tool, we observe only two points on each end. This makes it easy to control the lines; we can adjust the length and direction of the straight line effortlessly. If we use the curve tool, we can also manipulate the curvature of the curve line as needed. Moreover, we can relocate the line position anywhere on the canvas by holding control or using the object tool to drag the lines to the desired position.
This technique is incredibly useful and time-saving, especially when drawing buildings, vehicles, electrical appliances, or any technical illustrations that require the perspective ruler. Remember that this method only works in a vector layer.
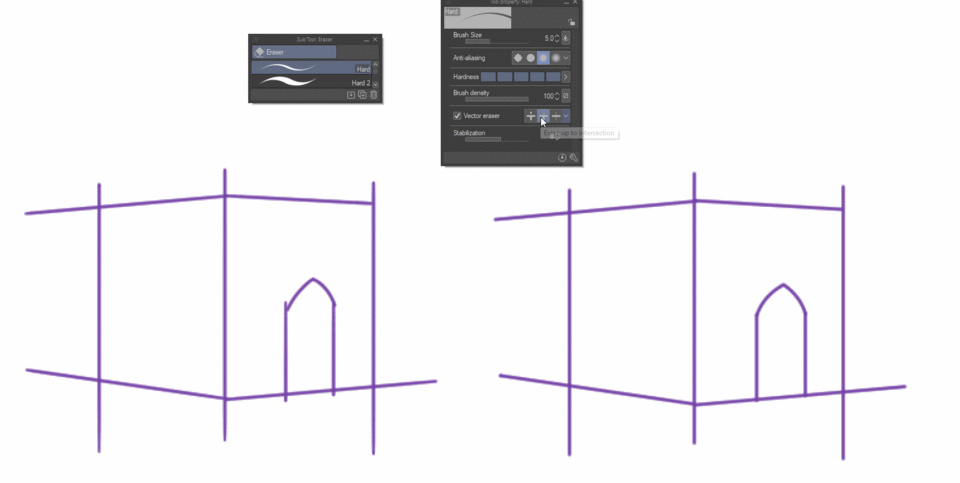
The second advantage of drawing in a Vector layer is the ability to use the vector eraser for swift line removal. Simply navigate to the tool property and check the vector eraser column box; there are three options available, but we'll only use the middle and the last ones. Choosing the middle one erases up to the intersection of lines, while selecting the third one erases the entire line, irrespective of intersections.

The third advantage of drawing in a Vector layer is the ease with which we can adjust the width of the lines. Press the "adjust line width" shortcut key we set earlier or select from the tool bar. Below the tool property, click on "thicken" or "narrow" to adjust the line's width. Typically, I use "thicken" to enhance the Contour lines of the drawing and "narrow" for line details. To conveniently switch between them, I create the same sub-tool and with different function. Following this, you can set the same or a different shortcut key for that similiar sub tool.
You can change the value for a more noticeable difference, but I prefer a slight one, so I set it as 0.5. If I want a greater line width difference, I usually just thicken or narrow the lines multiple times.
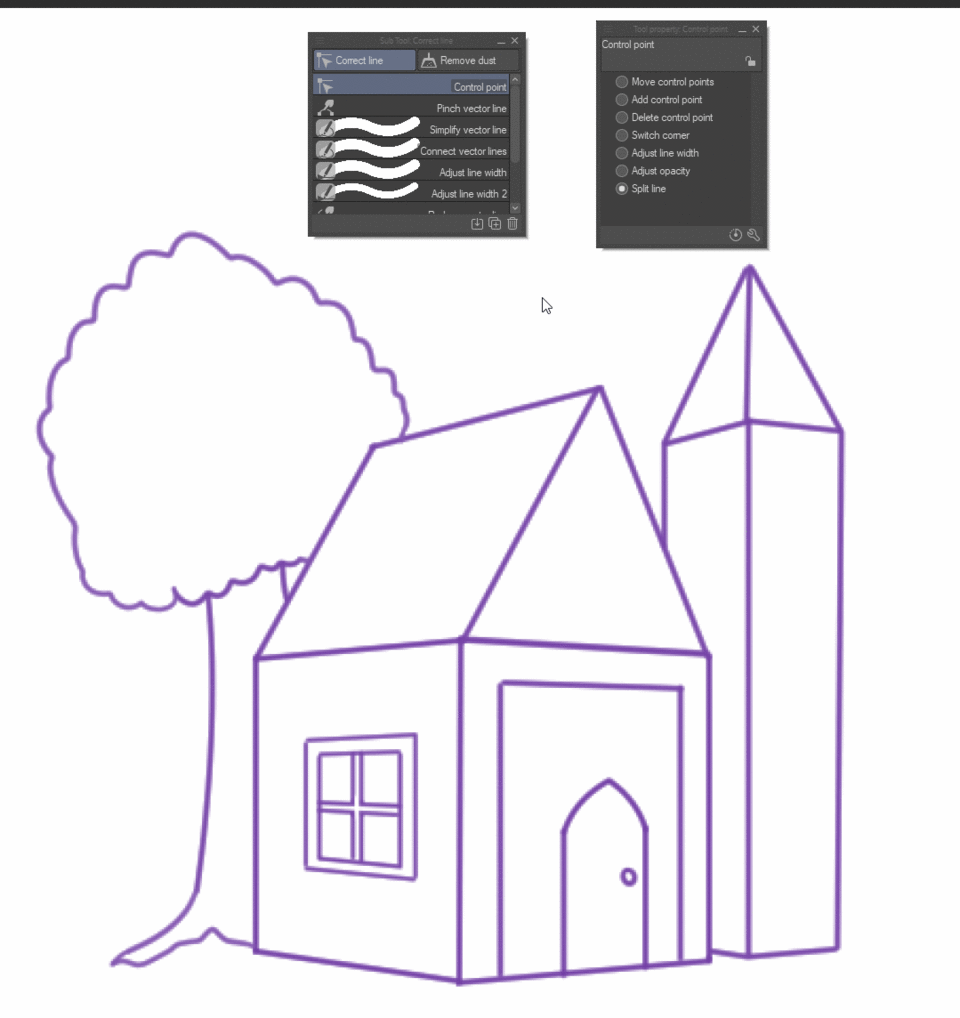
We can't achieve a perfect thick contour line using the "Adjust Line Width" tool alone . What we're going to do is use the "Control Point" tool. Select "Split Line" under the tool property to split the lines that we don't want to be thickened. By employing these three tools interchangeably, we can create a dynamic line art drawing.
Phase 1 - Deciding Overall Composition (Thumbnail)
For compositional purposes, the canvas doesn't have to be exactly A4 portrait or landscape size. I experimented with various angles of a cube or rectangle to convey the overall feel of the castle I wanted to present to the audience. I also sketched the floor/plane and sometimes the horizon line to illustrate the angle. I don't recommend using 3D primitives as substitutes unless you are aready familiar with drawing cubes from different angles. Drawing cubes is a foundational skill in art; if you can't even draw a cube in different angles, you pretty much cant draw anything in different angles.
I first started using “rectangle” tool to draw the canvas , then “straight line” tool to draw the buildings or vector eraser to quickly erase the lines.
Among all compositions, I don't recommend using a completely flat front view with no foreshortening because it appears too two-dimensional. This is unless you're intentionally aiming for a front view design for conceptual art, which we'll delve into in the next phase.
I opted a foreshortened front view at a slight low angle. The storytelling I aim to convey is the initial introduction of the character seeing the castle for the first time, creating a shared experience with the readers.
Phase 2 - Sketching Out the Concept Design
In this step, my sole focus is on the design of the castle without the burden of perspective. I disregard perspective and concentrate solely on the front view design. Feel free to use references to support your design and draw multiple sketches.
I don't prioritize detailing at this stage. I consider two main aspects: the forms and shape design, along with the composition—specifically, the leading lines or arrangement.
For this drawing, I've chosen to use a triangle arrangement. I've also decided to draw a magical fantasy castle theme adorned with crystals. Regarding forms, I'm opting for simplicity like cylinder and rectangular. In terms of shape design, you can observe big, medium, and small triangles arranged from top to bottom, forming a triangular composition.
Now, This is probably something you would draw in a front view, which is one-point perspective.
To create something more interesting , we actually can make the forms rotate by adding a two point perspective in this drawing. This is a perspective rotational theory you probably didnt realize even after years of drawing. This probably could be the the most important tip in this tutorial.
Perspective Rotational Theory (Most IMPORTANT TIP)
Let's examine this image. A front or side view is essentially in one-point perspective.
However in the second image, as the object rotates, it transitions into two-point perspective. When the cube starts rotating slightly to the right, the left vanishing point moves away from the center point in a short distance, indicating a smaller surface area, while the right vanishing point moves further away from the center (indicating a larger surface area )
When the cube is halfway turned, both vanishing points are at a similar distance ,( indicating an equal surface area on both sides of the cube)
As the cube continues to rotate furthur, the left vanishing point moves farther away from the center, and the right vanishing point gets closer to the center, creating the opposite situation of the second image.
Once the cube completes a full 90-degree rotation you can see there is only one vanishing point only , which represents one-point perspective.
Instead of drawing with just one-point perspective, we can incorporate both one-point and two-point perspectives sharing the same horizon line. Let's apply this rotational theory to drawing the castle.
As you can see, I rotated some of the forms, and I make the central tower into a hexagonal prism. I've also arranged the castle in a circular formation instead of a straight horizontal line. You can observe the circle I drew to illustrate how the castle would be viewed from the top.
While there's nothing wrong with drawing everything in one-point perspective, I personally find that incorporating a two-point perspective makes the drawing more visually engaging.
Next, I begin detailing the castle. For this stage, I'm using a combination of the default pen and the straight line tool. It's important to note that this is still a sketch, and I don't recommend investing too much time in these details as we'll be redrawing everything in a new canvas with proper perspective. I only focus on sketching the details at the focal point of the castle which is the middle section. I leave the rest blank because I am clear of the overall design. You can sketch everything if you prefer.
Phase 3 - Setting up Perspective Rulers and Drawing the Big Forms
Method to set up symmetry and 3 point perspective
This phase essentially combines phases 1 and 2. Now, drag the canvas with the castle design aside for reference. Create a new canvas with a size similar to the chosen thumbnail, and remember to create a new vector layer first.
Choose the Symmetrical ruler.
While holding Shift, draw a vertical line anywhere, then open the Align/Distribute panel from the Window. Press the Object shortcut key and select the vertical guideline.
Choose "Canvas" from the first row, then select "Align Horizontal Center" in the second row.
Right-click the ruler icon to select "Show in All Layers.
Do not draw on the perspective layer because we will be creating more perspective rulers for rotation purposes later. For safety precautions, I recommend convert the rasterized perspective layer to a vector layer first by right-clicking on the layer name (not the two icons). If you accidentally draw on the perspective layer, simply select all the lines with the lasso tool, cut them to a new vector layer, and merge it with the line drawing vector layer.
I aim to align the vanishing point in the middle, but unfortunately, the alignment tool doesn't work on the perspective ruler. Therefore, I have to drag it manually following the symmetry line we created earlier. After adjusting, I use the straight line tool to draw and test out the foreshortened lines and also making sure to have a straight line in the middle.
Using the Sketch as reference layer( Optional)
Before diving into the drawing, one approach is to duplicate the design sketch as a reference layer and transform the sketch design to align with the perspective lines by dragging the transform handles. Some artist prefer starting from blank canvas but personally I prefer starting by using this method . If we are dealing with angles beyond the front view, such as a quarter view or a high angle view ,we need to draw the sketch design in both front and side view , or sometimes even the floor plan , so that we can align them in each respective perspective line. in this case, a single front view sketch is enough. it's crucial to note we are drawing the castle at a slight low-angle . Make sure to draw the lower surface of each form later on.
For this tutorial, I have already filtered out the sketch lines because I want to keep the canvas clean so that you can see easily
Perspective Drawing Method
Activate "snap to special ruler" for both symmetrical and perspective drawing .
I started to draw the main tower first, but I canot draw a horizontal line. (Remember to use the tools mentioned before)
To overcome this, you can either deactivate 'Snap to Special Ruler' or hide the perspective layer below. If you deactivate 'Snap to Special Ruler,' both the symmetrical and perspective rulers will be disabled simultaneously since they belong to the special ruler category. If you hide the visibility of the perspective layer, you lose only the perspective ruler while retaining the symmetry ruler. Likewise, you can disable the symmetry ruler only by right clicking the ruler icon and deactivate show ruler.
To draw the other side of the tower, I drag the handle/point of the vanishing line to match the edge of the line and I adjust the line slope there. I find this method easier than dragging from the vanishing point on the horizon line.
I want to give the roof a slight curve, so I use the 'curve' tool to drag a straight line and adjust the curvature to follow the perspective. While you can use the 'object' tool or hold the 'ctrl' key to select the line and adjust the curvature again, this adjustment won't be mirrored to the other side, so I do it in one shot.
Next, I hide the perspective layer, I use 'straight line' tool to draw the roof. Then, I deactivate the snap icon and hide the symmetry ruler to to draw the tip of the tower using the 'curve' tool. I deactivate both because i prefer to draw the tip in a single curved line . While the functions and tools may seem a bit confusing initially, trust me, with a bit of practice, everything will become easy once you understand the logic of how the tools and functions work.
Next, I want to draw the tower below but at a 45-degree rotation. To do this, select and create a duplicate of your perspective layer. Then, hide the previous perspective layer. Drag the perspective point from the new perspective layer to align with the desired line and adjust the slope. By doing this, we have created a new set of 3-point perspective sharing the same horizon line but with different vanishing points.
In addition to turning off the snap function, you can also achieve the same result by holding Control or using the 'Object' tool to easily adjust the line direction while still keeping the snap function on
If you want to duplicate any line, hold 'Control,'and select the line, then pressing 'C' and 'V.' The duplicated line will be in the same position, you can drag it to a different location by holding control again.
Moving forward, let's delve into drawing a cylindrical tower. But before that, I'd like to share a small perspective theory you might not be aware of.
Cylinder perspective theory
In one-point perspective, a cylinder without foreshortening exhibits an oval-shaped bottom. Now, when we introduce foreshortening, simulating a three-point perspective, observe how the bottom surface shape changes as the cylinder moves towards the left or right. The oval shape becomes slightly slanted. There are no alterations in the shapes and silhouettes as the cylinder rotates.
Since the tower is slightly away from the perspective center, we need to rotate the oval slightly to the right. I duplicate a few ovals because I want to use them as a guide to draw windows later on. Remember to adjust the width and height of the oval after duplicating it, as ellipses closer to the horizon line will appear more flattened, while those higher up will be closer to a circular shape.
I draw a middle guideline using a different color, and then I draw the roofline to meet the guideline.
Next, I want to draw the main triangular window in the middle. Since the window is in the front view, we need to create a one-point perspective. To do this, use the same method I show before: select the perspective ruler we created earlier, duplicate it, hide the previous perspective layer, and adjust one of the vanishing points to the center.
I made a mistake here by not perfectly matching the vanishing point in the middle. Please double-check the vanishing point before you start drawing.
Next, I want to draw an “ornamental design in the middle. But the ornamental design is supposed to be infront and I didnt draw that first. So to overcome this issue, I lower the opacity of current layer and create a new Vector layer on top of it. I used the Curve tool to draw the ornament design.
If you find the lines annoying ,you can change the color of the lines, by clicking the “change layer color” icon .if you prefer a different color, click on the blue color displayed on the property layer above to select an alternative.
I use the Curve to draw the ornament design. Remember this is a slightly low anger view because the Horizon line is below so we have to draw some form underneath the ornament design .
After turning the layer color into blue, We can erase all the unnecessary blue lines easily. Then, we can revert the layer color back to black again and merge them into a single vector layer.
Next I want to draw a small Tower building with a different rotation. The method is the same as before, duplicate the previous perspective ruler, and adjust the new perspective points.
If you’re not familiar with finding the center point of a mass, a simple method is to draw an ‘X’ or diagonal lines at the top or bottom of the plane . Once you’ve found the middle point of the plane, you can extend the point up and that will be the center point of the roof . Another method to find the center of the mass is to draw a line down the middle of the entire structure. I’ve drawn this line in red for clarity. This line should divide the structure into two equal halves, with the left and right sides mirroring each other across the line. After drawing the roof line, use the vector eraser tool to remove the guide lines. This will leave you with a clean, symmetrical roof design.
Moving forward, I want to draw the back building with a different rotation. Again, the same method. Create a duplicate of your previous perspective layer. Then, select the handle of the vanishing line to control the slope of the vanishing line, which in turn affects the rotation of your building. This building is leaning backwards, like a rear-facing view.
Next, we’re going to draw the floating bowl(I am not sure what should I call it). To do this, we’ll use the ellipse and curve tools. Remember deactivate the ‘Snap to Ruler’ icon to turn off both symmetry and perspective effect before you draw this.
If you want to duplicate the oval ,use "object" tool or hold 'Control to select the line, then pressing 'C' and 'V.' The duplicated line will be in the same position, you can drag it to a different location.
Symmetry Flipping method
"After completing the overall forms, you may want to get a comprehensive view of your artwork. Follow these steps to duplicate and flip your drawing to the right side:
1. Select the 'Polyline' tool from the 'Selection' tool menu.
2. Zoom in on the canvas to ensure accurate placement of your first point.
3. Hold Shift and drag down to the bottom of your drawing.
4. Move to the right, up, and back to the initial point to create a selection.
5. Delete all the lines on the right side of your drawing.
6. Invert the selection by pressing 'Ctrl', 'Shift', and 'I' or choose 'Invert Selected Area' from the 'Select' menu command.
7. Create a duplicate of the layer.
8. open the ‘Duplicate and Alignment’ menu and choose ‘Selection Area’. Make sure to check the box at the bottom to activate 'Align Vector Paths' before selecting 'Align Left Edges.
8. Finally, press 'Ctrl+T' to vertically flip the lines, resulting in a symmetrical image.
When zooming in, you may observe some lines not connecting perfectly. We'll address this by deleting and redrawing them manually in the final phase. Currently, my focus is on visualizing the overall composition. After completing the details on the left side, I'll duplicate and flip to the right, fixing any imperfect line connections.
I aim to introduce a bit of asymmetry on the right side. To achieve this, I'll begin by erasing the parts I want to differ from the symmetry.
Afterward, I create a new vector layer to draw on top. I use the same method as before, duplicating a new perspective layer and changing the vanishing point to draw a rotated form
Once you’ve completed the overall forms, it’s time to move on to the next phase.
Phase 4: Detailing. ( Drawing smaller and complex forms)
This phase involves adding smaller forms and textures to your drawing. If you’re unsure about the design, feel free to duplicate layers and experiment.
To add smaller forms to the building, change the line color and lower its opacity. Then, create a new vector layer on top of your current layer to draw the details.
Close the current perspective layer and open the previous perspective layer that corresponds to the tower you’re detailing. At this point you might need to rename your perspective layers for better organization.
When drawing the details, You can use red or any colour choice for guide lines and black for the actual lines.
As always, Once you’re done,you can easily erase all the guide lines using the vector eraser tool. Then, revert the layer color back to black and merge with the previous vector layer.
Moving on to the cylindrical tower, I am going to draw a flag and some windows on it.
Make sure to turn off the snap function when rotating and adjusting the ovals’ sizes, as perspective rulers are not needed when drawing circular forms in any angle. Refer to the cylinder theory I explained earlier.
When erasing the excess lines from the ovals, I sometimes switch off the vector eraser function and use a normal eraser instead to maintain the curvature of the oval line. This is because a vector eraser can sometimes alter the path of the oval line, changing its curvature. I usually encounter this issue specifically with ovals.
The time it takes to draw the guidelines and details of the castle depends on the level of complexity you desire. If you aim for more details, it naturally takes longer. In my case, as I intended this piece for my portfolio, I invested hours in carefully calculating guidelines and drawing intricate details. While I won't be presenting the entire process here to keep the video concise, I've already covered all the necessary tools and drawing methods, which remain consistent throughout. If you encounter challenges in drawing specific forms in perspective, revisiting the basics of perspective drawing might be helpful .
Despite the detailed approach, I kept the forms for this castle relatively simple, incorporating additional pillars, windows, and decorations.
If you have already completed all the details of the left side, you just need to repeat the flipping symmetry method I explained earlier.
Then Lower the opacity of duplicated layer, and open the asymmetry layer we created earlier, then change the layer color and lower the opacity, and just erase the parts that you don’t want to be symmetrical.
Don't forget to revert the color of the lines back to black by clicking on the 'change layer color' icon again.
Drawing texture on a flat surface
Now, if you want to draw a texture or ornamental design on the wall of the castle.
1.Create a new canvas and draw the texture design there in full front view.
2.Then copy it to the castle drawing as a new layer.
3.Draw a guideline to indicate where you want your texture to be placed. Then use the transform tool by pressing Ctrl+T and drag the handle to match the perspective. If needed, you can also align it with the vanishing line from the perspective layer.
Phase 5: adjustments
After dedicating several hours to drawing, I finally completed a detailed sketch of the castle. To streamline the design process, I duplicate all the line vector layers and merged them into a single vector layer .Making a backup first before merging is advisable. This way, I can always revisit the layers and make changes if necessary.
I wanted to increase the height of the building a bit. So I used the transform tool to stretch the castle taller.
At this point , i also want to draw the background, so .......again the same method I showed before. lower the opacity , change the layer color. then create a new vector layer and draw on top of it. Afterwards,just erase any unecessary lines before reverting the layer color to black.
I felt like tweaking the composition a bit, so I duplicated the vector line layer as a backup. Then, I slightly extended the canvas height and I reworked on the foreground.
Finally, we can make a dynamic line art by adjusting the line width. The same method I showed earlier in this tutorial.
Streamline the file for coloring
This is the final result and I am happy with it.
If you want to proceed to colouring, simply save it as a new file first, then rasterise the lineart vector layer and delete all the unecessary layers underneath .
That’s it for this tutorial. I hope you find it useful when drawing a castle or any perspective drawing in clip studio paint.
By the way, this is the overall color mood I’ve painted for the castle. If given the opportunity, I’ll be happy to explain my coloring process in detail in a future session.
I hope you enjoyed the journey as much as I did.
Thank you for watching!
Feel free to share your thoughts in the comments below.
Thanks!
Users who liked this post


Comment