
Hi there,
I’m Mr. Miyagi, a fellow manga and comic creator with four years of experience, and I’d be delighted to guide you through the digital world of comics!
Having drawn for a long time, and starting with traditional methods, I’m eager to share my experiences in a clear and straightforward manner. I hope to give you a better understanding of the advantages of working digitally.
I hope you find this helpful!
Traditional
This isn’t meant to be a guide to traditional manga. Instead, I’d like to share a brief overview of my journey and how it all began.
Struggles
I could discuss the pros and cons of both digital and traditional manga, but my goal isn't to directly compare them. Instead, I want to share how the challenges I encountered with traditional media were often resolved more easily through digital methods.
Here are some of the struggles I faced while working traditionally:
-Time
-Money
-Assets/Tools
-Colors/Screentones
Digital
Above are the main struggles I faced while working traditionally. Now, I’d like to discuss them one by one to give you a better understanding and hopefully provide a helpful starter guide for navigating the digital world of comics!
Time
One of the most significant advantages of working digitally is the time savings it offers. Digital tools streamline the process with editing shortcuts such as:
Undo and Redo
Ctrl+Z and Ctrl+Y alone can revolutionize your career as a comic creator. The ability to instantly undo and redo actions is something traditional methods can’t match, and the time savings are immense.
Use Ctrl+Z to undo your last action and Ctrl+Y to redo it. You can also find these options in the Edit menu on the toolbar:
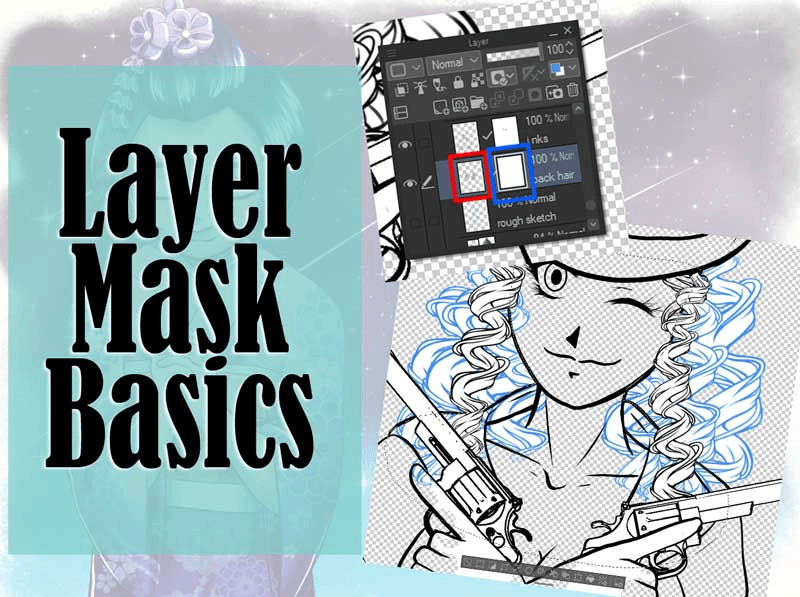
Layers
Layers facilitate the transition from a sketch to lineart without the need for erasing. Additionally, when working with colors, layers simplify the painting process by allowing you to separate different elements.


Registered Materials
You can use materials downloaded from the store, which I will discuss later. In this case, I am using material that I created, saved, and registered myself, allowing me to use it at any convenient time, such as for adding SFX.

Anyways i could just keep giving you tips on how time saving working digitally is, this alone could be the whole tip but we have other topics to cover.
Money
As someone who has worked traditionally for a long time, I can assure you that switching to digital will save you a lot of money. Instead of constantly buying pens, ink, and paper, or dealing with printing costs, you can simply use a pen tablet or pen display
Tablet or Display?
Honestly you should go with whatever makes you feel more comfortable, both can get the job done, you can find a cheaper option for both of them, the only thing that really matters is how you gonna use it!
In my case i use a tablet, but i will switch to display because i want to be able to work when i’m not home, since you will need a computer to use the tablet.
Assets/Tools
Before talking about tools i need to talk about clip studio paint being the software i use.
Clip Studio Paint
Clip Studio Paint, informally known in Japan as Kurisuta, is a family of software applications developed by Japanese graphics software company Celsys. It is used for the digital creation of comics, general illustration, and 2D animation, according to google.
My definition is that Clip Studio Paint is overall the most flexible and one of the cheapest softwares to use if you want to get into the industry, whether you need an illustration, comics or 2D animation it gets the job done perfectly,
But we’re not here to glaze it and the topic is about comics, so i want to show some powerfull tools you can use on CSP
Pens/Brushes
When it comes to Pens and Brushes you’ll never run out of options from the starter brushes to the assets store to creating your own brushes you choose!
You can even say that it is literally all you need to start drawing your comic, if you’re coming from a traditional media consider this your ink pack with all of your pens and pencils.
My sub tool bar looks like this because i do have customed brushes and i downloaded a few from the assets store, but this is a topic for another tutorial.
Paneling
Overall in clip studio you have multiple ways of paneling you comic, you can use one of the registered layouts:

Or create your own:

Balloons
You can use one of the already shaped balloons or use the balloon pen to draw it
Also there are diffrent shapes ballons available on the assets store, like this ones for example:

Focus/Speed Lines
If you draw a lot of action scenes like I do—or even in general for comics and manga—you'll often use lines to guide the reader's eyes or add dynamism to the scene.
Traditionally, you would need to draw these lines one by one, but in this case, you have them ready to use however you need.

For many of this tools i could go one by one on how to use them but then this Tutorial would be too long, so take this as guide to find everything you need to start creating your comic digitally and don’t exitate to try this tools.
Text/Font/Sfx
On the part of writing your dialogues you will obviously need a font,
The one i use the most is CC Wild Words, you can dowload it on the web, any font you install on your pc will be available for you to use it on CSP here:
Sound effects are a really important part of the precess of creating your comic that deserve as much attention as the others.
There are multiple ways of doing it!
In my case i have some manga sfxs i drew and registered them as a material so i can use them whenever i need.
But nothings beats the good old writing,
Here is where you can write and edit your sfx:
Screentones
A screentone saves an artist's time by allowing quick application of textures to the line art where a hand-shaded area would not be reproduced in a timely or acceptable manner, basically inking in traditional terms but with a better control on how light or darker your page will be.

You can add tones simply by selecting the area you want to ink and click on “add tone”
And then you will have the the settings that you can edits as you want
Colors
I've already mentioned how arranging your layers correctly can make the coloring process much easier. With web comics being so popular nowadays, you'll likely need to color your work. It's clear how working digitally offers significant advantages. So, here’s a basic guide on how to start coloring your comics digitally.
Color Wheel
With the color wheel you can choose and change your values
You can also change from color wheel to color slider or color set

Fill Tool
we have the fill tool that as you can see fills closed areas

Gradient
We also have gradients that you can customize with colors that better fit your mood and already customized ones.

Eyedropper

Extra Tips
Here are some of the extra tips on working digitally on your comic
Blur/Action Blur
I like to blur backgrounds or item/people in the second plan in order to emphasize the important parts of the illutration.

As for action blur as the name suggests, it distorts the image making it look like it’s in motion

Hope it was helpful!
Users who liked this post


Comment