
Presentation
Hello! Welcome. This time I will show you the process I follow to paint a flan (one of my favorite desserts) step by step in the easy way. Painting a realistic flan is really simple as you will discover when you follow this tutorial, I hope you stay until the end. Without further ado…
Let's get started!!
► Tools
To make this flan you will only need to use the default tools, specifically:
➀ Nib > G (or any other brush you like, but that doesn't have much texture).
➁ Airbrush > Soft
➂ Airbrush > Sprayer
➃ Color Mix > Blur
Note: If you feel that you don't like working with the airbrush, you can change it for another brush that suits you and combine it with the blur or color mix tool to get the gradients you are looking for.
As for the settings, there are a few settings to keep in mind.
(1) Airbrush: Working with this tool can go very well or very badly, so you have to be careful, that's why throughout this tutorial I will use the brush density between 50 and 100% or a little less. With this we get less diffuse brush strokes.
(2) Blur brush: The density of this tool in general I will use between 50 and 100%. The lower the setting, the more it will blur.
(3) Eraser: I find that a better way to erase without using the eraser tool is with transparency. Transparency allows us to erase while preserving the texture of the brush being used.
The transparency option is found in the color palette, it is the icon with the transparency pattern; we select it and the brush will change to its transparent mode, now we just have to erase normally.
Note: The settings of the brushes that we use with transparency can be modified normally.
0. File Configuration
By default, the program comes with some canvas presets that we can use for illustration, Webtoon, comics and animation.
➀ In our case we will choose the option: Custom size.
These are some considerations that we can have when configuring a file manually:
➁ Regarding the resolution, we have that files with more than 300 dpi are ideal for printing and 72 for digital files.
Tip: I considered it a good option to create all our files with a resolution of 300 dpi and when the file is exported, lower the ratio to 72 if necessary. This way you will always have a good backup quality.
➂ The dimensions of the Canvas are optional, but a measurement of 2000 x 2000 or more is ideal.
➃ Finally, we choose «Create canvas».
1. Painting process
CLARIFICATIONS: The steps shown in this tutorial can be used perfectly for both the simple mode on Smartphone and in the simple mode for tablets and the desktop version.
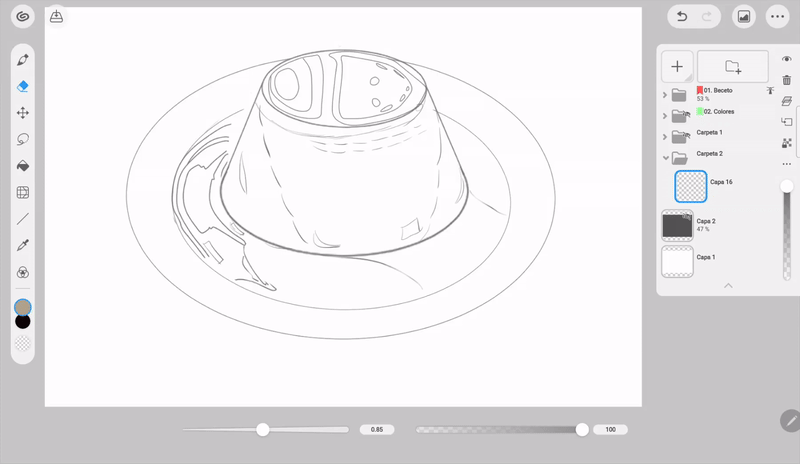
(A) Sketch
For this flan I took three different images as reference; from them I got the shape, the idea of the lights and shadows. Once I had the composition I made a sketch.
I put the sketch layers in a folder called the same way «Sketch». I divided the outline into different layers to keep better control of the lines.
➀ With the “+” icon you create a new layer and with the folder icon a new folder.
➁ To put a layer inside a folder you have to hold it down and drag it to the folder icon.
The beauty of sketches is marking the areas where the lights and shadows should go, so it will be easier to paint them later. I cleaned up the sketch using the Shape tool, specifically with the options: Circle and Continuous curve.
Finally, since it is uncomfortable and distracting to paint with a white background, it is best to create a layer below the others. This layer should be painted black, and the opacity will be lowered as much as you feel comfortable with.
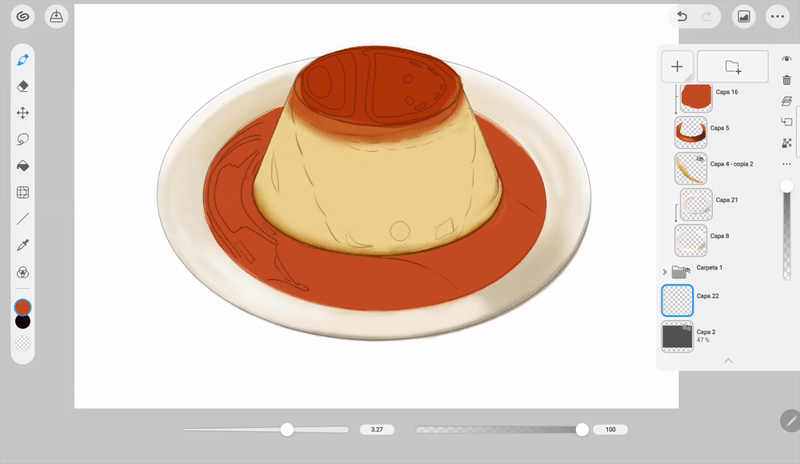
(B) Color base
The color palette I used was the result of selecting tones from some reference images with the eyedropper. This way I get more realistic colors.
A convenient tool to create a color set is to use the option: Color set. When you click on the bar of this tool, a menu will appear where you will find the option: New color set that will allow us to create our own set.
Now it's just a matter of selecting the color and adding it to the set with the add icon (+).
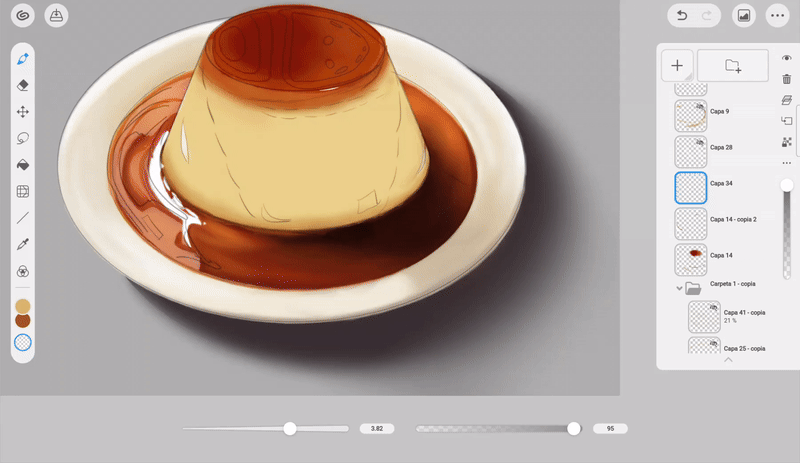
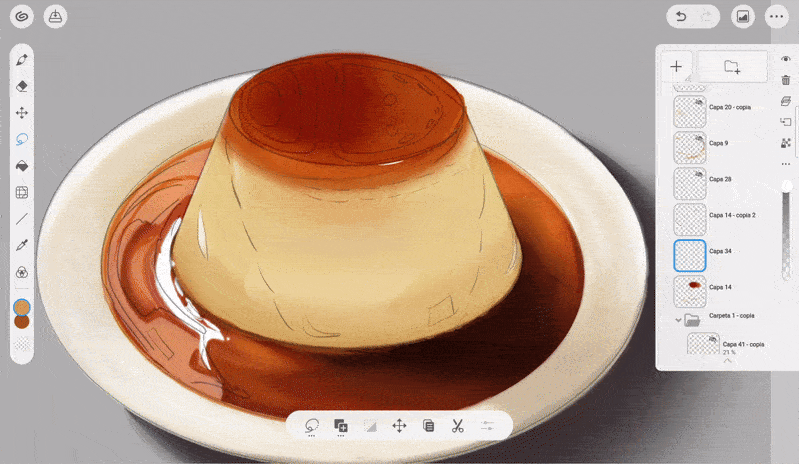
To apply the base colors, you have to choose the middle colors from your color palette. Using the Lasso tool, you can easily delimit the area to be filled. It is important that each item is on a separate layer, the flan on one, the candy on another, just like with the plate.
➀ In the floating menu you will find the option that allows you to add or remove areas with the selection tool. Ideal if you are not very steady.
Note: To exit the selection, click on the floating option «Clear selection».
In order for the fill tool to ignore the sketch line and only take into account the selection, we have to use the following configuration: Click on the settings icon in the lower part, the menu will be displayed where we will deactivate the option «Refer to all layers».
Now it's just a matter of using the "Paint Bucket" tool on the selected area and that's it, it will be filled instantly.
Another method to apply the colors is to do it manually with a hard brush. Also, during the process I lowered the opacity of the sketch folder, so the line won't be so distracting.
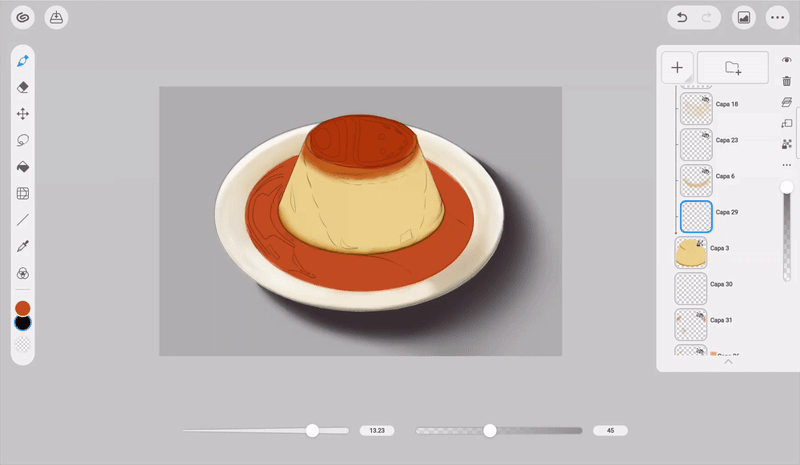
(C) Plato
We start by creating a new layer above, which we will dock to the layer below with the corresponding icon; icon on the right side of the layer. This will allow us to delimit the area where we can paint.
Note: This will be done throughout the entire process, it is an easy method of painting without going beyond the edges. This is why it was necessary for each base color to be on a separate layer. Also, you can stack as many layers docked to the same one as you want.
Light: To paint the lights on the plate I used the soft airbrush. First you have to determine the light source. The area where the light falls directly will remain white, that is the line that can be seen on the edge of the plate in the left region.
Shadow: In the other areas and especially on the right side where there is not much light I painted the shadows with a brown color.
Reflected light: There is also a concept in the theory of light and shadow called reflected light; this concept mainly tells us that light bounces between objects and ends up illuminating other areas where direct light does not reach.
This results in small lights at the edge of shadows.
Now, to give it more depth, I defined the edge in the dark areas with a creamy grey colour, and with the blur tool I softened the entire outline of the plate.
(D) Shadow of the plate
To recreate the shadow of the plate reflected on the surface, it is as simple as using the tool: Shape (Diagonal line icon) > Circle > Fill. We create a black oval that we will extend diagonally using the transformation tool (Icon with the cross of arrows).
Now with the Blur brush, we must blur the entire visible area of the oval until the hard edges are lost. Finally, we lower the opacity of the layer to a level that we like.
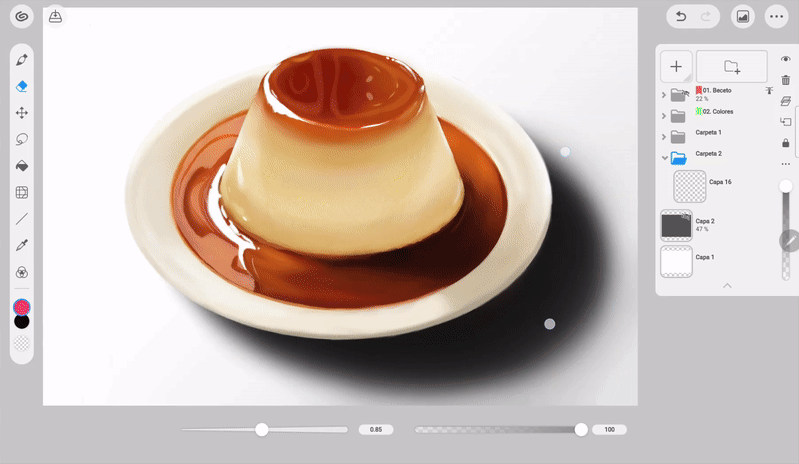
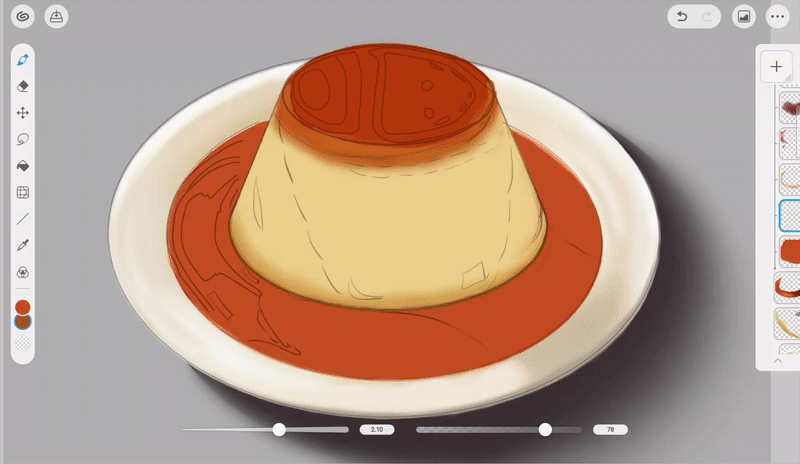
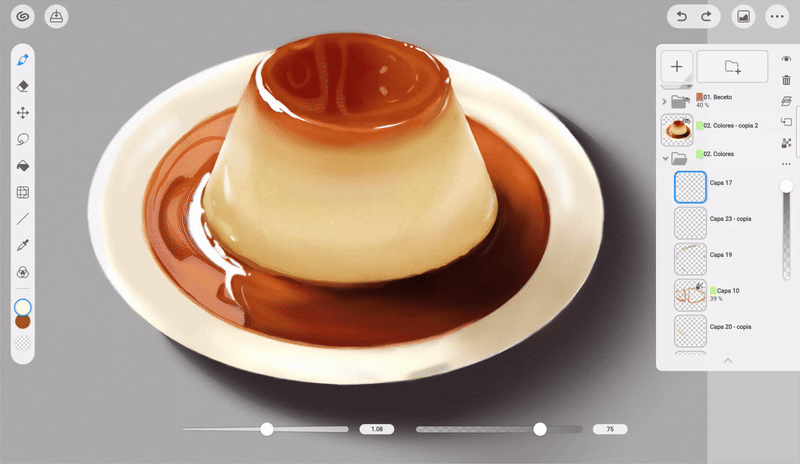
(E) Caramel
Using brush G, we paint the caramel area. The caramel on the flans takes on an orange tone.
Now, with a lighter color than the main one, we will paint the edges of the candy using the airbrush or with another brush, but if the edges are hard, they must be blended; both the upper and lower candy.
The technique we will use throughout this tutorial will be: Paint with the airbrush, G brush or the brush of your choice and then blur the hard edges with the blur tool.
But BE CAREFUL, the blurs don't have to be so strong. For example, reflections and highlights have practically no blur, but we will see that later.
For the light and shadow, you have to follow the same process as with the plate, only in this case the light will be more uniform.
Light: Using an orange-yellowish color, we will paint the center of the candy with the soft airbrush, leaving a border around the area close to the plate.
Shadow: With a brown-reddish color, we will paint the area where the shadow is marked.
Once again, use the airbrush to paint the entire edge of the candy in a yellowish color. This happens because the density of the candy refracts light very easily.
Now with an even darker brown color we will mark the shadow area more. The center and the edge are the darkest, while the periphery will degrade until reaching the base caramel color. To achieve this gradient it is best to use the «Blur» brush.
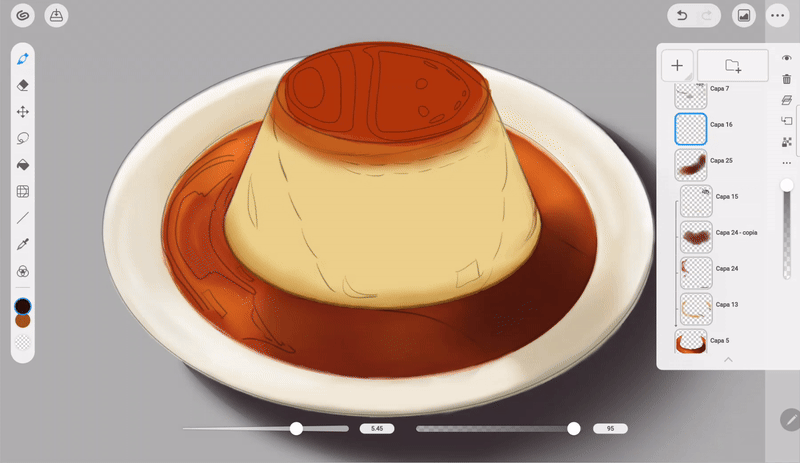
- REFLECTIONS -
Reflections simulate the presence of another object, even if it is not shown in the scene. Adding them adds more information to the illustration, making it more interesting.
It is not that difficult to represent them. First we will mark them with a solid color, they can be specific figures like a window or simple spots of another color. We blur these spots a little and lower the opacity of the layer. The color of the reflections should reflect a certain harmony with the rest of the colors in the composition.
Opaque: By painting only the reflections we get a matte-style texture.
Now comes the most important part. We will take the G brush, which we will lower the opacity to 50%, and in my case using the lasso tool I outline the shape and paint.
With this setting we will paint the reflection area on a new layer. To achieve a more realistic effect it is best to consult references. If despite the brush opacity the reflection is still very intense, then we will lower the layer opacity.
The point of adding these reflections is to recreate the effect of a crystalline surface.
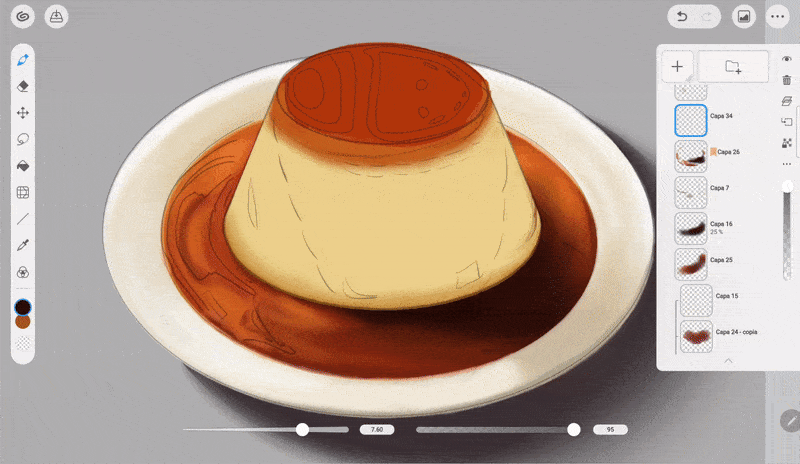
- SHINE -
Shine is the soul of the illustration, it highlights it, makes it more striking and delicious. We make these with a pure white color and a hard brush. For some of the shine it is good to blur the edges.
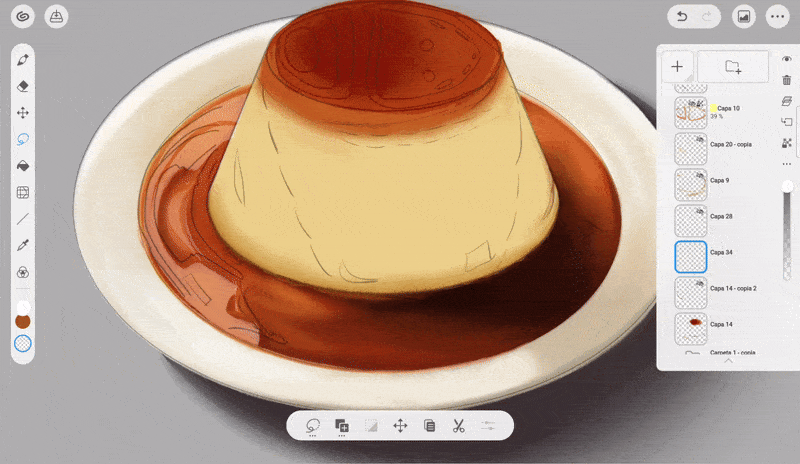
Glitter gives the illusion of a reflective surface. We will use it a lot to represent glazes and jams. These are liquids that run down the dessert or stay at the bottom of the plate. The thicker the glitter, the shorter its length will be due to its inability to slide easily across the surface; on the other hand, the lighter ones will be longer. Both need glitter to achieve their reflective texture.
Using the same G brush, but with maximum opacity and a pure white color, we will paint the sparkles. Now we duplicate the layer by clicking on the three points of the layer and choosing the option «Duplicate», we will move this layer below the first one and with the blur brush we will soften the edges to simulate that the sparkle has a glow.
These sparkles, although it may seem funny, give it a delicious feeling, give the candy life, make it look tastier.
An easier way to blur the layer is to go to the filters and effects icon; there you have to select: Effects > Gaussian Blur. At the bottom left you will find the indicator of the intensity of the effect, you have to choose a level that is not too high.
Note: This method is shown at the end.
(F) Flan
Using a slightly darker color than the base color of the flan, paint the bottom of the flan. This color change is to simulate the reflection of the caramel on the structure of the flan.
To soften the edges, I recommend using the blur brush.
If you remember, when eating a flan we can see that in many cases it does not have a flat and immaculate surface, it often has imperfections. To simulate them we will take the spray or droplet brush and with the same colour as before we will lightly paint over the surface of the flan.
If the grains formed are very evident we can lower the opacity of the layer and/or soften them with the blur brush.
(G) Candy 2
For the candy coating, the same principle is followed as for the candy on the plate. With the soft airbrush, I paint some light dark spots that I blend with the base color. This way I make it look less flat and give it a variation between light and dark.
Using a couple of orange tones, you need to paint some small details on the edges. Some simple highlights.
- REFLECTIONS -
As with the previous one, using the G brush with 50% opacity and pure white we mark the reflections of this part of the candy. Finally, with the blur brush (with hardness between 80 and 90%) we soften the edges.
If we think they are too shiny we can lower the opacity of the layer.
- SHINE -
With the G brush and pure white we paint the shine.
- GLOW -
Now we duplicate the layer by clicking on the three points on it and choose the option «Duplicate». We have to go to: Effects > Gaussian Blur. In the lower left we will find the indicator of the intensity of the effect, we must choose a level that is not too high.
(H) Details
I place some small white highlights with the airbrush and blur them with the blur brush.
Done. Now all you have to do is turn off the sketch guide layer and the visual guide layer.
Farewell
I hope that what you see here helps you to make your own flans. It would be very helpful if you share it and give me a like. Thanks for coming here! See you another time!
Bye bye.
Learn more about me at:
Users who liked this post


Comment