The ULTIMATE Guide To 3D Models
Hello Hello! I’m Jay,
And today I’m going to teach you how to use 3d models! Hopefully the long index didn't scare you too much haha!
This will be your guide to everything 3D in Clip Studio!! From character model posing, manga perspective, backgrounds, ways to speed up your coloring workflow, and even some tips for errors you might encounter along your 3D journey.
This is a beginner friendly tutorial so we'll start with the very basics all the way up to the cool stuff advanced Clip Studio Paint artists use.
I've also made a video walk-through of this tutorial if you prefer learning that way!
[Stage 1: Getting Started With 3D]
Let's start from the very beginning,
this set of folder icons is called the "Materials Panel." Any assets you download or make yourself will be found here.
My workspace might look a bit different to yours but that's just because I've moved this panel to a spot that's easier for me to access.
If you don't see the Material Panel within your workspace here's how to find it.
Go to the navigation bars found at the top of the program,
From there hover over "Window"
then go to "Material"
And click "All Materials"
This will always open the material panel. If you ever accidentally close it you'll be able to find it here.
Now that you have the material panel open, you'll be met with the different categories of default materials found within clip studio, I highly encourage you to click around and familiarize yourself with these categories.
Today, we'll only pay attention to the "3D" category
If you don't like where the material panel is placed within your workspace,
you can always click and drag the panel to a place that you prefer. As you move the panel, you'll see red lines. These show you the different places you can dock the material panel.
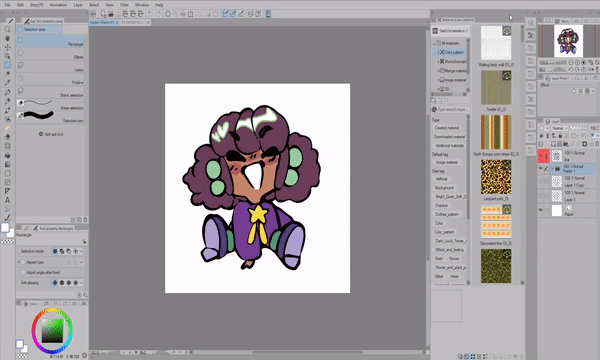
Camera Movement VS Object Movement
Now I'm sure you are excited to jump in BUT! I'm going to stop you for just one more moment to teach you a fundamental concept you need to understand.

When you work with 3D for the first time, the action of dragging a model will look the same to you whether you use the arrows ("Object Movement") or drag it with the little camera icons above the model ("Camera Movement").
While the result "looks" the same, these two actions function in completely different ways.
The difference between "Object Movement" and "Camera Movement" is whether the object itself is moving or the camera is moving further or closer to the object.

Let's say I want to bring this bed closer to me, it wouldn't be practical to drag the bed (moving the object) because it will collide with the other objects I have within my scene
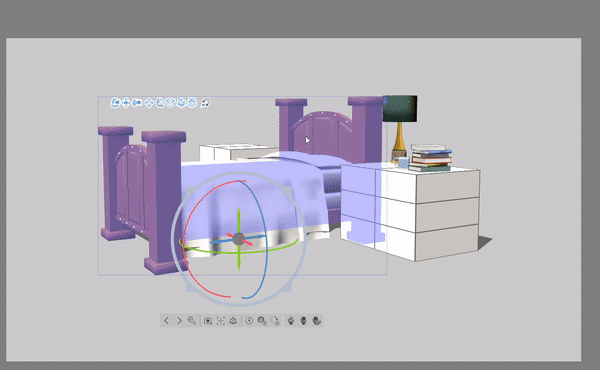
Instead I'll use these camera icons to position the camera.
We'll talk more about each icon later, for now I'll just use these 3 to change my view of the objects.

You can also click and drag anywhere on the canvas to adjust the camera as well.
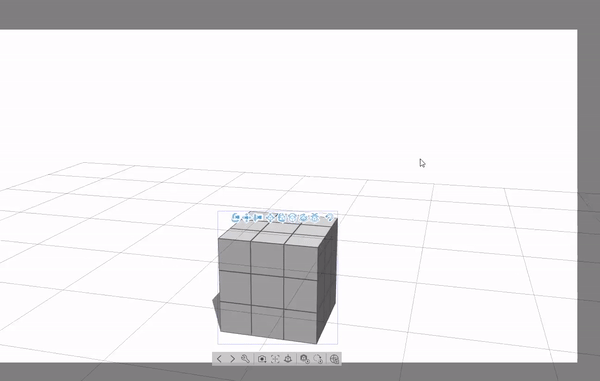
As you work in 3D you will have to decide if you need to move objects, or move the camera, which is why I wanted to explain the difference first.
3D Model Basics
Now that you understand the basics for how 3D models function. Let's place a 3D figure onto our canvas.
First click on the arrow on the section that says "3D" Then click on "Body type"
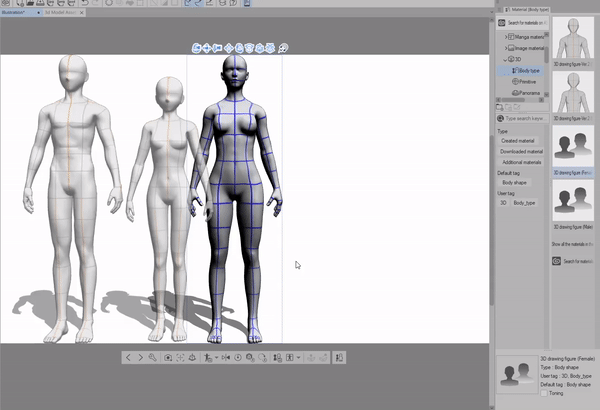
From here you can see two different sets of 3D character models. Once you click and drag the model you want to use, it'll place itself on the canvas
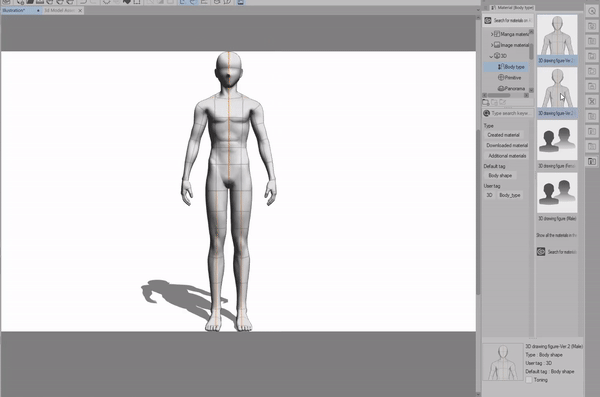
The first set of 3D models have very stylized proportions because they're designed for Manga style illustrations and comics.
However, for those with a more realistic style you'll enjoy the second set of 3D models which have better proportions.
[Image Text "1: [Root Manipulator] 2: [Manipulator]"]
When you click on the 3d model for the first time. You'll activate the first set of control options.
We call the overall control options on a 3D Object the [Root Manipulator] Don't let that name intimidate you.
The [Root Manipulator] is useful when you want to change the ENTIRE placement of a 3D object.
While the regular [Manipulator] options control the INDIVIDUAL placement of a 3D part you've selected.

On the bottom of the model you'll notice a set of colored rings and a set of colored arrows.
The Colored Rings control the overall angle of the model.

while the Colored Arrows control the overall placement of the model within the 3D space.
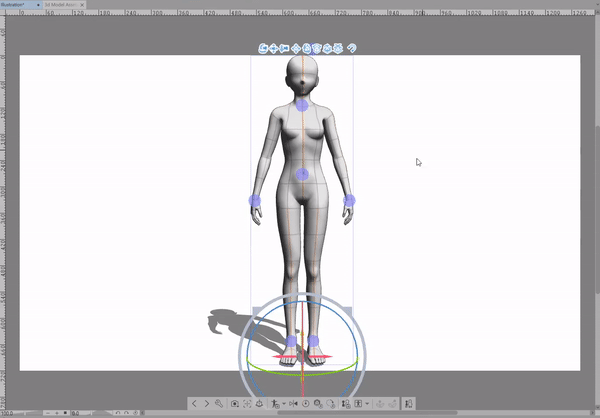
The Grey Outer Ring Changes the size of the 3D model.
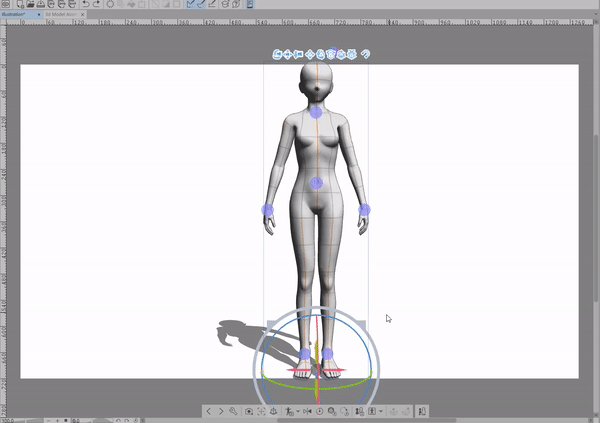
To activate the regular [Manipulator] options select the part of the body you want to edit. From there you can freely rotate the part you've selected.
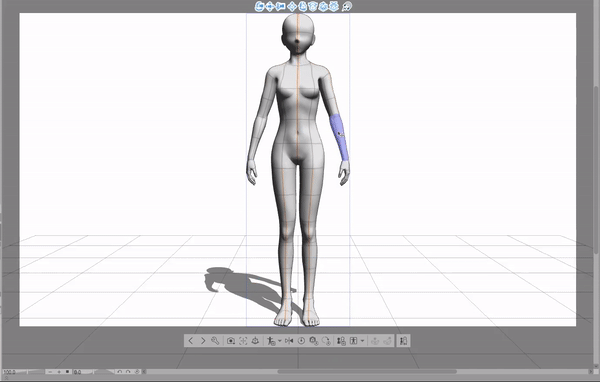
If you want to bring up the [Root Manipulator] double click on ONE part of the body.
Clicking on a different section of the body it will switch to that section's [Manipulator] options, instead of opening the [Root Manipulator]

Here's an example of utilizing everything we've learned so far!
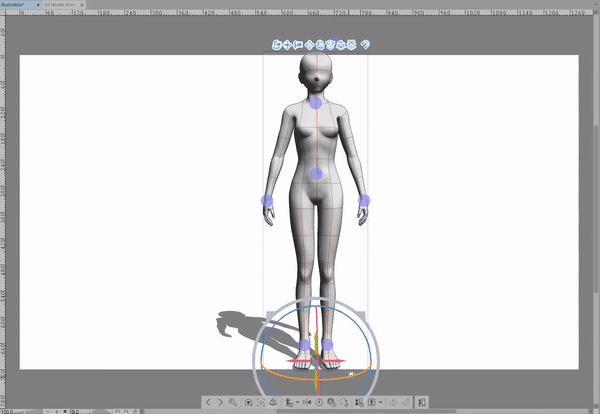
Congratulations! You've made it through the basics!! You should be proud of yourself, before you didn't know anything about 3D and now you're on your way to master it!!
Hmm, but something feels missing... Ah! Of course, this pose feels a bit stiff. Let's learn how to fix that
[Stage 2: Advanced 3D Figure Posing]
Remember how we opened the [Root Manipulator] in the last section? Well, something we haven't talked about just yet are these blue circles called the [Animation Controllers]
What do they do exactly? The [Animation Controllers] can only move specific areas, such as the line of sight (where the model is looking) and other body parts.
These controllers are helpful when we want to make our poses less stiff and unrealistic.
There are 7 [Animation Controllers] 6 of them are attached to the body.
The only [Animation Controller] that is not directly attached to the body is the one that is floating above the models head. (Labeled #1 in the diagram above)
The 1st [Animation Controller] changes where the model is looking. It's the only point that can be placed ANYWHERE outside of the model's body.

In order to make the pose in our last sections example look less stiff, I'll look for where the model's weight will be distributed. Basically, I ask myself what part of this model's body is keeping it balanced?
In this pose I notice that the left leg is where the model is putting the most weight on the ground.
Using the [Animation Controller] I'll reposition the hips, slightly drag the model towards the ground, and make small adjustments to give the illusion of movement.
As I'm posing the model I'll use a combination of directly dragging the [Animation Controller] or using colored circle manipulators to change the angle and position of the body.
The [Animation Controller] can move specific areas without moving other areas or, depending on the one you're using it'll move areas in relation to each other.
For example when I move the hips downward the knees and other parts of the body will adjust accordingly.
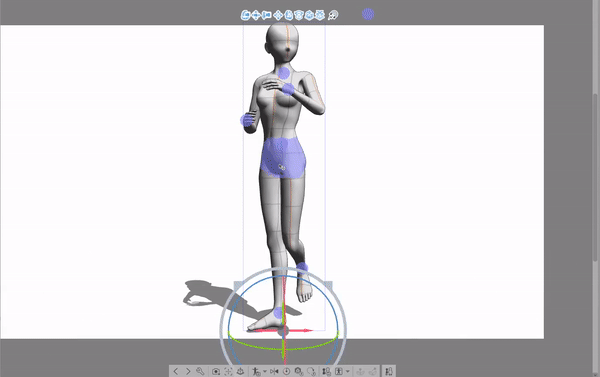
Understanding what kind of emotion you want to portray with your pose will determine how realistic it will appear to others. I can take the same general pose and turn it into various poses that tell a different story.
If the pose I want to create is full of excitement and emotion, throw the model's hands in the air! Are they shouting to someone off-screen? Or maybe they're an actor taking a final bow.
Is the pose full of sadness and disappointment? Cover the face with the arms and turn the model away from the camera! Or maybe I'm just bumping into a character that's casually walking across the street.
No matter the story you're trying to tell, 3D models are a great way to improve your art. Which is why I recommend them so much as both a learning tool, and a tool to speed up your drawing process
The best way to get familiar with posing 3D models is to take some time to just play with them! Put them in weird poses, rotate the body until it folds into itself, and try clicking different sections of the body to see how it manipulates the overall pose.
In our next section we'll talk about posing the hands!
Posing The Hands
[Image text "Posing The Hands"]
There are a few ways to pose the 3D Figure's hands. One method is to pose each finger using the [Manipulator] however this method can get tedious pretty quickly so let me show you some other ways to pose the hands!
Within the 3D category in the material panel, there's a section that says "Pose" and if you open it you'll be met with two different sub-menus. The "Entire Body" and "Hand" sub-menu the one I want to bring to your attention is the one that says "Hand".
Within this sub-menu you'll pretty much find every hand pose you'll EVER need. From holding various objects or writing with a pen, these presets will save you a lot of time posing the 3D models.
There are 50 different hand poses!!
(That doesn't even include the poses you can download from the asset store)
These are super easy to apply to your 3D model.
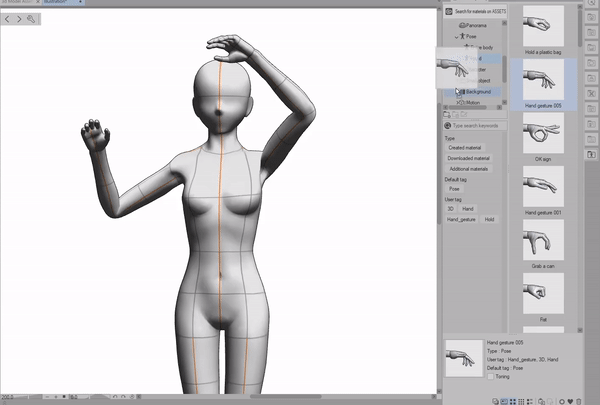
If you want to apply the pose to both hands at once, simply click and drag the pose onto the model.
If you want to apply the pose to only one hand, select the hand you want to apply the pose to and click and drag like before.
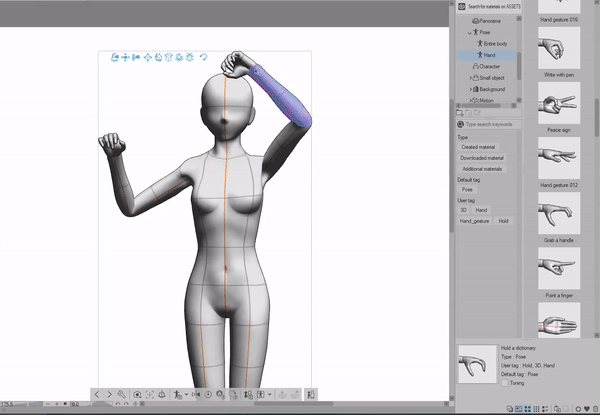
Let's say you couldn't find the exact pose you had in mind, let me introduce you to the [Pose Hand Sub Tool]
To open the [Pose Hand Sub Tool] menu
go to the grey toolbar found at the bottom of the 3D model, and click the wrench icon.
This will bring up the whole [Sub Tool Detail] menu. This menu is your go-to place for settings and fixing common errors you'll encounter!! So get used to it because you'll be in this menu a LOT.
We'll talk in depth about everything found in the [Sub Tool Detail Menu] but for now just focus on the Pose category.
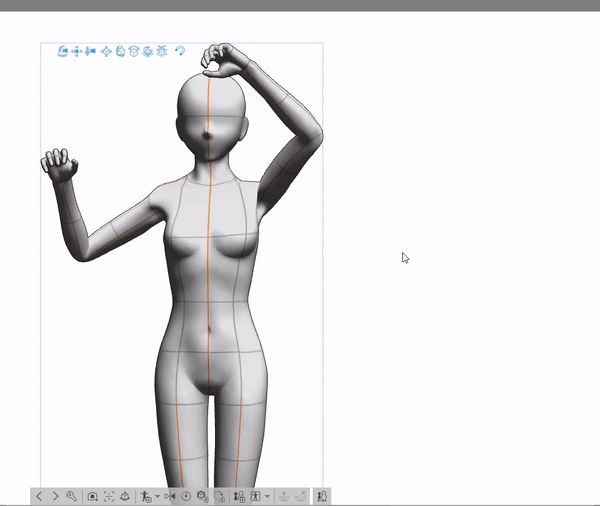
All you have to do is click and drag to change the pose of the hands.
Just like before, we can either edit both hands at once or select one and edit it by itself.
Did you notice that the hands open and close into a fist pose? You can actually change those settings as well!
Another setting you can utilize is the [Lock finger] feature to create truly unique and dynamic hand poses.

Pose Presets
Clip Studio paint has many built in full body poses that you can easily click and drag onto your 3D Figure.
These are great to use as a base to edit or use without any changes.
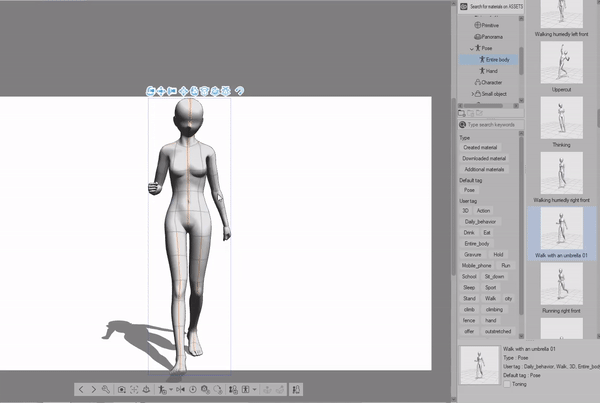
Just like before all you have to do is click and drag, to apply them to the model.
Alright, now that we've covered how to use preset poses and how to pose the 3D Figures on our own, let's talk about how to save the poses we create in the material panel.
On the bottom grey bar on the model, you'll find this "Register pose as material" icon if you click on the small dark grey arrow you'll bring up a menu with a few options.
"Register full body pose as material"
"Register left hand pose as material"
and "Register right hand pose as material"
For this example we'll save the whole pose as a material. Once you've clicked on the "Save pose as Material" Icon you'll be brought to this menu.
From here we can change the material name, Image, and most importantly choose where to save the material.
For my example I've already prepared an image to use as the material icon. When making your own I recommend using a square canvas (800 x 800 px) (400 x 400 px) etc.
Setting an icon will make it easier to find the pose later on so I would make one for your assets!
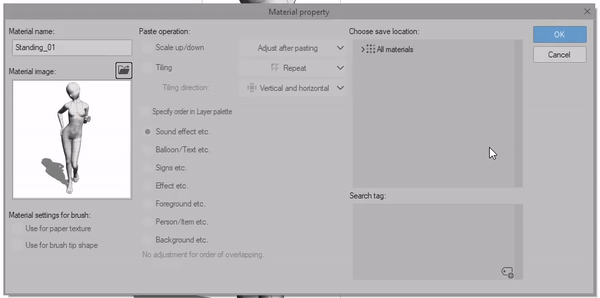
To save your material in whatever category you choose all you have to do is make sure you have that category highlighted in blue. Then, when you click "Ok" it'll save in the location you selected!
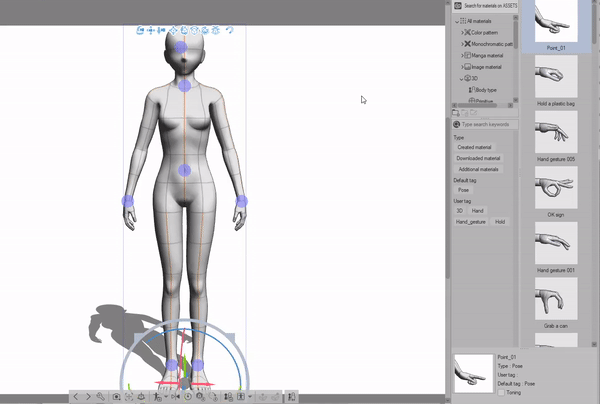
Keep in mind when you save a hand pose, it will only save anything relating to the HAND so if you made a pose with the arm bent it wont save that data.
It's best to save hand poses when you reuse a lot of the same hand settings. Otherwise, it's best to save full body poses.
Organizing Materials In The Material Panel
I tend to check the Asset store frequently for all kinds of poses that artists upload daily! Here, you'll find a range of poses from cute kiss scene references to action packed fighting poses!
The material panel can get a bit messy as you download assets over time so before we move onto the next section I'll show you some tricks for organizing your materials.
If you right click within the Material Panel you'll get a pop up window to create a new folder.
For Example let's say I want to create folder for my full body pose assets so I can easily find them later. I'll right click on the "Entire Body" category and create a new folder.
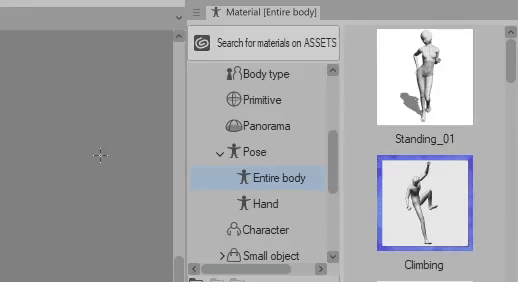
WARNING DO NOT DELETE FOLDERS BEFORE MOVING THE ASSETS INSIDE
Since I'm showing you how to customize your material panel I need to warn you that if you delete a folder with custom assets inside it will delete EVERYTHING. So PLEASE PLEASE PLEASE move your assets outside the folder you're planning to delete BEFORE you delete the folder.
Just to make sure you understand what happens I'll give you an example so you can see for yourself.
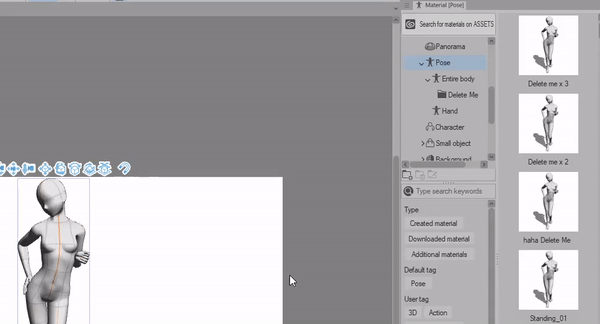
You might assume since you can see a material within multiple categories, that it would be safe to delete a folder with materials inside.
In the example above after deleting the folder my materials were nowhere to be found, they got deleted permanently and there's no CTRL Z To undo that kind of mistake. I was lucky to be able to test these scenarios with no real harm but in practice this kind of mistake could be absolutely devastating.
It doesn't matter if you've put the material as a "Favorite" either, once it's gone, it's really gone.
This would be useful if I've updated a bunch of custom materials and wanted to delete the old ones in bulk. Though for the average user this would be a simple mistake that's so easy to accidentally do.

You can easily click and drag materials and place them into folders you create. To select multiple at once hold down shift and drag and drag them into the folder you want to place them in.
You can also move multiple materials out of a folder by holding down shift to select them all and then dragging them to another category in the material panel.
It's not always practical to click and drag materials from farther ends of the material panel. So with the material you want to move selected,
look at the panel found at the bottom of the material panel and click the gear icon.
From this menu you can select the category you want to save the material in!
Once you select the folder or category you want to save the material to, click "OK" and you're good to go!
Pose Detection From Images (Technology preview)
Another feature is the "Pose scanner" you can use images you take of yourself or anatomy references you want to study from.
Keep in mind that this feature is in the technology preview stage and it's currently not perfect.
With an image you want to extract a pose from in an folder you can easily access,
Click on the pose scanner icon and let the program process.
Image text: "Image" , "Result"
keep in mind that some images won't work or will give strange results. As this feature goes further into development it'll be able to detect more complex images and poses. It currently also doesn't detect any hand poses but it will move the arms.
I found that the best kinds of images are ones where the person is easily visible and there isn't a lot of clothing in the way of the pose. Long dresses, bulky clothing, and jackets will tend to not work.
In general this feature is great to create a baseline to work with when you want to create more difficult poses.
Once the program has finished processing you can rotate and edit the model to your liking
Locking The Model's Joints
A somewhat hidden but useful feature you can use when posing the 3D models is the ability to "Lock Joints"
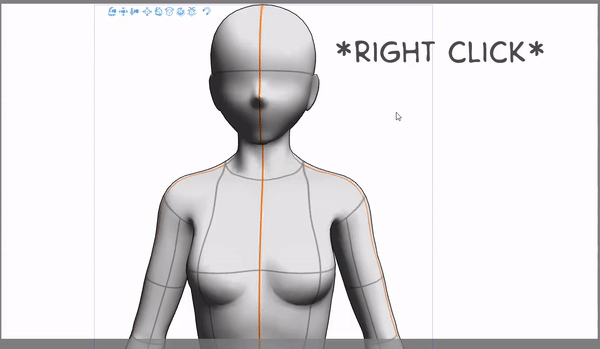
to lock a joint, simply right click on the part of the body you want to lock. You'll then, see a blue square on the model.
To unlock a joint, right click again.
NOTE some tablets won't give the right input (You might activate the zoom using right click on your pen)
For those with drawing tablets or prefer shortcut buttons you can also find the lock joint icon down at the bottom grey bar.
To unlock joins you can either click the lock joint icon again. Or if you want to unlock multiple joints at once click on the second icon labeled "Release all locked joints"
So why would we ever want to lock a joint?
Well, locking a joint is useful when you want to keep one part of the body in the same spot as you adjust other parts of the model or, if you want to control the whole body from a specific point.
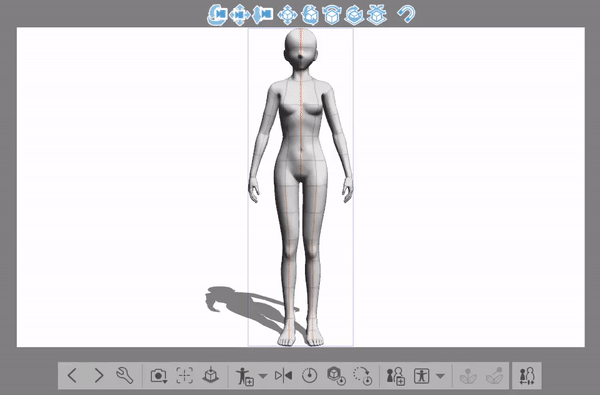
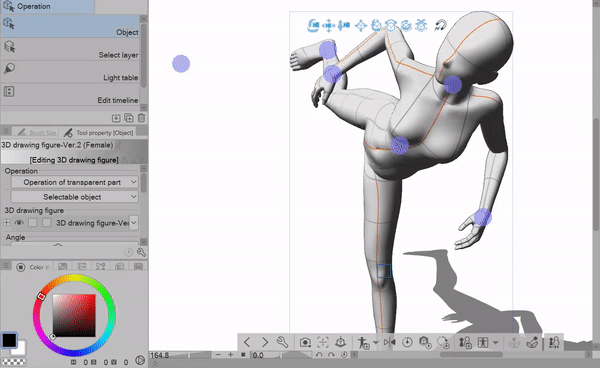
The "Lock Joint" is perfect for poses that require elements of the body to stay in one place. In the example below I decided to create a rollerskating pose.
First I'll lock the places where weight of the body will lean on. In this case it would be the right leg and foot. Then by clicking and dragging the body, I can freely move it anywhere within the canvas.

For any final edits I'll use the [Animation Controller] and the regular [Manipulator] controls to fix any areas that seem a little off.
In the end I was able to create this complex pose in under 5 minutes!! Isn't that neat?!
Changing The Model Proportions
The 3D figures are great for pose references but, did you know that you could change the body type as well?! I'll be using the manga style 3D models but you can edit the body type of the realistic ones as well the same way!
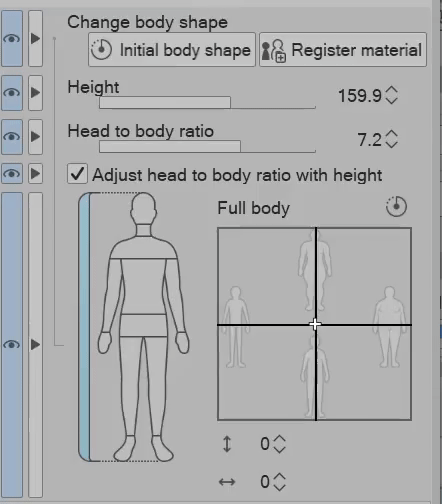
Let's take a dive back into the [Sub Tool Detail] menu! Within this menu we'll be talking about "3D Drawing Figure" section.
The first set of options you'll see will allow you to reset the 3D model completely
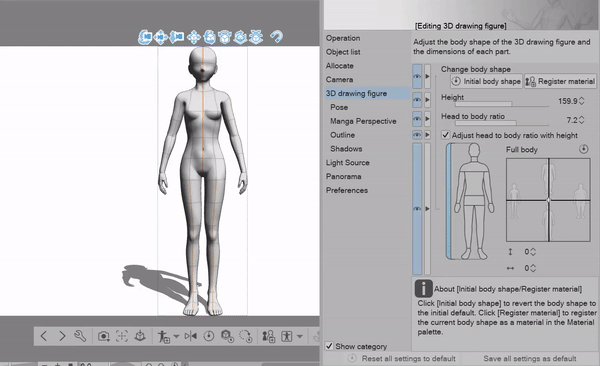
[Initial Body Shape]
And the second option will save the body shape as a material.
[Register Material]

Using the [Height] and [Head to body ratio] sliders you can change the proportions of the 3D model.
The [Height] slider is set to centimeters .
So, if you have a particular height in mind for the character you're making a reference for, you can set this number by hand by clicking on the numbers and typing in the height you want or, by using the slider.
As you change the [Height] slider it will adjust the body's OVERALL proportions together
In contrast, the [Head To Body Ratio] slider changes the OVERALL head proportion separately from the body .
Going down the line of setting options there's a little checkbox called
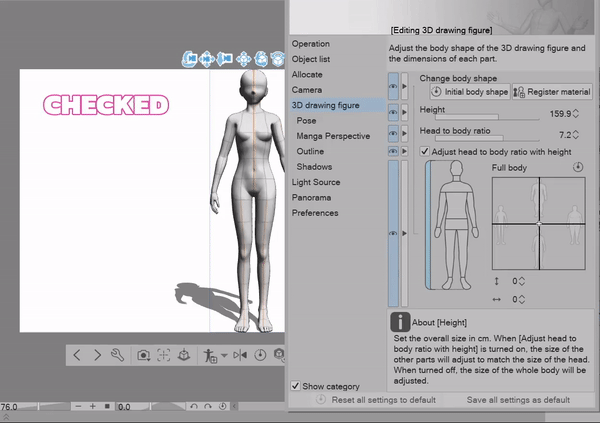
"Adjust Head to Body Ratio With Height"
When you change the Height using the [Height] slider the values for the head-to-body ratio will automatically adjust. This checkbox toggles on and off those automatic adjustments.
As you get more comfortable changing the model's proportions you'll find different ways to utilize this checkbox. In the example below you can see how this checkbox works!
annnnd for our main event, let's talk about how to change the body type and other settings for the 3D figure!!
Something that I would like to point out is the blue highlighted bar next to the body figure.
This bar will allow you to switch back and forth between full body manipulation and specific body part manipulation. As you click and drag within the grey square you'll be able to change the body shape.

I recommend having as much fun as possible when playing around with the body shape! It'll help you learn in a way that will stick around for a lot longer than just casually making realistic modifications.
By testing the limits of the modifications you can make you'll be able to get a better idea of how you want to plan your body type settings and what to avoid as well. OR you could be like me and create references for horror monsters that will keep you up at night!
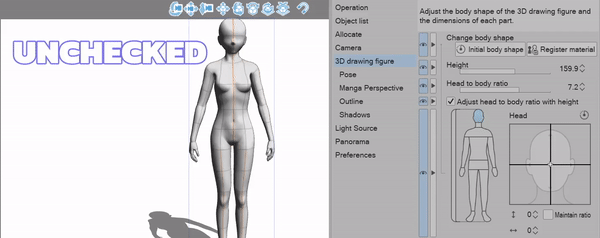
When you start to adjust specific parts of the body you might get frustrated with some of the strange warping effects you can get.
There is a checkbox setting prevent this and keep your body within normal proportion called "Maintain Ratio"
For that extra bit of control you can use the [Horizontal] and [Vertical] arrow icons to either type in the value you want or, you can hold it down to control the body shape and size.
Of course, no sane person wants to make the same changes to a model over and over especially if you use a particular body type reference a lot. So! Let's talk about how to save our edited figure as a material.
If you want to save a model as a material you can do it in two ways.
the first way is using the "Register Material" option that we saw before within the [Sub Tool] menu
The second method is using the [Save body shape as material] icon in the bottom grey bar of the 3D figure
Both methods will create a whole new model type. And the method that you use to save it is the same method in the "Pose presets" section of this tutorial.
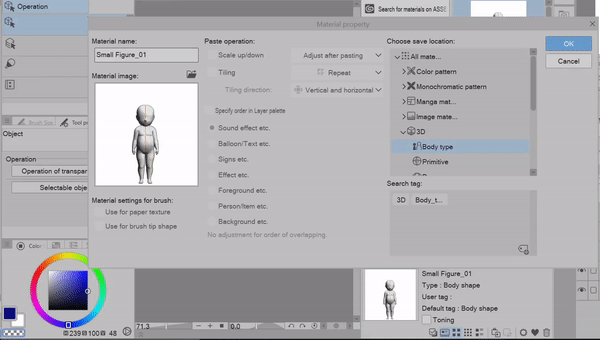
After you've saved a body shape as a material you can either add it to your blank canvas or! apply it to models you already placed on the canvas.
Applying a body shape to a model that's been previously placed on the canvas wont reset the pose.

[Stage 3: Camera Settings & Manga Perspective ]
Now we're getting into some more fun stuff,
Starting out with something pretty simple, some camera presets!
Down on the bottom grey bar of the model you'll see a camera icon called "Specify camera angle from preset"
Once you click on it you'll bring up a menu with 30 different camera presets you can use.
These presets are great for those quick and easy references you need to make. Instead of having to set the camera by yourself all the time!
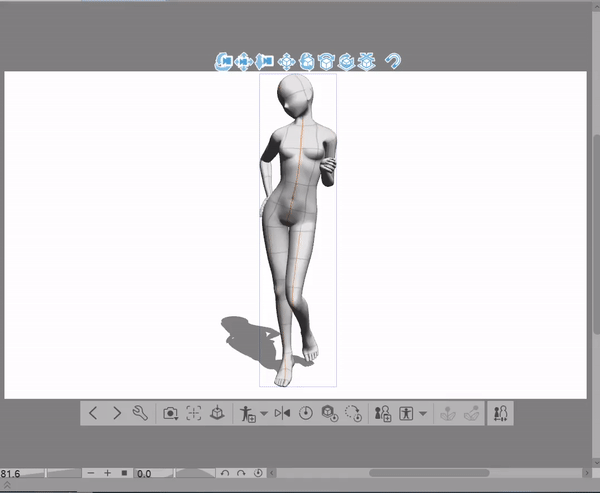
if you want to position the camera fully yourself
click and drag on blue camera icons above the model to place the camera in the position that you want. Each one works a bit differently so I've created an example below so you can see how each one works.
The first icon rotates the camera,
The second adjusts the camera up and down
and the third icon zooms in and out.
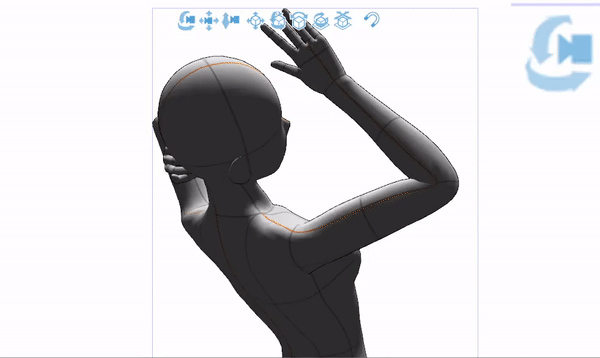
In [Sub Tool Detail] menu, you'll find some more camera settings. This menu is great for the more intricate changes you want to make
under the section labeled "Angle" you'll find another place you can bring up the camera presets shown before, and a button to "Center Object"
The "Center Object" button will set the camera to a position that shows the 3D object you have selected in the center of the canvas.
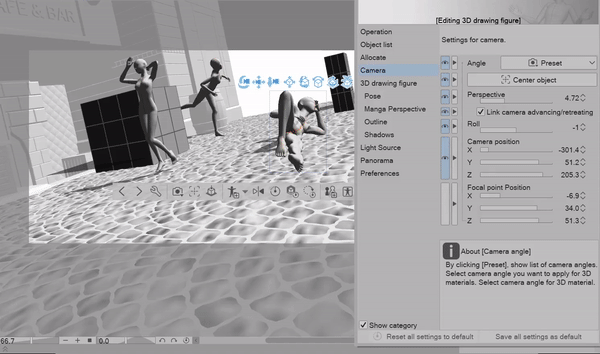
Keep in mind that the "Center Object" button won't show up on all types of 3D objects. In the example you can see as I switch to objects that are connected to the 3D background model that I've placed on the canvas the "Center Object" button with disappear but, when I switch to other objects it'll show again.
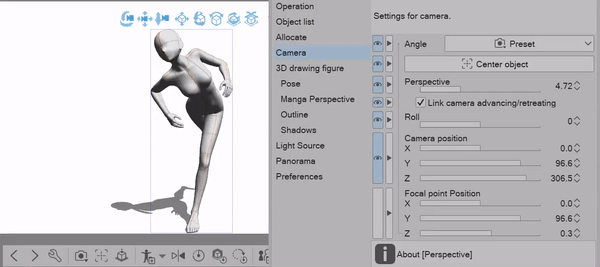
The [Perspective] slider allows you to warp and create really cool camera perspectives that are difficult to achieve on your own!
If you uncheck the [Link Camera advancing/retreating] checkbox the slider will work very similarly to just zooming in and out.
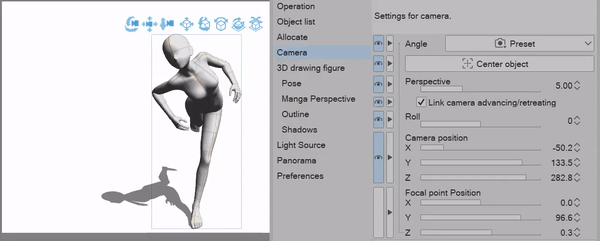
The next slider we'll talk about controls the rotation of the camera. Once you change the camera using this slider you'll notice the grid the 3D floor will change as well.
You're not actually moving the 3D floor or the 3D model itself, instead you're just changing the camera's view of those objects.
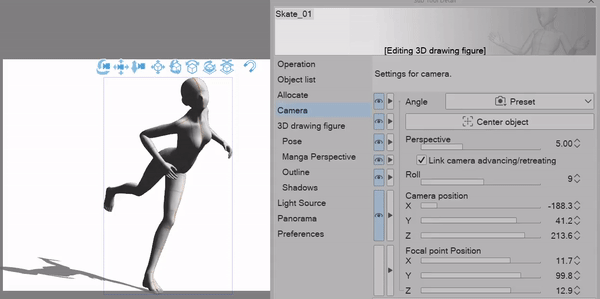
You can adjust the camera with the different sliders [X, Y, Z] just like we've done before with the blue camera icons.
You won't find yourself adjusting the [Focal Point Position] sliders and frankly it's difficult to tell where exactly the focal point is. In fact, the focal point automatically changes as you adjust the camera anyways.
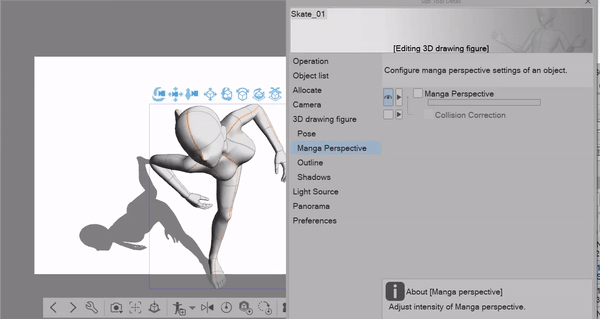
Now it's time for the fun part!! Manga perspective.
Manga perspective works a lot like the [Perspective] slider In the [Camera] category and you might find yourself using a mixture of both to fully get those interesting perspectives.
Manga perspective can take up a decent amount of processing power so depending on your device it might be better to use the [Perspective] slider.
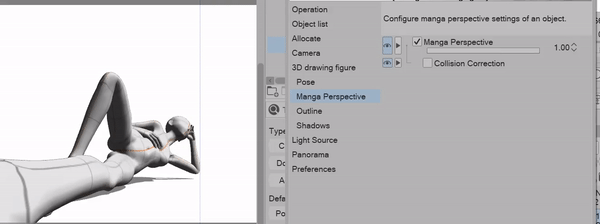
Sometimes you might find it useful to use the [Collision Correction] checkbox if you find that the pose you're using has the arms and legs in a position where they start to collide. Though, sometimes you wont notice a huge difference with it on or off.
Understanding The Settings Menu
PHEW- Oh my we've talked about a lot by now! This section designed for those who either skipped to this part in the index or are coming back to this tutorial later on trying to find something in particular.
I hope you find this list helpful in the future as you get more comfortable with all the buttons and settings,
(I know it's a lot, that's why I've made each description as simple and easy to understand as possible)
Just before we get into the descriptions I'd like to note that you can always hover over anything within the [Sub Tool Detail] menu and you'll find a short description of the section you have selected at the bottom of the panel.
see you in the next part <3
1]" Operation"
This menu is settings for the object tool and you won't find yourself in this menu, like...ever. For the most part you really won't need to change anything from here.
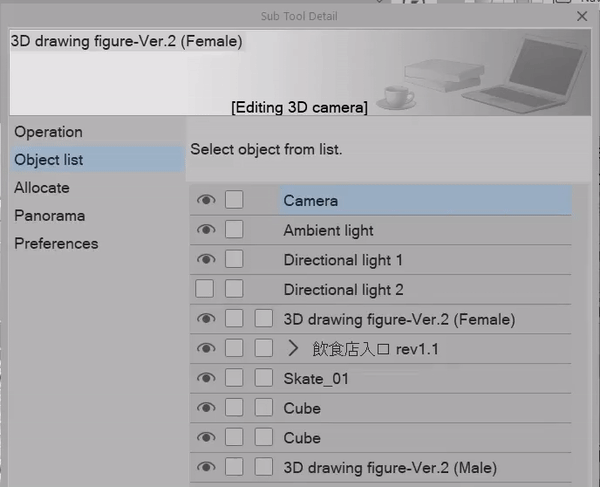
2] "Object List"
Switch between different 3D objects you have selected your canvas. Depending on the 3D object you have selected you'll either see extra settings or less settings, so if you can't find something in the [Sub tool detail] menu make sure you have the right object selected!
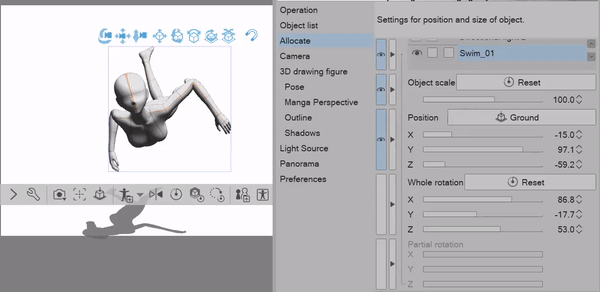
3] "Allocate"
changing the 3d object you have selected within the [sub tool detail menu]
the same functions can be found in "3D Model Basics
useful if you want to type in values for position and size.
4] "Camera"
see "Stage 3: Camera Settings & Manga Perspective"
5]" 3D drawing Figure"
see "Changing The Model Proportions"
6] "Pose"
See "Posing The Hands "
7] "Manga Perspective"
See "Stage 3: Camera Settings & Manga Perspective"

8] "Outline"
Changing the outline for 3D objects
also see "Troubleshooting and Common Errors"
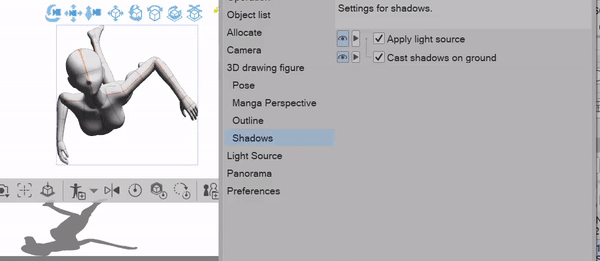
9] "Shadows"
The Checkboxes for Apply Light Source and Cast Shadows on the ground
also see "Troubleshooting and Common Errors"
10] "Light source"
for 3D object light and shadow settings
found in "Making Buildings With Primitives" and Troubleshooting and Common Errors"

11] "Panoramas"
See "Panoramas in Clip Studio"
12] "Preferences"
for troubleshooting broken textures, or settings for 3d objects that have physics, plus display settings. In the "Rendering Settings" You can also turn off the outline on the 3D models and change some lighting settings as well. The "Physical Settings" menu won't show up a whole lot since the base 3D models do not have any physics to change.
[Stage 4: 3D Backgrounds ]
Clip Studio Paint has many built in 3D backgrounds that you can find within the 3D category.
If you've never downloaded a 3D background in Clip Studio you'll notice this green cloud icon. All you have to do is click and drag the model and you'll bring up the prompt to download.
You don't need to reopen Clip studio after downloading, after it's finished it should auto refresh and you can start using the background right away!
Once you place the 3D background on the canvas, you can change the camera angle by using the blue icons, or by using some preset camera angles.
Now keep in mind that not EVERY model you download or find will have preset camera angles and for those models you'll have to position the camera by hand.
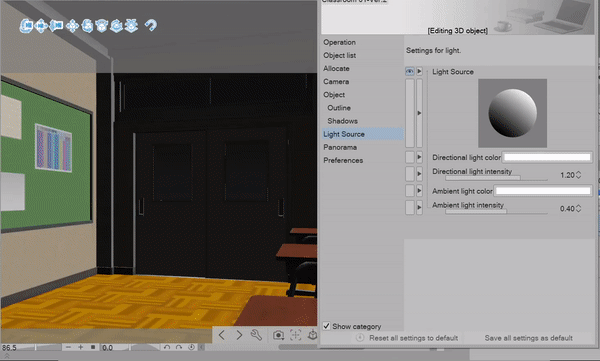
You might've noticed that the lighting is a tad intense in some areas and the doors are completely covered in shadow which isn't what we want.
Within the [Sub Tool Detail] menu we'll go straight into the light source settings.
In this menu we'll see a big circle with shadows, as you click and drag you can change the direction of the shadows.
After we're satisfied with the shadows, we can edit the [Directional Light] which is the light that is affected by the shadows we just edited.
The [Ambient Light] settings are not affected by the shadows but rather change the overall lighting within the environment.
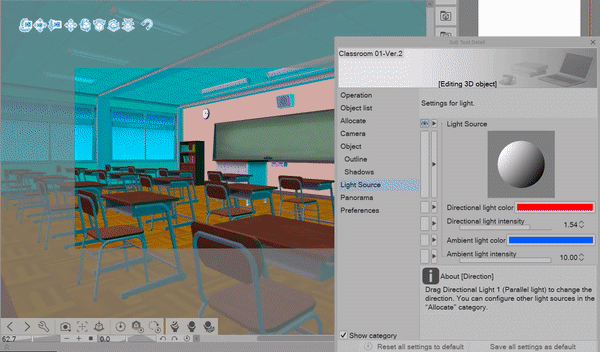
I highly recommend playing with all kinds of colors so you can see what colors work best for your particular goals.
Here's examples for just a few of the cool lighting settings you can achieve!!
In addition to creating cool lighting effects, if you'd like to create a pop art/comic style background there's a few settings you'll love!

In the [Sub Tool Detail] menu we'll be changing the settings through the [Preferences] category.
Click on "Rendering Settings"
Then, we'll apply an outline to the 3d model, I'll be setting mine to 100
Go to the box under "Lighting" and change the method to [Toon]
and that's it!

Some 3D backgrounds will have some further presets you can use, just like the camera presets you'll find settings for movable objects (doors, windows, etc.) or general lighting and color settings.
The first hand icon [Select Material Preset] deals with anything from alternative color sets, to different versions of the same model.

The second hand icon [Select Layout Preset] will allow you to change or remove objects within a 3D model. This will become particularly useful when you need to get rid of walls or objects that are in the way.
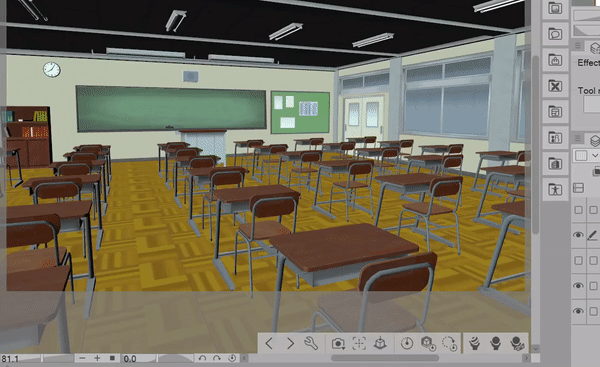
For the third and final hand icon [Select Preset Moveable Parts] we can change any parts of the model that have been set to move. So objects like doors, swings, windows and whatnot.
Keep in mind that every model you download may not have moveable parts and in those cases you'll only see a blank grey box.

[Stage 5: Primitives]
Alright, now that we've talked about 3D Backgrounds let's talk about a newer feature that's been added, 3D Primitives! Be sure to have the latest update otherwise you might not see them.
Under the [3D] category go down to the section that says [Primitive] that's where you'll find all these new 3D objects.
before we get into all the amazing things we can do with 3D primitives I want to go over some basics that will make using these models much easier. Starting out with these blue square icons above the model called the [Movement manipulator]
These icons will show up for every 3D object however, you'll find them very useful when posing the primitives in particular.
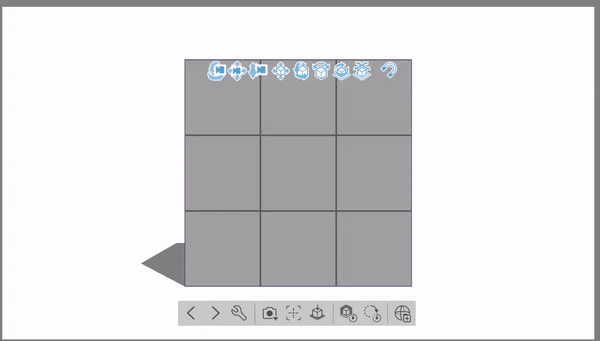
You can either click and drag on the blue icons, or click on the icon you want to use and you'll notice it'll become a darker color. Once you've activated an icon by clicking on it, you can freely click and drag on the canvas to rotate and move the object.
I'm sure I know what you're thinking, "This might be useful but, it's too unpredictable and frankly a bit hard to control that I might as well use the [Root Manipulator] controls instead"
To that I would say you're right, EXCEPT I might've left out a key element just to let you see the difference between having this feature on or off.
This magnet icon toggles the [Snap to 3D Models] mode.
The [Snap to 3D Models] mode allows you to snap 3D materials to the positions, rotations, and sizes of other objects when moved. You'll notice in the example below that the [Movement manipulators] work much more efficiently with this setting on.
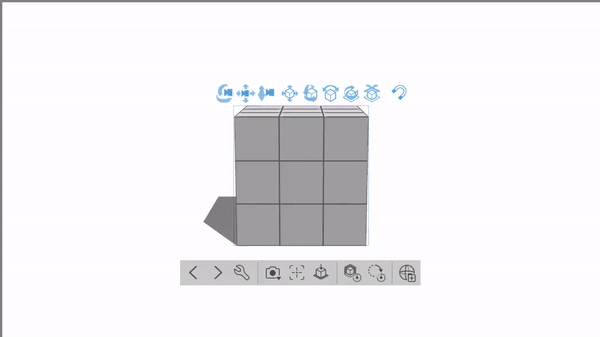
ok ok I know we've been hanging out with this boring old cube for too long now so! Let's do a quick run down for all the features we'll be using in the next few sections
1. A brand new addition to the [Root Manipulator]. We can adjust the length, width, or depth using these colored knobs.

All the following settings are found within the [Sub Tool Detail] menu under [Primitive]
1. Sub-divisions
2. Show wireframe checkbox
3. Object color & all options below
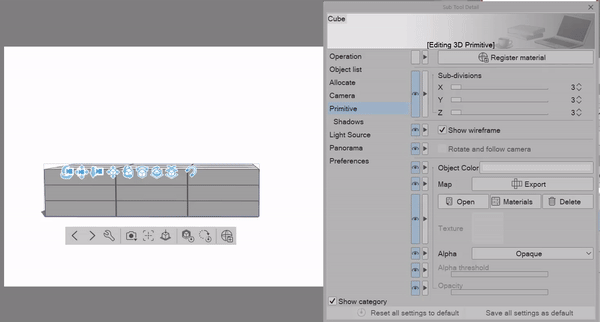
Making Buildings With Primitives
For the first time we can make our own buildings within clip studio!! Without any external 3D modeling program. How exciting is that?!
Keep in mind this feature is fairly new and there will be some limitations HOWEVER we can make some pretty cool stuff.
To start us out we'll make the shell of a house. I want to avoid using too many primitives on one single layer so instead of making any walls by hand I'll use cubes.
I'll also turn off the wireframe to give me a better view of the model. As we go along we'll play with the wireframe to create a door and some windows!
I have the [Snap to 3D Models] feature on to help me make sure my objects are lined up and connected correctly.

To make some simple windows, I'll add another cube to the canvas, then once I've made it to the correct size, I'll open the [Sub Tool Detail] menu and change the wireframe settings along with the object color.
This will help later on as we turn this house into a Webtoon Background!

Before I add in a door, I'll change the colors of each part of the house so it's easier for me to see.
For this house I made a pretty simple roof. By adding another square on top of the house then changing the color to a darker grey.
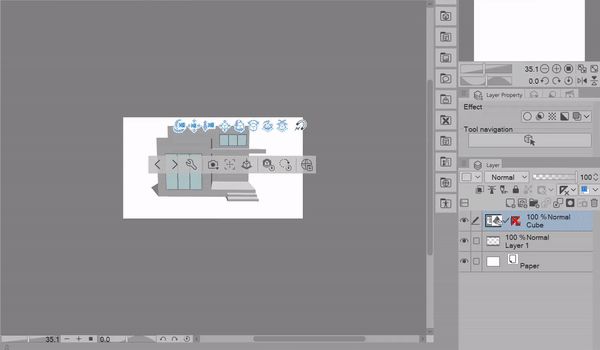
I'll make glass on the door in the same way that I did with the windows. Everything else from this point is just final touches and small editing.
Just like that we've built our first house! But how do we use it for backgrounds?
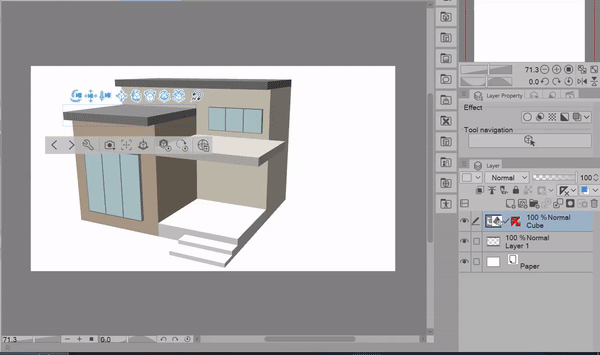
It's completely possible to just use what we have currently to create some amazing background assets, in fact at the end I'll show you how to quickly achieve the result in the example below.
HOWEVER there is something that does bother me a tad when it comes to the way we have the model currently. There's no texture!
Ah well, you've been here in this tutorial long enough, you know I have something in store :)
Adding Textures To 3D Primitives
Before we can start adding any textures to our 3D model, we'll need to grab the [UV Map].
Don't freak out! It's not as complicated as it sounds. The [UV Map] is the unraveled 2D version of our 3D object. The [UV Map] allows us to create our own textures to place on the model.
With the [Sub Tool Detail] menu we'll go to [Primitive] and click [Export] this will bring up a prompt to make a new clip studio file.
Once you've saved the file go ahead and open it.
For my example I colored and labeled each of the squares. This template will help me design and draw my textures for the door and windows.
Making a template helps you visualize how textures are placed on 3D primitives.
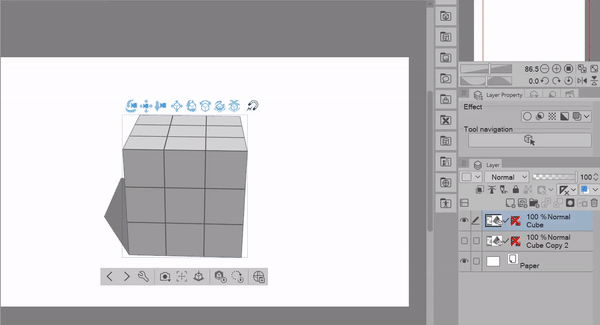
Keep in mind whenever you add anything to the back or bottom square you need to flip the image. Otherwise it'll appear upside down!
For all the windows I'll mostly color on the 1st plane on the UV map. Since I won't ever be flipping the window around there's no point to me coloring that side. However! For an extra bit of depth I'll take an airbrush and add a bit of edge shadow.
When you're making textures for UV Maps you don't have to worry about overflow, since the model will only display texture that fits within the UV Map.
WARNING Be sure to turn off the UV map grid on the file your working on otherwise you'll have the grid in your texture!
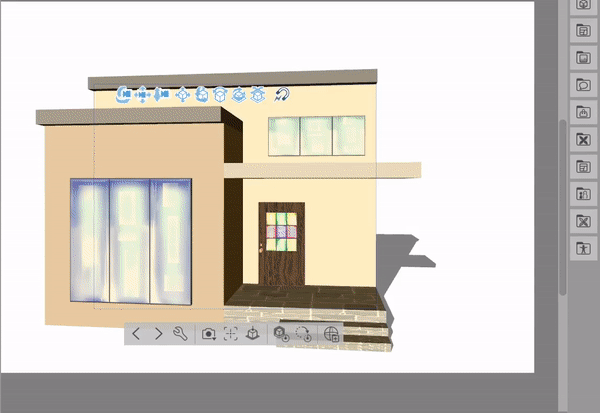
It is possible to click and drag textures onto 3D primitives however not every shape looks good with the same texture.
For example when I put the wood texture on the house it made it big and distorted, but when I applied it to the sphere and other primitives it looked a lot better. For this reason I highly suggest exporting the UV map and adding the texture there.
In general you'll have a lot more control over the results using the UV maps then you will placing the textures directly on the model.
Depending on the model the texture will either squash or stretch and you'll have to edit your texture with that in mind.
Since my door is basically a long square, I'll squash down the doorknob texture a tad to achieve the result I'm looking for
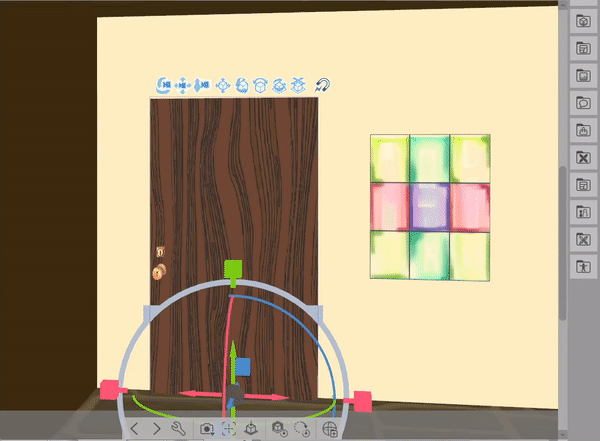
I recommend planning the shape you're going to use BEFORE creating a texture for it, if you decide to make shape changes that are too drastic the texture will start to look lower quality and distorted.
Saving Room Presets
So! You've put in all this time and effort into this amazing house. Now all you have to do is save it on its own canvas and just copy and paste till the end of time- wait, isn't there a better way to save my house assets?
I'm so glad you asked! Now you might know already that you can't save the WHOLE house as an object, unless you like having a single large cube.
no no there's something that I learned about 3D primitives that has yet to be talked about before,
Saving your house as a Template!!
Before you can save as a template you have to make sure that you don't have any other layers on the canvas. This is to avoid accidentally saving extra layer data that you don't want.
Make sure you have the 3D layer selected, then go to
[Edit]
[Register Material]
and click [Template]
After you've saved the material you can click and drag it onto the canvas!
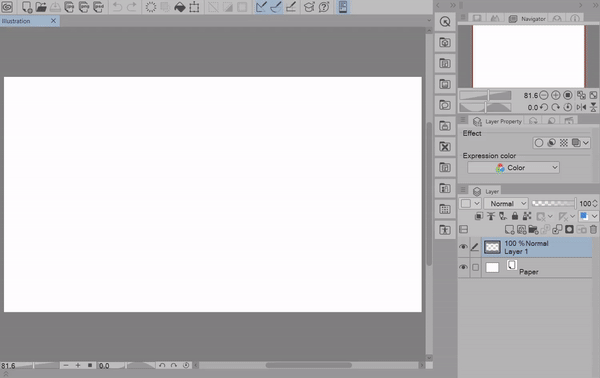
You'll want to avoid attempting to move all the parts of the house together.
As of this tutorial you can't merge objects, so when you try to rotate them all together you'll just break the model.

If you find yourself accidentally rotating objects you can go open the [Sub Tool Detail] menu
then go to [Object list] and lock all the objects on the layer. You won't have the option to rotate or move the objects until you unlock them again

Adding Multiple Assets Together
Right then! We've gotten to play with the 3D figures and 3D Backgrounds, and for the most part from here you have all the tools you need to use them together.
I have just a few features you'll find handy as you continue your 3D journey.
We'll be talking about the last set of icons we've yet to discuss. From left to right we have,
[Center Object]
This is the same button we had in the [Subtool Detail Menu] back in the camera section of this tutorial
[Place Model On Ground Level]
[Revert Model To Default Pose]
This will reset the 3D figure posing
[Reset Model Scale]
[Reset Model Rotation]
For the most part all these buttons are just used to reset the model you have on the canvas to it's default status. However you'll find the [Place Model On Ground Level] button very helpful.

You'll use this button to place 3D figures in chairs, beds and whatnot. It also helps if you've placed a model too far above or below the ground level.
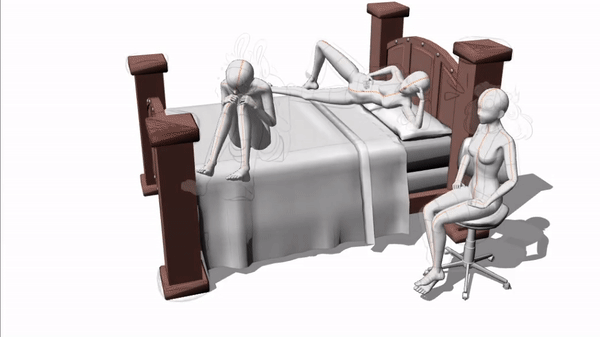
Look at that! We've talked about all the buttons and settings you need to know when using 3D, I know it's not always the MOST exciting topic BUT I hope it brings you some inspiration to start using 3D in your own workflow.
In general using 3D assets together help save so much time when making illustrations, comics and client work especially if you're on a tight deadline. Even though it might seem like you're taking huge shortcuts, it still takes a lot of skill to be able to turn 3D into professional artwork.
All Sides View palette (EX ONLY)
To be completely honest I wanted to avoid talking about this feature too soon, it would've been better suited when we started talking about making houses with primitives. Though, I held off because I didn't want you to feel like you NEEDED this feature to get the full 3D posing experience.
The [All Sides View] is an exclusive feature for the EX version of Clip Studio Paint, and it's wildly under discussed.
This feature allows you to edit the 3D models on your canvas from multiple perspectives.
To open the [All Sides View] go to [Window] and you'll find it there.
Once you click on it you'll see either your 3D models or a blank square.
If you see a blank square be sure to select your 3D model layer and then you'll be able to see the multi view perspective.
You'll notice a variety of icons at the bottom of the [All Sides View] panel, Each one changes some settings relating to the view you have of the 3D objects and the multi views you have within the panel.

The first icon changes the types of views you have presented.

The second icon [Adapt View To Editing Target] changes the perspective of the [All Sides View] panel to focus on the object you have selected..
The third icon [Makes Camera Perspective Reflect Perspective View] sets the perspective view in the [All Sides View] menu to match the canvas perspective you have.
The fourth icon [Makes Perspective View Camera Reflect Canvas] does the opposite of the last and changes the canvas view to reflect the perspective view.
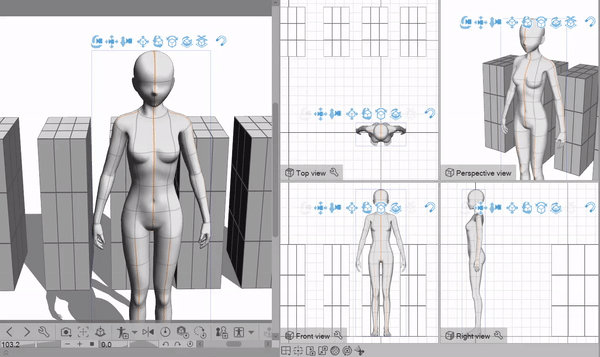
The last 3 buttons change some general features,
The First [Show Face Border Edge] turns on and off the mesh grid and even though I personally won't use it you might find it helpful as well!
The Second icon auto syncs the camera on the canvas and the perspective view.
The third lets you see the camera position in 3D space and you can adjust it from there as well.
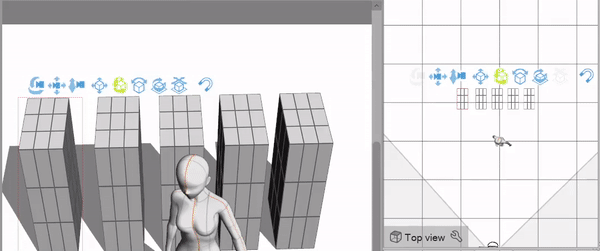
The [All Sides View] is perfect for when you want to copy and paste multiple objects on a canvas and adjust them all at once.
Again this feature is not required to fully be able to make cool things in 3D, it's just a very cool tool you can utilize if you have the EX version.
[Stage 8: Getting more out of 3D] Extracting Lines From 3D Models (PRO & EX)
The PRO version of Clip Studio doesn't have a way to extract lines from 3D models but! There's an alternative way to get comic style lines! Sometimes I'll use this method instead of the Extract line feature in the EX version because of how nice it looks.

Go ahead and place and position the 3D model you want to turn into a background.
After that right click on the layer and select [Rasterize]
Next duplicate the layer and name one "Color" and the other "Line"
Turn off the visibility for the "Color Layer" this is to allow us to see the lines we create in the next step
With the "Line" layer selected go to [Filter]
[Effect]
and click [Artistic]
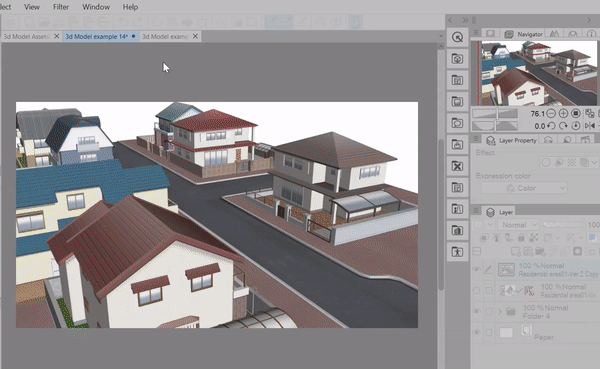
Once you're in the [Artistic] menu click on the option that says [Lines only] once you're satisfied with the result click [Ok].
Now we have a new line layer and when we turn the color layer back on we can edit them individually.

I'll be using a gradient map to make the color palette harmonious. I left the asset that I used above. But this method works with any kind of gradient even ones that you create using the [Freeform Gradient Tool] which I talk more in depth about in my "How to Master Reference Layers Tutorial.
It's up to you how you want to edit and change the 3D background. This is just one example of the endless things you can accomplish with 3D background models.

Extracting Lines From 3D Models (EX ONLY)
Extracting lines from images or LT Conversion, is an EX exclusive feature. For the most part, it's pretty straightforward. You can either right click and select the option [Convert to Lines and Tones] or you can use the [Extract Line] icon in the [Layer Property] menu.
You probably assume these methods achieve the same results...Right? The answer is Yes and No.
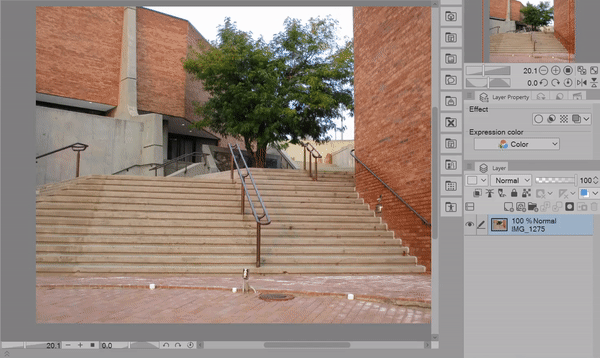
Since most people know this feature for its usefulness in photo-bashing for manga and comics, we'll start out with a photo.
I took this photo myself of this staircase, it has many different elements, such as a tree, some bricks and the metal bars for the stairs.
You'll notice that when I click the [Extract Line] icon it gives me some lines but is mostly black and white. Then when I go to use the [Convert to Lines and Tones] you'll get a completely different result.
Why?
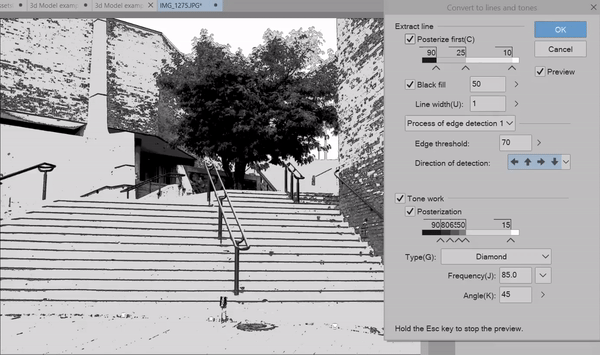
The big difference between these two methods is the addition of tones. In general when you attempt to use the [Convert to Lines and Tones] you'll get a lot of greys and mid-tones in contrast the Extract line will only focus on the lines and will not add any tones.

For this image I got a better result using the [Extract Line] button,
once I was done with the settings I went to the [Layer Property] Panel I scrolled down to find the option [Convert to Lines and Tones]
Clicking the button through this menu will keep the results that I got from the [Extract Line] button and wont add any extra tone's unless I specifically add them in the pop up menu.
Now I'll have a folder with the lines and a white fill, I did this instead of just Rasterizing the layer which would just give me a flat image, because of the correction filters I want to use.
The first correction filter [Adjust Line Width] makes the lines thinner or thicker depending on what you want to accomplish.
The second Correction filter [Remove Dust] gets rid of all the random tiny pixels that I don't need. Be sure to have [Remove Dust From Transparency] on or this filter wont do anything to the image.
If you use the [Convert to Lines And Tones] option through right clicking on a 3D object layer, you'll get some extra options that allow you to export the lines as a vector or raster layer.
The new options you'll see are [Extract line] and [Depth] , which adjust the line thickness and other settings for the line extraction.
In the future I would like to make an in depth tutorial on line extraction and how to prepare 3D object and different kinds of images but, I wanted to keep this tutorial accessible to both users of the EX and PRO version. So if that's something you're interested in seeing from me be sure to let me know!
For now, I've given you the basic tools to comfortably navigate through this feature so go explore and test it yourself!
Coloring Backgrounds With AI (Technology preview)
So far I've shown you examples of 3D models with some sort of color already built in, but what happens when you start to use a 3D model that's in grayscale? Better question, what if you're on a deadline and have a bunch of backgrounds that need to be colored within a short period of time?
Well recently I found myself faced with both problems, and I was able to make some of the coolest comic panels in my career with this tool. (That's no hyperbole this tool genuinely made it possible for me to finish my Webcomic project in time)
This feature is in the EX and PRO version.
I've been using the [Colorize (Technology Preview] to color my images using the lines that I already have on my canvas to auto color my backgrounds. This feature gives me a fantastic base to work with and allows me to speed up my coloring process/
You first need to have your lineart on one layer, set it to a reference layer, and then in another layer below put down the general colors you want to use.
Then you go to [Edit]
[Colorize (Technology preview)]
and click [Use hint image and colorize]
after you let the program process you'll get the result.
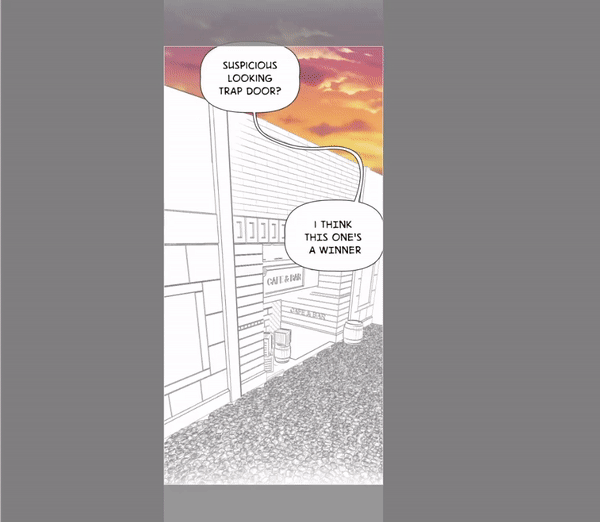
In the first image you'll see my lineart,
The colors I placed down,
The result,
and then some final post processing that I did myself.
What baffles me as someone who does illustrations and comics are the possibilities that this tool allows! I can spend more time being creative and less time doing the time consuming side of coloring backgrounds. I hope this feature makes it less intimidating to color 3D backgrounds!
All the images in this section are from my webcomic "Peppermint Occult" Which you can find on webtoon canvas. It'll also be linked down below as well.
Panoramas in Clip Studio
Along with the 3D primitives, we've also gotten a new type of 3D object called Panoramas.
Panoramas are 2d images that can be rotated 360-degrees in a 3D layer. You can use them for backgrounds in your illustrations and comics!
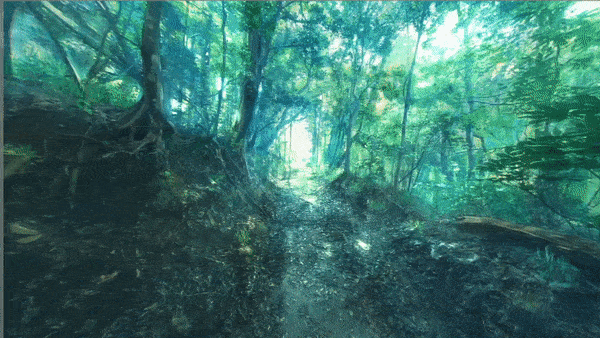
Panoramas are in the 3D category within the [Material Panel] You might need to download them first.
If for whatever reason the built in panoramas don't show up in your folder. Try going to the clip studio launcher
click "Manage Materials"
then click the gear icon,
from there you'll see the option "Download additional materials" and this should fix the problem!
Once you've placed down the Panorama you'll want to open the [Sub Tool Detail] Menu and change the [Perspective] settings in the camera category.

You can also place 3D figures on the same layer you have a Panorama in, however you'll need to do some tinkering to make sure that the perspective matches.
Panorama's are helpful when drafting and making comic scenes, and I can't wait to see the things the community comes up with this new tool!
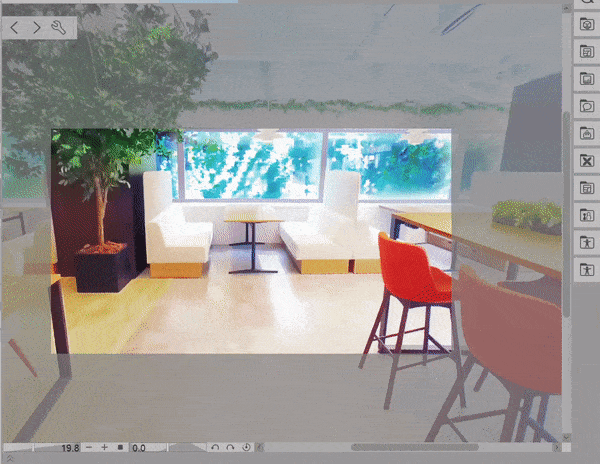
If you already know how to make panoramas yourself but don't know how to set one up here's what you need to do.
Go to [Layer]
[New Layer]
and click [3D Layer]
This will create a blank 3D layer you can place your panorama image in.
Next open the [Sub Tool Detail] Menu
Go to [Panorama]
and click [Open] then you'll be able to add your panorama image!
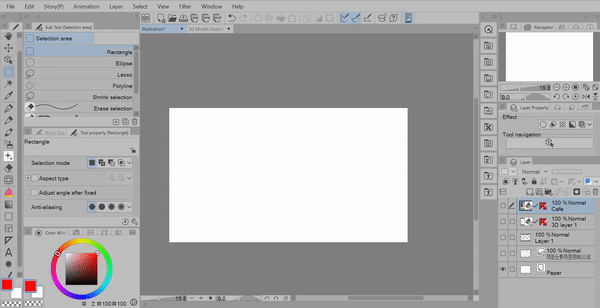
[Stage 7: Troubleshooting and Common Errors ]

One of the MOST common accidental errors you'll come across is switching tools while working with 3D. It's so easy to switch to a brush by misclicking a key on the keyboard or maybe switching tools without noticing .
The result is your mouse turning into a red crossed out circle and not being able to edit anything on the 3D layer. All you have to do is switch to [Operation] and then click the [Object] tool and you'll be able to start editing again.
Sometimes the icon will change if you switch tools within the [Operation] tool set and in that case you just have to click on it and find the [Object] tool.
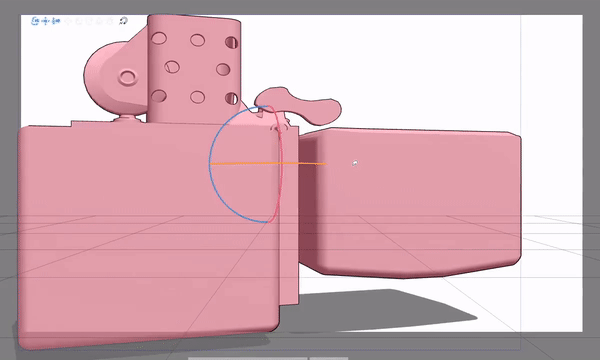
The second most common error you'll come across is "Broken Rotating Models" and no they aren't actually broken, just like we talked about with houses made of primitives, you can't always rotate objects themselves. Instead you need to use the camera to rotate and change the perspective of the object.
You'll come across a lot of these kinds of 3D models in the asset store so that's why I've made such an emphasis on the differences between moving objects and moving the camera.

Another error that I've come across that I'm SURE has led to abandoned assets and frustrated users is this strange looking black shadow that moves as you rotate the camera.
99% of the time this shadow is not because the model is broken but rather a strange anomaly caused by an applied outline on the model.
In the [Sub Tool Detail] menu go to [Outline] and turn off the checkbox.
I feel the pain of all the users who couldn't figure out what the problem was, only to now tell you myself that the solution is quite literally a checkbox away. Sorry you had to find out this way! Hopefully this will revive some old assets you've downloaded in the past.
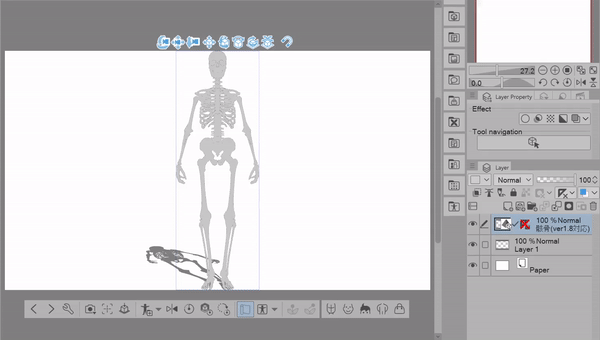
On the topic of checkboxes another common error you'll encounter is turned off shadows on a model. Some models heavily rely on shadows to show depth and if they're turned off you might think something wrong happened in the downloading process.
Again, it's simply a setting you have to turn back on.
Open the [Sub Tool Detail] Menu, [Shadows] and turn on [Apply Light Source]
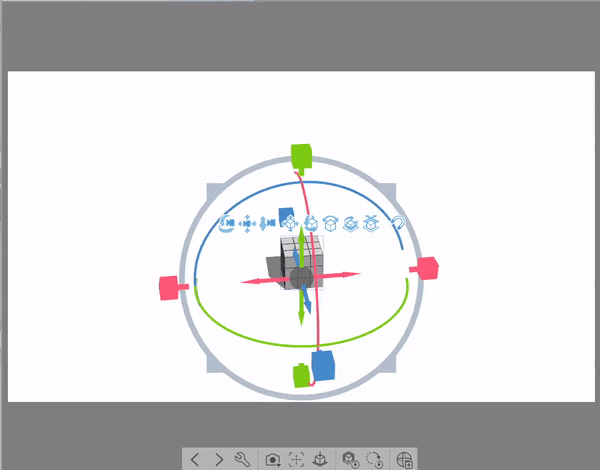
Another "error" that I've seen come up occasionally is the grey bar at the bottom of the 3D model suddenly switches from the bottom to the top, and all the camera icons will disappear as well.
However in the last section we saw the grey bar at the top when creating a new blank 3D layer, so it's not so much of an error but a rather confusing thing to happen when you're in the middle of working.
I've noticed it pops up after copying and pasting a bunch of objects then hitting the undo button, or when I place down some 3D backgrounds for the first time.
To fix this you can either click one of the arrows (These arrows switch between 3D objects you have on your layer) or simply click on your 3D objects again.
For the most part, you shouldn't come across many errors and if you do, usually deleting the layer and placing the 3D objects again should fix whatever issue you're having. Or at the worst you close and reopen Clip Studio to fix the problem.
If you still seem to have issues it could be a broken asset that you've downloaded from the asset store OR there's something in the [Sub Tool Detail] menu that's causing a problem.
Final Thoughts
PHEW- Oh my this was a long one, but I'm sure you've learned a few new things in this tutorial.
Thank you so much for joining me,
Make sure to like and favorite this tutorial to save it for later. It also lets me know to make more tutorials in the future!
If you want to see more of my artwork you can find it here on my Linktree where you can find my Insta, Tiktok, and Youtube where I post even more content like this!
A lot of the artwork shown in this tutorial is from my webcomic Peppermint Occult, so if you liked my artwork and enjoy a bit of comedic horror you can check it out here in the link below!
I've also made more fun tutorials such as
"Color Your Illustrations Like A PRO, a beginners guide to fill tools in clip studio paint"
"How To Draw Legs AND Feet" a guide that specializes in keeping things simple by using 3D models and the Lasso Fill tool to create amazing illustrations.
"Design Stunning ICONS For Social Media " A beginners icon design tutorial where we talk about sizing, how to make your own icon template, and the differences between saving images as a JPEG or PNG
and "How To Master REFERENCE LAYERS" the one stop shop for everything involving reference layers. From the practical to cool unknown features, this tutorial talks about it all!
And with that, I hope to see you again soon bye byeee!


Comentario