
This tutorial is all about setting up comic frames and panels using the Frame Border tools in Clip Studio Paint. I’ll also be doing another supplemental tutorial about speech bubbles very soon!
Here’s a video version of this tutorial, but if you prefer text, it can be found below.
FYI - This is a huge subject, so I won't be covering webtoons, printing options like trims and bleeds, or the multiple pages options in EX today. Let me know if you want to see any of that in future tutorials, though!
Create a Comic Canvas
Clip Studio Paint started out as Manga Studio, so it has a lot of features related to comics.
In fact, when you create a new canvas by going to File -> New, four of the six project types are comic related.
Note: You will not see the Printing of Fanzine option or any of the multiple page options if you’re on Clip Studio Paint Pro. They are features of EX.
The Comic project type is pretty good, but has some limitations, like how you can only set up a file in millimeter units.
I prefer to go to the "Show all comic settings" category instead, which as the name implies, makes all of the settings available in one place!
For this example, I'm going to make a digital comic on a 3000 pixel wide by 2000 pixel tall canvas.
First, I'll change the unit to pixels using the dropdown in the top-right corner.
I won't be using the trim options since this project will be digital only.
While it’s possible to just turn the Comic Settings checkmark off completely, that would also get rid of the Inner Border, which I do need. I’ll show you why in a moment!
To get rid of the trim size, set the Bleed Width to 0, and then you can set the Trim Size to 3000 by 2000. Notice that the canvas size will update to match the trim size, and the trim will be out of the way.
Note: I’ll talk about the Template setting later in the tutorial. As for Resolution, it’s only relevant if you intend to print the canvas. If you’re curious about image resolution (often called DPI or PPI), I have a tutorial talking about that here:
The Inner Border is a guide to where your comic frames will go.
I'll set it to 2800 by 1800, giving me a hundred pixels on each side.
Click OK, and here’s the new canvas! You can see the outline of the inner border 100px in on each side. The trim is technically there too, but since it matches my canvas size exactly, you can’t really see it.
Adjust the Canvas
Comics often have a wider margin at the bottom than what I’ve set up, so now’s a good time to learn how to adjust the settings.
Go to the View menu, and select Crop Marks/Inner Border Settings.
Here are some of the same settings you saw when creating the canvas.
I’ll change my height from 1800 to 1700px, and add a vertical offset (a Y offset) of -50 pixels to make up for the difference. (Be sure to add NEGATIVE 50 pixels, the “-” is important.)
You can see in the background how my canvas changed to match the new settings. Much better!
It's also important to know that using some options like Edit -> Change Image Resolution or Edit -> Change Canvas Size will result in your crop marks and borders being removed.
If you need to change the size of your whole canvas and want to retain the Trim Size and Inner Border settings, go to Edit -> Canvas Properties instead.
Panel Frame Border
First, I'll create the comic's Frame Border.
There are two ways to do this, but the easiest is to go to Layer -> New Layer, and select Frame Border Folder.
You can name it if you wish, and the other options are for if you want a border to appear around it. I'll go with a line width of 15.
If you want any diagonal panels, turn anti-aliasing on. If all your panels will be horizontal and vertical, you can leave it off. I'll leave it off for now so I can show you the effect later.
When you click OK, two things happen.
For one, you now have this frame with a black outline of 15px, surrounded in blue.
Notice that it appears exactly where I set up the inner border. If I tried this without an inner border, the frame would just go all the way to the edges instead.
The frame appears as a special type of folder on the Layer panel.
Dividing Method: Divide Frame Folder
The other thing that happened is CSP automatically switched me to the Frame Border tool, specifically this Divide Frame Folder sub tool.
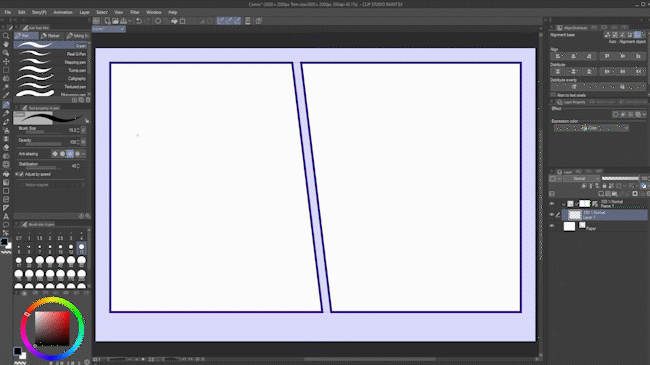
If I click and drag, my frame gets split along that line.
And I've now got two frame folders, one for each part that was split off.
I’d like a wider gutter between them, though, so I’ll undo that with Ctrl-Z (Command-Z on Mac).
In the Tool Property palette, I’ll change both my vertical and horizontal gutters to 60 each.
When I click and drag now, there's a wider gap between them.
Keep clicking and dragging, and your frames get divided again and again.
Hint: Hold down Shift to lock the frame divisions to vertical, horizontal, or 45 degrees.
The Shape of Division option is set to Straight Line by default, but the other two options allow you to add jagged or curved divisions, like so:
Space of Frame Border in Preferences
If you find you're constantly using the same frame border size, go to File -> Preferences.
Go to the section labeled Layer Frame.
Here, you can set the default vertical and horizontal gutters. Press OK when you’re done.
Back in the Tool Property palette, choose the Space of Frame Border in Preferences checkbox, and it'll just use your preferred gutters as a default.
Drawing in the Frames
So, now we've got a bunch of frames - what do we do with them? You get a null icon if you try to use drawing tools on one. The hint is in the name, though - they're folders!
Create a new layer inside of one. It can be any type of layer: raster, text, speech bubble, and even other folders. Here, I’ve just used the New Raster Layer button to create my layer.
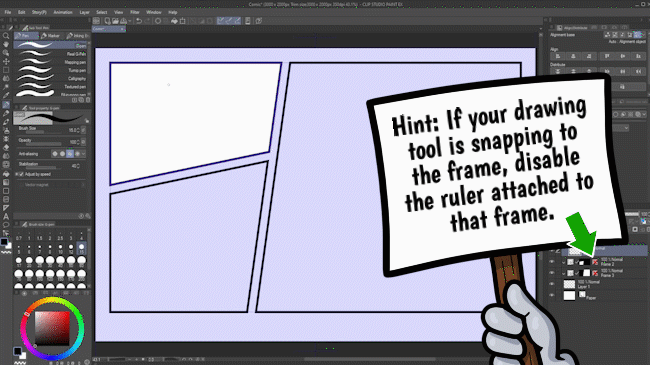
Now you can draw on that layer - and your drawing gets bounded within the frame!
Hint: If your drawing tool is snapping to the frame, disable the ruler attached to that frame by right-clicking the ruler icon and de-selecting “Show Ruler”.
You can put as many layers inside a frame as you want, so you can have one for sketching, line art, and colors - or whatever structure works for you.
Dividing Method: Using a Single Frame Border Folder
If it seems like that’s a lot of layers to keep track of, you’re right! There are reasons why you might want to keep every frame as a separate folder, but that’s not the only way to do it. Let’s look at another option: using a single frame border folder instead.
I’m starting again from my original frame border folder.
This time, next to Dividing Method, I'll select the option Divide Not Folder But Frame Border.
Click and drag to create the division. With this option, it still adds a division between the frames…
…but keeps them in the same folder.
Creating a layer in this one and drawing in it shows the difference. You don't see the drawing in the gutter, but you can draw across both panels.
Combine Dividing Methods
You can combine the two methods as well. Change the Dividing Method back to Divide Frame Folder and Duplicate Inside Layer.
Make another division.
Now you've got two frames on one folder, and one frame independent of the two. You can separate frames like this if, perhaps, you want one of them to overlap the others.
Notice it also made a copy of the original frame's child layer, including the drawing!
If you don't want that behavior, choose the middle Dividing Method, Divide Frame Folder and Create Empty Folder.
This does exactly the same as the first option, except it allows you to start with a completely blank frame folder instead of copying the original.
Adjusting Frames
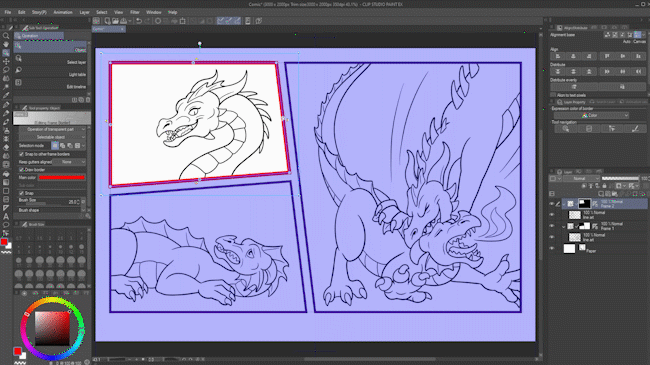
Frame Borders are objects, so to adjust them, go to the Operation tool and choose our old friend, the Object subtool.
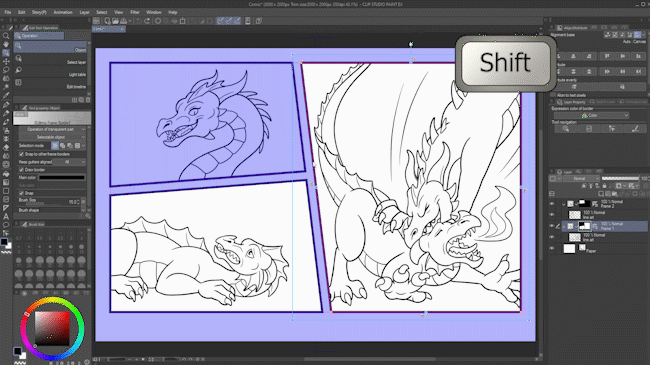
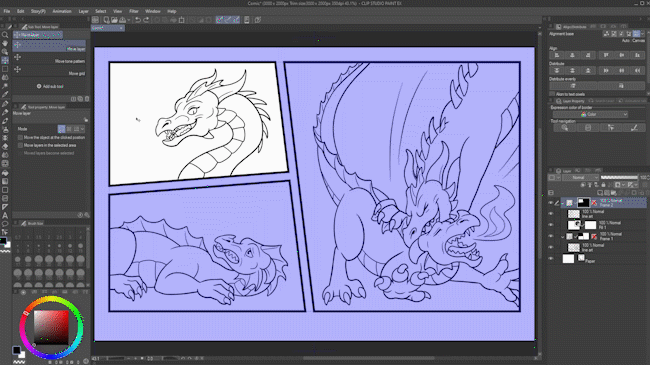
Here’s a little comic I did as an example. (Don’t worry, it’s just a couple of dragon hatchlings roughhousing, they’re not hurting each other!)
With the Object sub tool, you can select an individual frame. You can also select multiple frames by holding down Shift, as long as they're in the same folder.
You cannot, however, select frames from different folders at the same time.
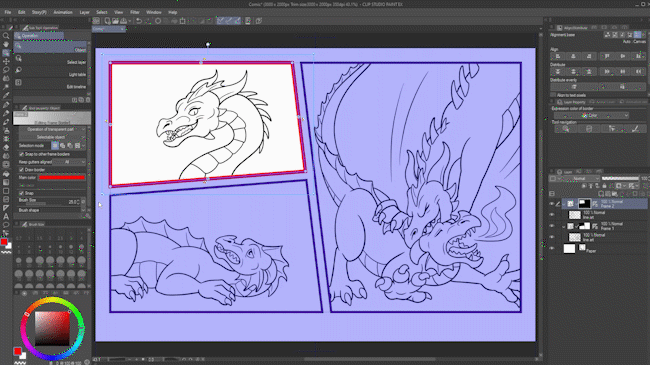
With a frame selected, you can change properties like its border color using the Main Color option, or the thickness using the Brush Size option.
Hint: There are many other brush options as well, if you want to get creative!
Keep Gutters Aligned
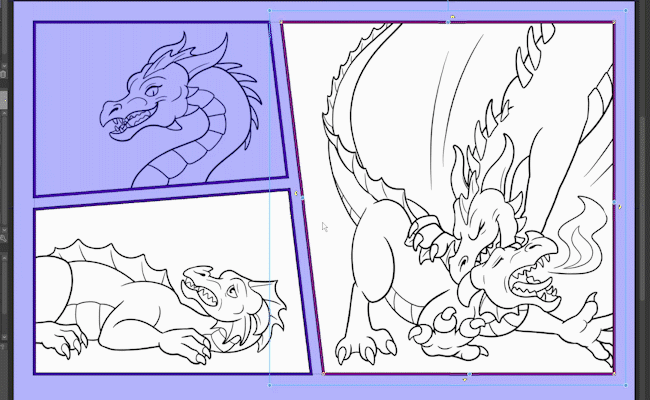
You can also adjust the frame’s size.
By default, the program attempts to adjust the other frames to match, even if they’re in different folders.
If you don't want this behavior, turn the Keep Gutters Aligned option to None.
Now you will only be adjusting the one panel, and none of the others will attempt to match the adjustment.
Remove Gutters
Notice these little yellow arrows around a selected frame.
You can click on them to get rid of the gutters, both between frames, and between a frame and the edge of the canvas.
This is great if you want a full-bleed frame like you see in some comics.
Moving Frames
You can move a selected frame using the Object sub tool, but notice that the layer (or layers) inside the folder stay static.
If you want to move the whole thing, go to the Move Layer tool, and make sure the Move Layer sub tool is selected.
Select the whole frame folder (not any of the sub layers) and click to drag it. Both the frame and its contents move together.
Note: If you have a sub layer selected, only that layer will move and the frame will not. This is helpful if you want to reposition a drawing within the frame!
Obviously, this works best when all your frames are separate folders and is one reason you might want to use them.
Anti-Aliasing
As I mentioned before, if you want diagonal frames, you'll most likely want anti-aliasing turned on.
I left it off as a demonstration. When I zoom in, you can see the edges of my frames are jagged pixels.
To turn it on, open the Sub Tool Detail palette by clicking the wrench icon, then go to Anti-aliasing.
Medium is a good option.
Notice it only affects whichever panels you have selected, so if you have all your frame borders as separate folders, you'll need to do this for each one. (That's why it's best to turn anti-aliasing on at the very beginning if you think you’ll need it!)
Custom Frame Shapes
That's all great for straight-edge panels, but what if you want to get creative?
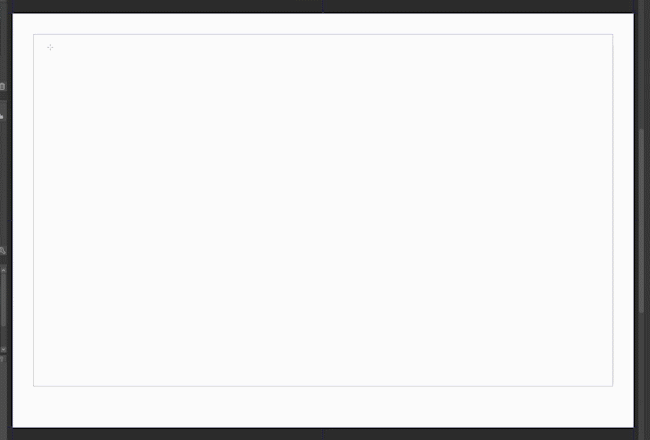
I’ve started back with my completely empty canvas set up with its inner border.
Rectangular Frame Sub Tool
On the Frame Border tool, there are two tabs up at the top: Create Frame, and Cut Frame Border. Up until now, we’ve been using the second one, but now, click on Create Frame.
Then, select the Rectangular Frame sub tool.
Click and drag out a frame border.
It still snaps to your inner border if you're close enough to it, but you can make it any size you want. This is similar to how we created our border before, but here you've got more control and don’t have to make it the same size as the inner border.
In the Rectangular Frame tool properties, next to How To Add, you have two options. Let’s start with Create a New Folder.
Adding new frames with this option puts them in a new folder by default, which also allows you to overlap frames nicely.
The second option is Add to Selected Folder.
This simply adds any new frames to the same folder as the initial frame.
By default, creating new frames using the Rectangular Frame sub tool (or any of the sub tools under Create Frame) will also provide your frame an empty raster layer and a white background fill.
Use the toggles shown to turn one or both of these options off.
Circle and Polygon Frames
The Rectangular Frame tool has a similar feature to other Figure type tools in Clip Studio Paint, where you can go into its sub tool detail palette by clicking the wrench icon, then choose the Figure section.
Here, you can change the tool to allow you to make circular or polygonal frames.
You also have access to the other Figure features, like number of corners, rounded edges, and locking them to a particular aspect ratio.
Polyline Frame
The next sub tool is the Polyline Frame.
It has options for drawing jagged frame borders with straight lines…
And also borders with three types of curved lines (spline, quadratic bezier, and cubic bezier).
Frame Border Pen
The last default sub tool is called the Frame Border Pen.
This one simply lets you draw a frame by hand, completely free form!
Built-in Panel Templates
Clip Studio Paint also has a variety of built-in panel templates to get you started.
Open the Material panel by going to Window -> Material, and choosing any of the options shown.
Open Manga Material, and select the Framing Template folder.
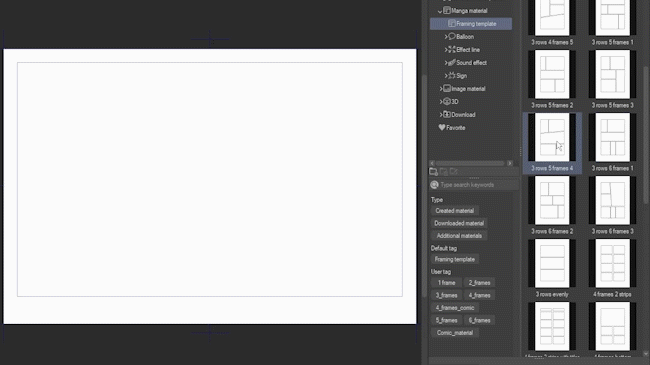
They're shown in vertical format, but what's really nice is if you click and drag one in, it conforms to your canvas size.
It also respects where you've set your inner border!
I mentioned I’d get back to that Template option earlier in the tutorial!
When you create a new canvas, you have the option to include a template. These are the same templates you just saw in the Material panel.
Hint: You can also make your own templates, but that’s a subject for another tutorial!
Enable the Template checkbox, then click the button right under the paper color to select a template.
Choose the template you’d like from the list, and click OK.
When you create the new canvas, the template you chose will be included right from the get-go!
Divide Frame Border Equally
One last thing! Let’s say you just want a simple grid of equal frames.
Start with a frame border like we’ve done before, and make sure the Frame Border Folder is selected.
Go to Layer -> Ruler/Frame -> Divide Frame Border Equally.
Choose the number of vertical and horizontal divisions you want.
The Divide Folder option is just the same as the dividing methods we've looked at before.
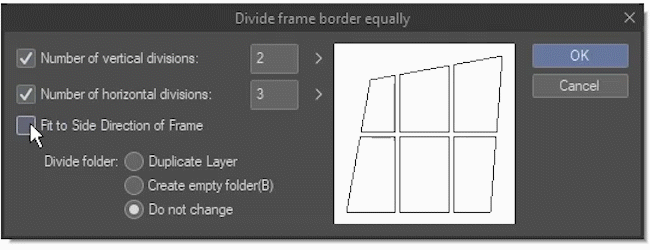
You can see what Fit to Side Direction of Frame does in the preview when I toggle it. it won’t make any difference on a rectangular frame, but it does on any other shape.
Click OK, and there you go. Perfect, equal divisions!
Note: It doesn't give you an option for the gutter widths. The Divide Frame Border Equally feature uses what you've set up in Preferences instead.
Conclusion
Okay, that’s it for this one. Clip Studio Paint has a lot of really useful tools for setting up comic panels, and I hope I’ve helped you learn how to use them well.
I’ll be doing another video on my YouTube channel very soon about adding speech bubbles to that little dragon comic I made. Clip Studio Paint has some great tools for speech bubbles too, so stay tuned for that!
Be sure to follow me @MsRedNebula on Twitter, Instagram, Bluesky, or Mastodon to see when I announce new tutorials. You can also follow me here on Clip Studio Tips, or subscribe to my YouTube channel.
Enjoy making comics!
Usuarios a los que les gustó esta publicación


Comentario