
Digital Ikebana Yourself is inspired by the ancient Japanese aesthetic discipline of the Ikebana floral arrangement that fused with Clip Studio Paint. However, my Ikebana exist only as prints and digital images.
The tutorial is comprised of a variety of images created from default brushes of Clip Studio Paint especially with Digital Watercolor techniques. The final results have been re-purposed to investigate the relationship between artifice and nature as well as experimental project to create personal wedding invitation, book marks collection, and any other merchandise ideas.
My name is Grace, it's been a while since the last time I published tips with Clip Studio Paint and I've been practicing myself with sub tool such as Realistic Watercolor brushes! Now that I'm ready to share my findings to all of you, I hope it will bring joy to this month of Love!
What is Digital Ikebana Yourself?
“I like to think of this tutorial as a futuristic Ikebana practice, where moments of beauty are created and preserved only by a constant stream of creates and shares within the community of digital artists”.
In ‘Digital Ikebana Yourself’, minimal arrangements of flowers and plants which set amidst modern minimalism floral themed invitation cards (wedding or any other occasion) with geometric shapes frame—artfully designed and decadent despite their minimalism—these illustrated floral compositions offer a non-organic way to experience the art of flower arrangement.
Floral Alphabet Creation
Before we go through the depth of Digital Ikebana creation, we should learn from the basic first. In this chapter, we will create a floral arrangements using default Text tool, as well as standard brushes available from Clip Studio Paint default material. You will also know and learn how to use Realistic Watercolor Brushes along the way.
What you will need is a new file with these following suggestion:
※ 3000 x 3000 pixels
※ 300 resolution
Please note that I'm using 1000 x 1000 pixels with 300 resolution. Because my graphic tablet is small and its components inside will be lagging while brushing with watercolor brushes.
1. Text Tool:
You can start using any of your chosen Font selection with your preferred colors as well, but to make it international standard, I am using this following settings as a starting point:
Font: Times New Roman
Size: 100
Rest of the tool property can be modified by yourself to suit your needs.
Attention: you might be asking 'why my font is too small for size 100?'
It's because you're using the 3000 x 3000 pixels dimension. While I'm using only 1000 x 1000 as I stated before - just to fit my graphic tablet's workspace as well as not lagging.
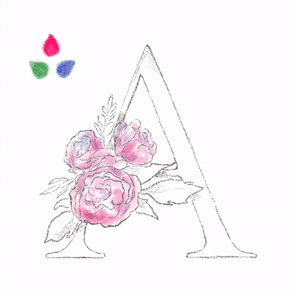
2. Tracing the text:
Using Design Pencil, I start to make a rough idea of where the flowers and its leaves. Using standard RGB (Red, Green, Blue) color, you can easily place any composition to your whole floral design, play along with any desired position of the flowers as long as the main letter "A" remains clear and readable.
3. Outlining the text:
Doing the outline for the traced image will be crucial for the end result although it's done midway. Using Real Pencil lightly (not pressing your graphic pen too much) will make the initial image looks compelling enough.
I will use Realistic Watercolor for the most of our coloring process. So please make sure you understand completely how to do it by following the behavior of the digital watercolor as seen on several GIF images below.
※ Tapered Watercolor:

Tapered Watercolor works with the pressure of your pen (graphic tablet), when you give a stroke, you need to make another strokes on top of it on the same layer. The results will vary depending on the pressure as well as colors that you choose.
If you see the last stroke, I did that with the pen pressed on and off to gain the vanishing end or fading effects automatically. It's one of the best features you can achieve using Tapered Watercolor.
To effectively use Realistic Watercolor for this project, I suggest to learn in depth with the combination of Tapered Watercolor and Watery Brush first before experimenting with other brushes to achieve the standard-look-a-like results of digital watercolor style.
※ Watery Brush:
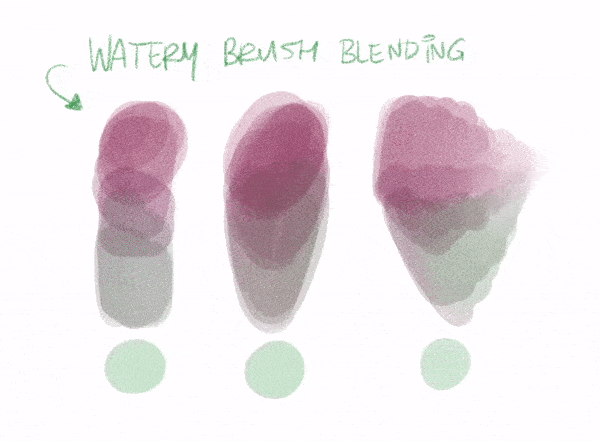
The effect of Watery Brush is lighten up the colors. Or in my own word; to add 'digital water' into your deep colors. Usually in traditional watercolor technique, if you had any spots with too much watercolor paint (which cause darkened area), you'll add more water to wash it out or make the color becomes lighter.
Actually as you can see the GIF above, I use the Watery Brush as a blending tool, especially on the edges of the Tapered Watercolor brush strokes.
Please also note, you need to experiment using different brush size, also you can practice to give some strokes in the middle parts as well.
4. Layers order:

I use only 3 layers for this flower alphabet creation:
First layer (the bottom one) is rough sketch which I hide after done with the outline.
Second layer, on top of rough will be the color layer.
Third layer, (on top of every other layer) will be the outline.
Tips: you can always make the color layer on top of outline layer to get another look or feel, it's only a personal taste if you wish to make the outline a little bit washed away by the color.
5. Adding brown as an extra color combination:
Digital watercolor can be flat if it's only with the one or two combination of colors, to avoid this; usually I will try to add an extra color of brown or simply by using the other available colors.
Unless necessary, don't add black to any digital watercolor artworks; instead replace it with dark brown. For the outline itself, I always use dark brown to make the entire artworks subtle in appearance. It's not an oil painting with vibrant colors anyway.
6. Color balance:

Finally, there's only the "A" letter to be filled with color. Rose already red, leaves with green, only the letter left. It's possible if you think to let it be white, or even black to make a contrast.
I choose blue (purplish) to balance the composition of colors. Using Tapered Watercolor with pen pressure pressed on and off, you can even see I intentionally leave some area colorless to achieve better digital watercolor approach. Slightly using the blue to some areas of the rose, and erase some parts of the leaves with Watery Brush.
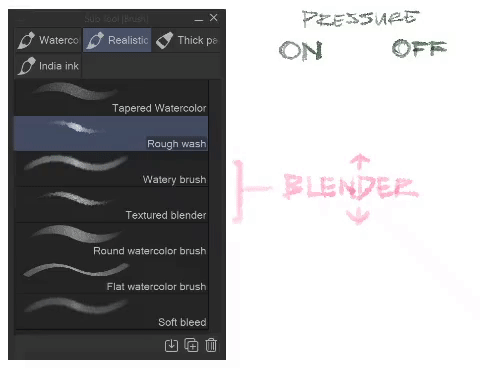
Realistic Watercolor Brushes Tips & Techniques
It is no secret that digital illustrators nowadays had an urge to create something similar with watercolor techniques and try to have the best one that mimics it. Also, it's been a common habit to find and collect as many brushes as we think that we need them to create stunning digital watercolor artworks. I've been on the same boat with you from many moons ago.
As you've seen the great and versatility of Realistic Watercolor brushes with Tapered Watercolor and Watery Brush combination, here's the rest of the default brushes from Clip Studio Paint that will help you to create your own Digital Ikebana with each distinct features and save your time from the pursue of having too many custom brushes:
※ Rough Wash:

Rough Wash is one of my favorite Realistic Watercolor brush while designing flowers, especially their petals and leaves. But before you try to make one. Make sure to understand the characteristics of Rough Wash first, my suggestion from GIF above; try to make one stroke with pen pressure harder, then make it lighter. A bit of color variation as well to experiment.
You can also try to adjust the brush size to make detailed edges.
※ Rough Wash + Watery Brush technique:

Now I'm talking the technique I mostly applied with default Clip Studio Paint: Rough Wash. If doing it correctly, then I think it will be fair enough to achieve quick watercolor artwork. But you'll need its companion to make it even satisfying to look at! And here it comes, the blending of Watery Brush again.
My suggestion, try to make the brush size larger to wash out some parts like we did with Tapered Watercolor from the edge and medium size brush to 'add water' into detailed parts. Last but not least, the pressure you did to your artworks will make the result different!
Below is my application using Rough Wash + Watery Brush to create leaves as well as a flower:
/////// Digital Watercolor Leaves ///////

Using Rough Wash with medium to small brush size, I begin the shapes of leaves. While pressing harder on the tip of the leaves will create the deep color contrast. Then lightly give the brush strokes some subtle effects into it, especially in the middle.
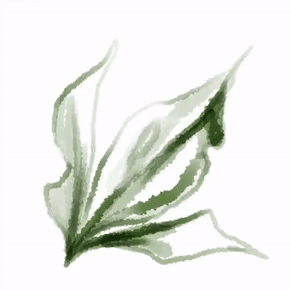
Now with the base color applied, you just need to add another lighter color with different pen pressure hard or light as you wish. You can also use Rough Wash to remove some unwanted parts with transparent color.
Next step is creating the leaves texture with some strokes, lightly draw it to give rich details, also you could remove some parts to make the shape a bit interesting.
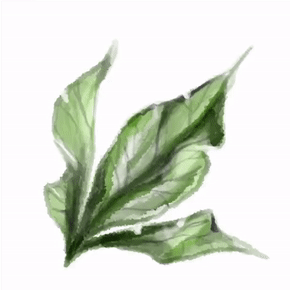
To finalize the leaves, you can start utilizing Watery Brush and make the leaves a bit blurry (or watery) on some of its edges.
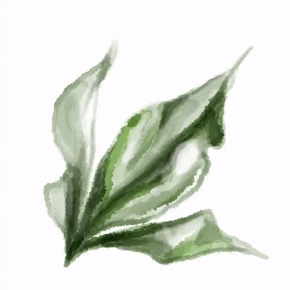
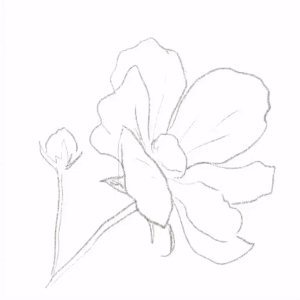
/////// Digital Watercolor Flowers ///////

For initial sketch, I am using Tapered Pencil, the way that I create petals always start from the upfront image, then continue to follow its surrounding such as the flower twig and bud. This is one of many basic flower elements that you need to try and exercise more.
For coloring, I use Tapered Watercolor as well as Soft Bleed for the color base. I choose 4 different colors to show you my quick chosen color pallet the same way with subtle watercolor paints in traditional painting method. By blending its primary color and secondary color, it will enhance the overall image creation and capture both balance and beauty.
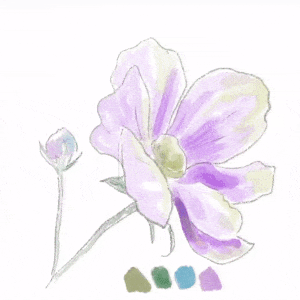
To finalize the whole flower design, I use additional color which is a bit of maroon to give an outline for the flower with Rough Wash, then with Tapered Watercolor Brush with a bit of olive color for the petals. Finally blend everything with Watery Brush.
※ Round Watercolor Brush:

Honestly, Round Watercolor Brush is the least expected brush to be used on my watercolor style creation. But I still encourage you to use it as an experimental one,
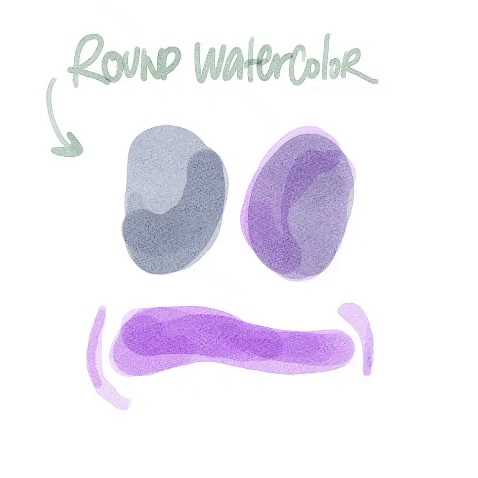
Round Watercolor is good with Textured Blender or Watery Brush especially for blending its edges that looks kind of weird or unnatural if you just leave it be.
My personal opinion, you need to try by yourself by using many size of your brushes, pen pressure, as well as other Realistic Watercolor Brushes to get what you wish or maybe unexpected results sometimes.
※ Flat Watercolor Brush:

Flat Watercolor Brush has unique features but could be tricky and difficult to be used at first, especially the randomness of paint which flows depending on the direction of angled pen. Sometimes, I'm still a bit confuse to use it..
But as you can see, the way I'm using will be like this; draw without lifting the pen for some parts, then draw again, and overlapping the area that already drawn to get the deeper tones; for example some edges of the branches - and so on.
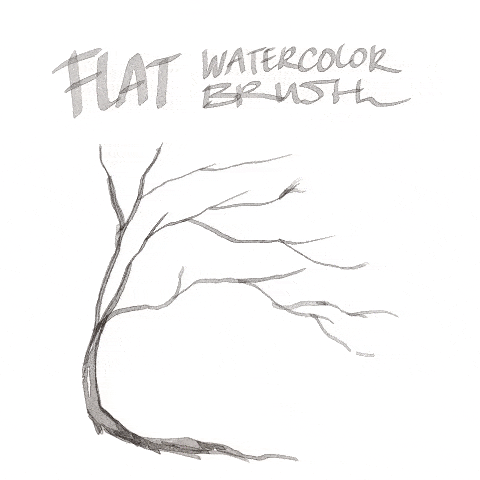
Because of the randomness, I use Flat Watercolor Brush without even thinking what would come of for the results. So instead worrying about the perfectness, I just create the Cherry Blossoms with adding different colors of pink like GIF above and make a quick grass as well as other little branches here and there to complete the artwork.
※ Soft Bleed:

Soft bleed is considered to be tricky brush as well, the way I use it always with my graphic tablet pen pressure on and off (it means lifting up the pen a bit to press it hard and light). As you can see, the way it 'bleeds' on the edge what makes Soft Bleed unique. Please note: you can only see the bleed on 300 resolution document size with bigger brushes!
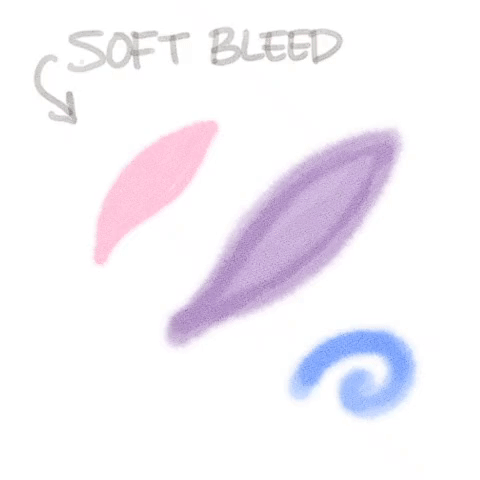
Now, if you're not really cool with the edge that bleeds too much or having a darker areas, you can always have the right blender tools to fix that; either Watery Brush or Textured Blender; but as for this case; I prefer Watery blending method, which might be useful to smear the color and the edges at the same time and make the color even softer.
※ Recap of Realistic Watercolor Brushes with Pressure ON & OFF + Blender:
As a recap, I try to give you last example GIF of how each of the brushes interact with my graphic tablet's pressure. ON means I press my tablet's pen a bit harder to get the color, OFF means I'm not really pressing my tablet's pen.
Watery Brush & Textured Blender in the middle of Realistic Watercolor Brush set because it's easier for me to notice which will be the priority brushes that I mostly use. It is only my personal preferences, you can drag your brushes to reorder its placement.
Happy trying!
Floral Graphic Elements [ Practice Time ]
Planning your wedding or next elegant event? Let's design your personal Floral Graphic Elements set with your creative and beautiful mind with Digital Ikebana style! This romantic collection of digital watercolor roses, peonies, cherry blossoms, and magnolias are simply stunning and perfect for any classy occasion.
It's super simple to design a whole suite of stationary with the set we're going to make! In each set there are RSVP cards, table cards, thank you cards, save the date invitations and wedding (or any event) invitations and it couldn't be easier. Simply pop into Clip Studio Paint Pro or EX that supports .PSD files (if you wish to print them later, because in my experience unfortunately in Indonesia, there is no digital printing place that can accept Clip Studio or .clip file) and edit the information and you're done!
You can create your own individual elements and pre-made arrangements! And of course you can easily create your own projects without picking up a paintbrush if you're in such a tight deadline. You'll love designing with these feminine floral!
First thing to do, you need sketches like this (in any of your desired document size):
I start with A4 document size, 300 resolution.
Then start doodle using Tapered Pencil with something related to floral elements that consist of leaves, flower twigs and buds, main flower selection such as rose or any other easy to be drawn flowers good to go- as long as I try to fill my empty canvas.
Tips: make sure you create a clear space between each elements for later purposes when you need to cut and paste it to your other project.
Secondly, with a new layer (on top or below your sketch); we jump into colors:
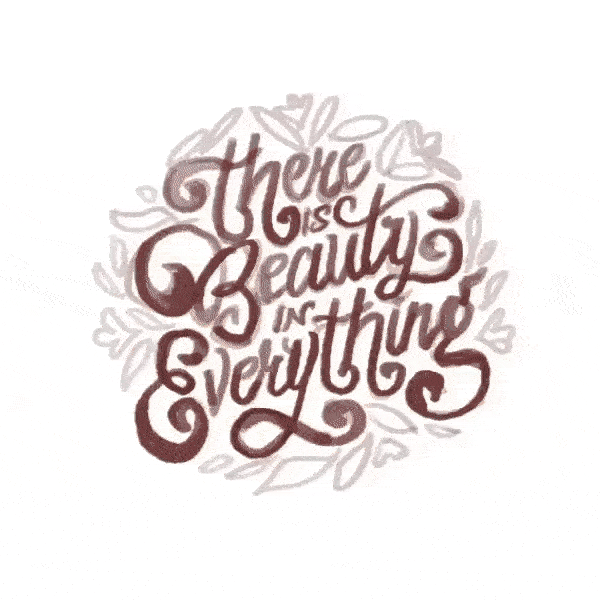
Beauty In Everything - Typography + Ikebana
Now, in this special chapter, I will show you some examples of how to compose a typography, digitally hand-made using standard brushes, plus Ikebana elements of flower doodles surrounding it to create personal merchandise such as cutting stickers, magnet, pins, or any other beautiful gift ideas! There is beauty in everything that you'll do with Digital Ikebana Yourself!
If you're curious about hand-lettering process, you could see my other tutorial with the link below. On that tutorial, there will be an extended step-by-step guide for digital lettering process from empty canvas. Feel free to check it first or later if you wish to know the composition, how to create your own hand-lettering brush by yourself, and so much more:
/////// #1: Prepare the canvas & tools that you need.
You can start a new document with following settings:
※ 1000 x 1000 pixels
※ 300 resolution
If you want to make larger pixels, go ahead. But with my own experience, the larger the canvas; you'll having some issues with the watercolor result, especially the textured ones. They will less visible. For the image below, I only use Design Pencil brush to create the 'silhouette' or concept for my composition.
I use Figure tool, then choose Ellipse as a starting point or a guideline for quick composition.

Tips: Try not to draw any design or shapes outside the circle with Design Pencil. But simply make some letters bolder which will fit the circle inside better or make it stands out.
After that, you can add some graphics elements which consist of leaves and flowers around the typography itself. Any illustrations possible, but as for now; I will stick to the theme.
/////// #2: Outlining the rough design.
I am using several techniques to achieve this illustration, but first; I always use the same, ordinary technique with the outline of the artwork. You could have your own preferences but I prefer to outline my artwork with Tapered Pencil. By doing so; I get the feel of doing it on the rough textured paper. Simply by pressing hard then loosening a bit of strength will vary the results and it looks less digital.
/////// #3: Coloring the artwork.
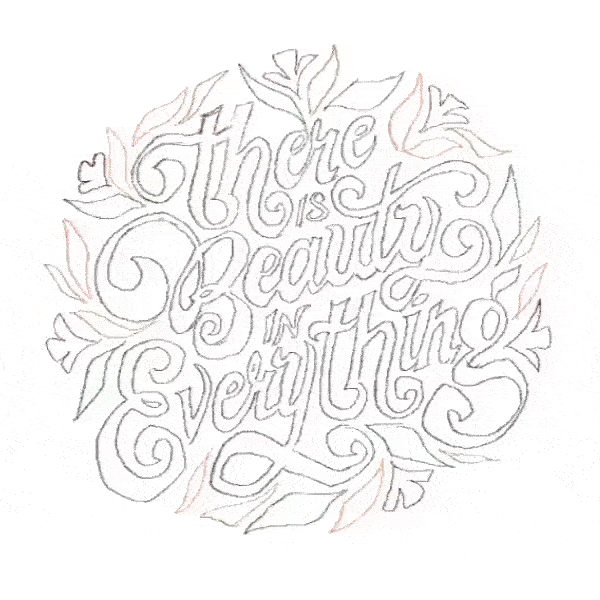
I limit my brush selection to Rough Wash and Flat Watercolor Brush. I think for the detailed design, using Flat Watercolor Brush could be tricky and difficult, but it has special perks; the randomness of paint that flows within the direction of angled pen, the multiply effects with deeper tones from overlapping brush strokes will be the main points to use it for coloring the typography.
For the other graphic elements such as leaves, flowers; using Rough Wash will be the perfect tool for filling out the colors very quickly.
Last but not least, using a bit Watery Brush here and there, adding more bolder strokes to edges of leaves and flowers, and re-outlined the typography with small size Flat Watercolor Brush will finalize the artwork to make it looks wet and dry altogether as seen on image below.
Note: feel free to download image below, it's a hi-res PNG, printable version.
Flower Crown Illustration
Heliotrope -
Devotion; Eternal Love
The Greek word heliotrope means "to turn toward the sun" -helios is Greek for "sun" and tropein means "to turn". The heliotrope features in Greek myths about the sun god, Helios. In one such myth, Clytie, a water nymph, falls deeply in love with Helios, who is enamored of a princess. Clytie sits for nine days and nine nights on the riverbank simply admiring Helios' chariot. As she wastes away to her death with love and longing, Helios takes pity on her and transforms her into a fragrant heliotrope flower.
In her new state she is able to keep her vigil for ever. This is how the heliotrope became the symbol for eternal love and devotion as seem on many Greek wedding ceremonies as well as many modern weddings in particular. If you look at heliotropes on a sunny day, you will see the plants turn their flowers and leaves toward the sun.

My inspiration with this quick digital watercolor illustration comes from reading the book about The Secret Language of Flowers by Samantha Gray. I am unable to give any links nor pictures here, but you could find it on the internet.
I start my rough sketch of Helios (and let it be like that - to achieve quick illustration style) with Tapered Pencil and leave some area empty to fill it with the heliotrope flowers and the leaves with Soft Bleed from Realistic Watercolor Brush. Although I give a speed 3 times faster with GIF, but you could see that I did this pretty quick and thinking less details to the shapes of the flowers. The final image done within less than 5 minutes.
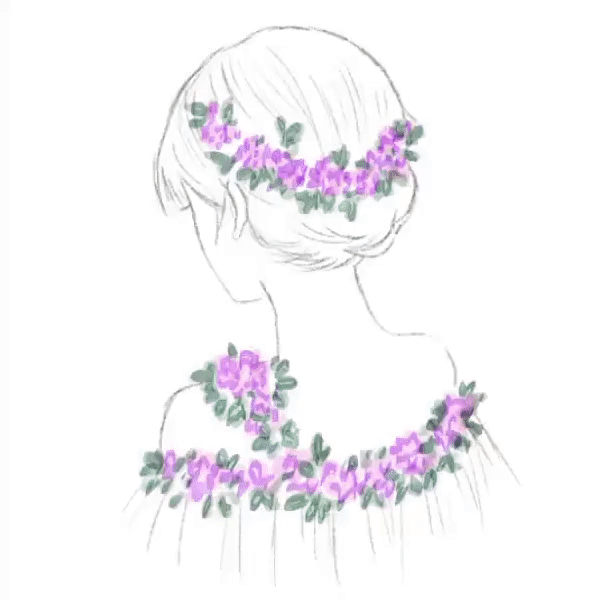
After done with the flowers and its elements, I start to fill the hair, the skin, as well as the Helios' garment with Soft Bleed. To get better feel of traditional watercolor media; you could use the Watery Brush or Textured Blender - whichever is fine as long as it suits your need - switch it often times to get unexpected results while blending the colors.
Here's the final image rendering of Helios with heliotrope flower crown and garment, an illustration with such speed and less details will be great for those who wants to create a stylish wedding invitation, business cards, or any subtle illustrated images within short deadline.
Flower Frame Illustration
Peony -
Enduring Friendship; Nobility; Peace; Honor; A Happy Life; Good Health; Prosperity; Female Beauty and Reproduction.
Once loved by the royal families of China, peonies were used to make floral displays for the imperial palaces. They were known as "the flowers of riches and honor" and the red peony was designated King of the Flowers. Frequently used as a motif in Chinese decoration, peonies became symbolic of good fortune and a happy marriage. Pictured in full bloom, peonies symbolize peace. Their large, showy flowers, produced in spring, are also associated with female beauty and reproduction.

For centuries, peonies have been part of Chinese marriage ceremonies, since they bring good fortune. It is still considered good luck to have vases of cut peony flowers at home, too. Peonies in bloom also signify enduring friendship and were often given as gifts in China.
I create my digital watercolor sketch above with the tales in back of my mind and Tapered Pencil while listening to Chinese Instrumental songs and hear light rain outside my home. As you can see, sometimes you just go with the background story or plots, and the right mood to create an image - not a meticulous plan.

To color this illustration, I use only two-three watercolor brushes: Soft Bleed and Tapered Watercolor, while a bit of blending with Watery Brush will make the whole image comes together good and presentable to be seen as digital watercolor artwork.
If you love Peonies, you have high ideals and strongly held values. You are courageous enough to maintain your opinion even when it makes you stand out from the crowd. Since others admire you and find you inspirational-they might even be a little awe of you-you are likely to achieve great things in life.
Flower Wreath Design + Geo Shapes
After you've done designing your own individual graphic elements, this chapter will mainly focus on the making of flower wreath (frame) arrangements which have been a trend for graphic designers to use it as the promotional media; especially wedding invitations creation and any events for the past 21st centuries. Flower with geo-shaped frame design will be a perfect digital watercolor artwork to enhance your wedding cards, invitations, scrapbooking, branding, social media, and more.
I will show you how to create a delicately digitally painted set of air-plants, succulents, greenery leaves and other floral elements. You've come to the ultimate part of Digital Ikebana Yourself tutorial to create better creative work and making your digital watercolor wreath artwork stands out.

I start my design mainly with Figure tool - square; with red color, and use it as a base-untouchable area for the typography alone. Any digital hand lettering, specifically the type design with curly elements surround it would be a great idea inside the frame.
Here's the steps:
1. Figure tool, rectangle, color fill red.
2. Create a new layer on top of rectangle layer.
3. Doodle with Pencil (any pencil, I prefer to use Real Pencil) around the rectangle.
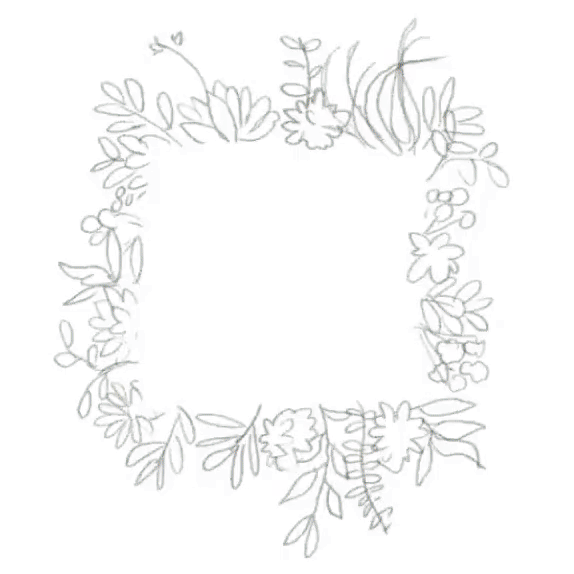
Now into the coloring part, this is actually the best practice for you! You can either use many digital watercolor techniques from Tapered Watercolor, Rough Wash, Flat Watercolor Brush, and so on.
Note: feel free to download image above, it's a hi-res PNG, printable version.
Afterword
Flowers are used in many cultures as reverent offerings and in herbal medicine and vibrational medicine they are some of the greatest remedies available to us. In the Victorian language of flowers, they were used as codes to express emotion - honeysuckle for devotion, azaleas for passion, tulips for the perfect lover - there are many more with the history of each connection stemming from different folk and cultural references, and of course direct experience.
Most familiar to us perhaps is the remedial use of flowers in the essences that were popularly developed by physician Edward Bach. This was actually an ancient Egyptian technique and many people, and animals respond almost immediately to these emotional aids. In Mexico they use flowers on all the alters and in the healing work flowers are used over the body cleansing away negative thoughts, imprints and focus us on joy, and pure intentions instead.
Flowers are magic! So with this completed tutorial, I hope you could bring joy and happiness to your beloved ones through the touch of digital watercolor illustrations combined with digital flower arrangements in this lovely month of February - for those who celebrates Valentine's Day!
この投稿を「いいね!」したユーザー


コメント